© 2019-2022 rxmicro.io.
Free use of this software is granted under the terms of the Apache License 2.0.
|
Copies of this entity may be made for Your own use and for distribution to others, provided that You do not charge any fee for such copies and further provided that each copy contains this Copyright Notice, whether distributed in print or electronically. If You find errors or omissions in this entity, please don’t hesitate to submit an issue or open a pull request with a fix. |
This entity is also available as a PDF download.
1. Introduction
RxMicro is a modern, JVM-based, full stack framework designed to develop distributed reactive applications that use a microservice architecture.
The RxMicro framework provides developers with a convenient tool to focus on writing an application business logic. Meanwhile, routine and standard operations, which are the prerequisite for launching an application, are delegated to the framework.
The RxMicro framework is small and lightweight. Even though the RxMicro framework is designed to create microservices, a developer can easily use separate RxMicro modules to develop any type of application using a reactive approach.
The RxMicro framework is a framework that uses reactive programming as the main and only approach when designing microservices.
Any blocking operations are not supported!
|
When developing a project using the RxMicro framework, use only non-blocking drivers to interact with databases, network connections and files. Otherwise Your project will work too slow, and won’t be able to process a large number of clients' requests. |
1.1. RxMicro Features
The RxMicro framework provides the following feature set:
-
Declarative programming using annotations.
-
Reactive programming using common libraries:
-
Configuring using java configuration, annotations, files, system properties and environment variables.
-
Declarative handlers of HTTP requests to the microservice.
-
Request routing based on HTTP method, URL path and HTTP body analysis.
-
HTTP header processing.
-
HTTP parameter processing.
-
Path variable support.
-
Automatic conversion of request data into Java model and vice versa.
-
Built-in validation of requests and responses.
-
Static configuration support.
-
Handler versioning support.
-
Cross-Origin Resource Sharing (CORS)support. -
Support for request identification during inter-service interaction.
-
-
Declarative REST client.
-
HTTP header processing.
-
HTTP parameter processing.
-
Path variable support.
-
Automatic conversion of request data into Java model and vice versa.
-
Built-in validation of requests and responses.
-
Static configuration support.
-
REST client versioning support.
-
Request timeout.
-
Automatic redirection support.
-
Customization option for standard client implementation.
-
-
Contexts and Dependency Injection (CDI).
-
Dependencies can be explicitly managed without using CDI.
-
Dependency injection by fields, methods and constructors.
-
Qualifier support.
-
Factory method support.
-
Post construct method support.
-
Class factory support.
-
Optional injection.
-
Resource injection.
-
Multibinder support.
-
Dependency injection using JEE and Spring style.
-
-
Generation of REST-based microservice documentation.
-
Documenting with annotations.
-
asciidoc support (widely used and multifunctional documenting format).
-
Configuration of the project documentation standard sections.
-
-
Data Repositories.
-
Postgre SQL Data Repositories.
-
SELECT,INSERT,UPDATE,DELETEoperation support. -
Auto-generated primary key support.
-
Composite primary key support.
-
Transaction support.
-
Variable support in SQL query.
-
Customized
SELECTqueries support. -
Possibility to customize a standard repository implementation.
-
Access to a low-level API.
-
Auto registration of enum codecs.
-
-
Mongo Data Repositories.
-
find,aggregate,distinct,insert,update,delete,countDocumentsandestimatedDocumentCountoperation support. -
Auto-generated entity id support.
-
Query parameter logging.
-
Possibility to customize a standard repository implementation.
-
Access to a low-level API.
-
-
-
Monitoring
-
Health checks.
-
Request tracing.
-
-
Testing.
-
Monitoring.
-
Health checks.
-
Request tracing.
-
-
Integration with other Java libraries and frameworks.
-
A GraalVM native image support.
-
1.2. RxMicro Benefits
The RxMicro framework provides the following benefits:
-
Declarative programming using annotations.
-
CDI by demand.
-
Human readable generated code.
-
Verifier of the redundant and inefficient source code.
-
Runtime without
reflection. -
Fast startup time.
-
Reduced memory footprint.
These benefits are gained due to:
-
using of Java annotation processors, which generates standard code based on
RxMicro Annotations; -
replacing standard Java libraries that require
reflectionfor their work with analogs that do not needreflection; -
using of Netty as the primary NIO framework for non-blocking asynchronous IO operations;
-
generation of low-level code avoiding unnecessary abstractions and proxies.
1.3. Requirements
The RxMicro framework requires JDK 11 LTS or higher.
To succeed in studying this guide, it is assumed that the reader is familiar with the following technologies:
The RxMicro framework uses the following Java modules:
-
Common module(s):
-
The
rxmicro.loggermodule requires the following module(s): -
REST client and REST based microservice test modules require the following module(s):
-
The
rxmicro.data.r2dbc.postgresqlmodule requires the following module(s): -
Netty requires the the following module(s):
-
jdk.unsupported.
-
2. What are Microservices?
Microservices - also known as the microservice architecture - is an architectural style that structures an application as a collection of services that are:
-
Highly maintainable and testable.
-
Loosely coupled.
-
Independently deployable.
-
Organized around business capabilities.
-
Owned by a small team.
(Read more at https://microservices.io/…)
Thus, a microservice project consists of several microservices. Each microservice must fulfill only one business task.
Let’s look at a microservice that displays the current date and time in UTC format:
public final class MicroService1 {

    public static void main(final String[] args) {
        System.out.println(Instant.now());
    }
}
Does this microprogram constitute a microservice?
Yes, since this microprogram fulfills a business task.
Unfortunately, this program has a serious disadvantage: it interacts with clients through the console.
Therefore, only a client’s program with a console interface launched in a session of the current logged-in OS user will be able to interact with this microservice!
This restriction makes it impossible to scale this microservice!
Can we improve this situation? Yes, we can:
public final class MicroService2 {

    public static void main(final String[] args) throws Exception {
        Files.write(
                Paths.get("/var/microservice/now-instant.txt"),
                Instant.now().toString().getBytes(UTF_8)
        );
    }
}
This microservice uses a file system to interact with client’s programs. In this way, the only requirement for the client’s program is to be run on the same computer on which the microservice is running. The situation has improved, but it is still impossible to scale this microservice horizontally!
Can we improve this situation? Yes, we can:
public final class MicroService3 {

    public static void main(final String[] args) throws Exception {
        try (final ServerSocket serverSocket = new ServerSocket(8080)) {
            try (final Socket clientSocket = serverSocket.accept()) {
                try (final OutputStream out = clientSocket.getOutputStream()) {
                    // read command from input stream
                    out.write(Instant.now().toString().getBytes(UTF_8));
                }
            }
        }
    }
}
Now, the microservice uses the network to interact with clients. This implementation of the microservice is scalable as the microservice can now be run on several networked computers. The situation has improved markedly, but there are problems with networking:
-
Presence of firewalls.
-
The need to create an interaction protocol.
-
Independence from the programming language is an important criterion for the interaction protocol.
Can we improve this situation? Yes, for this purpose You can use the HTTP protocol with the REST architecture style:
public final class MicroService4 {

    public static void main(final String[] args) throws IOException {
        final HttpServer server = HttpServer.create(new InetSocketAddress("localhost", 8080), 0);
        server.createContext("/now-instant", exchange -> {
            final String content = Instant.now().toString();
            exchange.sendResponseHeaders(200, content.length());
            exchange.getResponseHeaders().add("Content-Type", "text/txt");
            try (final OutputStream body = exchange.getResponseBody()) {
                body.write(content.getBytes(UTF_8));
            }
        });
        server.start();
    }
}
That’s why microservices are often referred to as REST-based microservices
For simple tasks, the entire logic of the microservice can be found in one class, which is often called microservice. If a microservice has to solve a complex task, then this microservice is divided into two logical components:
-
REST controller, the main task of which is:
-
to accept HTTP requests;
-
to validate HTTP requests;
-
to convert HTTP requests into Java models;
-
to invoke request handlers;
-
once the response model is received, convert it to an HTTP response.
-
-
Business service, the main task of which is:
-
if the task is of medium complexity, then independently calculate the result and return it to the REST controller;
-
if it is a high-complexity task, then decompose it into sub-tasks and delegate its execution to other microservices. After all sub-tasks have been completed, merge the result and return it to the REST controller.
-
Therefore, the following is implied in this guide:
-
If You find the term microservice, it means REST-based microservice, unless stated otherwise!
-
If You find the term REST controller, it means a logical component of the microservice that performs its direct functions!
3. Quick Start
This section describes in detail the steps to be taken in order to create the REST-based microservice that returns the "Hello World!" message, using the RxMicro framework.
In order to successfully execute these instructions, You need to install JDK 11 LTS or higher on Your computer. For Your convenience it is also recommended to use a modern IDE, for example IntelliJ IDEA.
|
The features of the IntelliJ IDEA Community Edition version are enough for a complete and convenient work on a project that uses the RxMicro framework. |
The RxMicro framework consists of several dozens of modules, so for convenient handling it is recommended to install maven on Your computer.
|
Any modern IDE for Java ( To run |
3.1. Creating a Project
For creating a project, it is recommended to use a modern IDE, for example IntelliJ IDEA
3.1.1. Using the IntelliJ IDEA
To create a new project, proceed as follows: File → New → Project or Create a New Project.
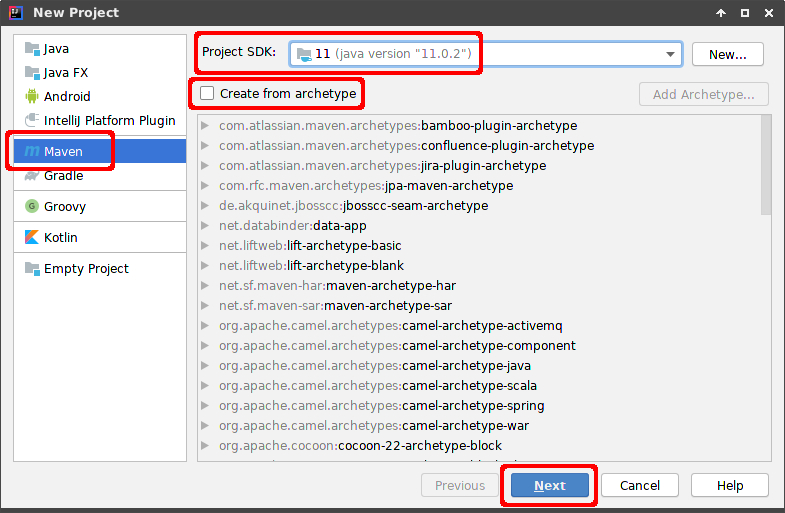
In the appeared dialog box select the Maven type, make sure that Project SDK version 11 or higher will be used, remove the Create from archetype checkbox and click Next.
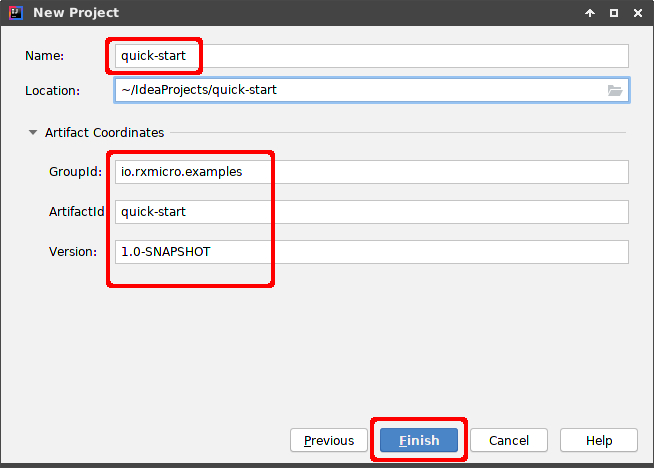
In the appeared dialog box type Name, Location (if the default value is wrong) and GroupId
(if the default value is wrong), and click Finish.
As a result, IntelliJ IDEA will generate the following project template using maven settings:
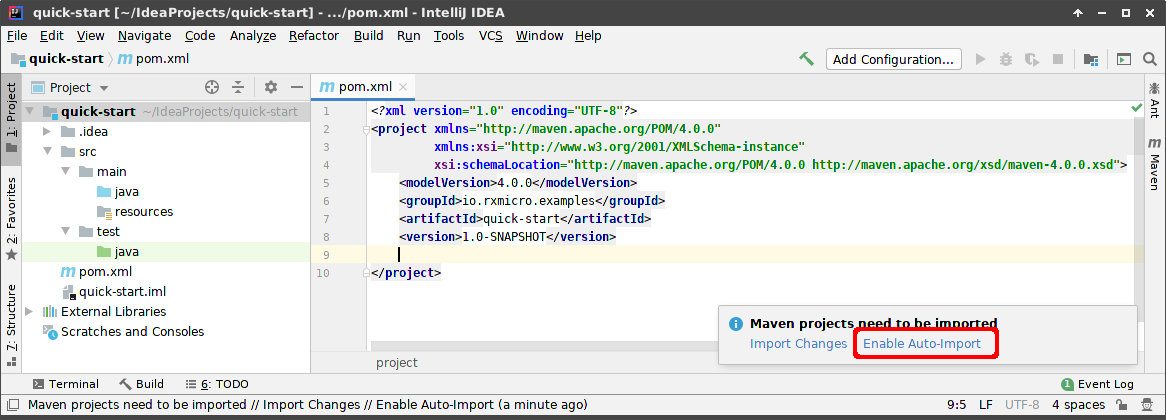
After creating the standard template, activate the Enable Auto-Import option.
|
If for some reason the As a result, Your template should fully match the template: Figure 3, “Creating the simplest project in IntelliJ IDEA: Basic project template.”. |
3.1.2. Using the Terminal
It is possible to create a new maven project without using the IDE.
|
If You don’t intend to write the source code of a project in notepad, but rather use the IDE to do this, You should directly create a maven project using the IDE. |
To do this, open the terminal and run the following command:
mvn archetype:generate -DgroupId=io.rxmicro.examples -DartifactId=quick-start -DinteractiveMode=false|
In order to run
A detailed instruction on the |
As a result, the quick-start folder with the basic project template will be created in the current folder.
After that, the created project must be imported into the IDE.
|
By default, As a result, Your template should fully match the template: Figure 3, “Creating the simplest project in IntelliJ IDEA: Basic project template.”. |
3.1.3. Using Other IDE
Creating the simplest project with other IDEs does not differ much from creating it with IntelliJ IDEA. When creating, You should also specify maven archetype, groupId, artifactId and version.
The main thing is that after creation Your project template should fully match the template: Figure 3, “Creating the simplest project in IntelliJ IDEA: Basic project template.”.
3.2. Configuring the Project
Before writing the code of a REST-based microservice, You should configure pom.xml of Your project by performing the following steps:
-
Define the versions of used libraries.
-
Add the required dependencies to the
pom.xml. -
Configure the
maven-compiler-plugin.
3.2.1. Definition the Versions of the Used Libraries
To make further updating of library versions convenient, it is recommended to use maven properties:
<properties>
    <project.build.sourceEncoding>UTF-8</project.build.sourceEncoding>
    <rxmicro.version>0.11</rxmicro.version> (1)
    <maven-compiler-plugin.version>3.10.1</maven-compiler-plugin.version> (2)
</properties>3.2.2. Adding the Required Dependencies
Before using RxMicro modules, the following dependencies must be added to the project:
<dependencies>
    <dependency>
        <groupId>io.rxmicro</groupId>
        <artifactId>rxmicro-rest-server-netty</artifactId> (1)
        <version>${rxmicro.version}</version>
    </dependency>
    <dependency>
        <groupId>io.rxmicro</groupId>
        <artifactId>rxmicro-rest-server-exchange-json</artifactId> (2)
        <version>${rxmicro.version}</version>
    </dependency>
</dependencies>3.2.3. Configuring the maven-compiler-plugin
Since the RxMicro framework uses the Java annotation processors, You need to set up maven-compiler-plugin:
<plugin>
    <artifactId>maven-compiler-plugin</artifactId>
    <version>${maven-compiler-plugin.version}</version>
    <configuration>
        <release>11</release> (1)
        <annotationProcessorPaths>
            <annotationProcessorPath>
                <groupId>io.rxmicro</groupId>
                <artifactId>rxmicro-annotation-processor</artifactId> (2)
                <version>${rxmicro.version}</version>
            </annotationProcessorPath>
        </annotationProcessorPaths>
    </configuration>
    <executions>
        <execution>
            <id>source-compile</id>
            <goals>
                <goal>compile</goal>
            </goals>
            <configuration>
                <annotationProcessors>
                    <annotationProcessor>
                        io.rxmicro.annotation.processor.RxMicroAnnotationProcessor (3)
                    </annotationProcessor>
                </annotationProcessors>
                <generatedSourcesDirectory>
                    ${project.build.directory}/generated-sources/ (4)
                </generatedSourcesDirectory>
            </configuration>
        </execution>
    </executions>
</plugin>| 1 | The RxMicro framework requires a Java compiler of v11 or higher; |
| 2 | The annotation processor library, that will handle all RxMicro Annotations; |
| 3 | The annotation processor class, that handles the launch configuration; |
| 4 | Location of the generated Java classes by the RxMicro Annotation Processor; |
3.2.4. The Final Version of pom.xml File
After all the above changes, the final version of the pom.xml file should look like:
<?xml version="1.0" encoding="UTF-8"?>
<project xmlns="http://maven.apache.org/POM/4.0.0"
         xmlns:xsi="http://www.w3.org/2001/XMLSchema-instance"
         xsi:schemaLocation="http://maven.apache.org/POM/4.0.0
                             http://maven.apache.org/xsd/maven-4.0.0.xsd">
    <modelVersion>4.0.0</modelVersion>
    <groupId>io.rxmicro.examples</groupId>
    <artifactId>quick-start</artifactId>
    <version>1.0-SNAPSHOT</version>

    <properties>
        <project.build.sourceEncoding>UTF-8</project.build.sourceEncoding>
        <rxmicro.version>0.11</rxmicro.version>
        <maven-compiler-plugin.version>3.10.1</maven-compiler-plugin.version>
    </properties>

    <build>
        <pluginManagement>
            <plugins>
                <plugin>
                    <artifactId>maven-compiler-plugin</artifactId>
                    <version>${maven-compiler-plugin.version}</version>
                    <configuration>
                        <release>11</release>
                        <annotationProcessorPaths>
                            <annotationProcessorPath>
                                <groupId>io.rxmicro</groupId>
                                <artifactId>rxmicro-annotation-processor</artifactId>
                                <version>${rxmicro.version}</version>
                            </annotationProcessorPath>
                        </annotationProcessorPaths>
                    </configuration>
                    <executions>
                        <execution>
                            <id>source-compile</id>
                            <goals>
                                <goal>compile</goal>
                            </goals>
                            <configuration>
                                <annotationProcessors>
                                    <annotationProcessor>
                            io.rxmicro.annotation.processor.RxMicroAnnotationProcessor
                                    </annotationProcessor>
                                </annotationProcessors>
                                <generatedSourcesDirectory>
                                    ${project.build.directory}/generated-sources/
                                </generatedSourcesDirectory>
                            </configuration>
                        </execution>
                    </executions>
                </plugin>
            </plugins>
        </pluginManagement>
    </build>

    <dependencies>
        <dependency>
            <groupId>io.rxmicro</groupId>
            <artifactId>rxmicro-rest-server-netty</artifactId>
            <version>${rxmicro.version}</version>
        </dependency>
        <dependency>
            <groupId>io.rxmicro</groupId>
            <artifactId>rxmicro-rest-server-exchange-json</artifactId>
            <version>${rxmicro.version}</version>
        </dependency>
    </dependencies>
</project>
3.3. Creating the Source Code
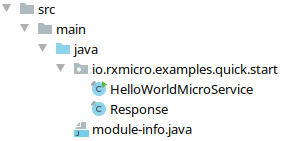
The source code of the simplest REST-based microservice consists of one module, one package and two classes. The source code of each of these components is described below.
3.3.1. A module-info.java Descriptor
Java 9 has introduced the JPMS.
Therefore, the RxMicro framework, which requires the use of JDK 11 or higher, requires a module-info.java descriptor for any of Your microservice projects.
module examples.quick.start {
    requires rxmicro.rest.server.netty;         (1)
    requires rxmicro.rest.server.exchange.json; (2)
}| 1 | Module for building REST-based microservices based on HTTP server that uses Netty, with all required transitive dependencies. |
| 2 | Module for converting a Java model to JSON format and vice versa, with all required transitive dependencies. |
|
Usually Thanks to the transitive dependencies of the RxMicro framework, the number of modules required has been greatly reduced. Only basic RxMicro modules must be specified! |
3.3.2. An HTTP Response Model Class
package io.rxmicro.examples.quick.start;

import static java.util.Objects.requireNonNull;

@SuppressWarnings("SameParameterValue")
final class Response {

    final String message;

    Response(final String message) {
        this.message = requireNonNull(message);
    }
}|
According to the specification, JSON format supports the following data types: object, array and primitives: strings, logical type, numeric type and To simplify communication between REST-based microservices, the RxMicro framework supports only JSON object as a return type of any REST-based microservice. Thus, any REST-based microservice built via the RxMicro framework can return only JSON objects. In case You need to return a primitive or an array, You need to create a wrapper class. Therefore, to display the |
3.3.3. A REST-Based Microservice Class
package io.rxmicro.examples.quick.start;

import io.rxmicro.rest.method.GET;
import io.rxmicro.rest.server.RxMicroRestServer;

import java.util.concurrent.CompletableFuture;

public final class HelloWorldMicroService {

    @GET("/")
    CompletableFuture<Response> sayHelloWorld() {       (1)
        return CompletableFuture.supplyAsync(() ->
                new Response("Hello World!"));          (2)
    }

    public static void main(final String[] args) {              (3)
        RxMicroRestServer.startRestServer(HelloWorldMicroService.class);  (4)
    }
}| 1 | REST-based microservice contains a handler of HTTP GET method: sayHelloWorld, which doesn’t accept any parameters and returns a
CompletableFuture reactive type. |
| 2 | The CompletableFuture.supplyAsync()
static method is used to create an object of CompletableFuture class. |
| 3 | To launch a REST-based microservice the main method is used. |
| 4 | The launch is performed using the
RxMicroRestServer.startRestServer(Class<?>)
static method, which requires the REST-based microservice class as parameter. |
|
Note that the HTTP request handler method doesn’t need to be The |
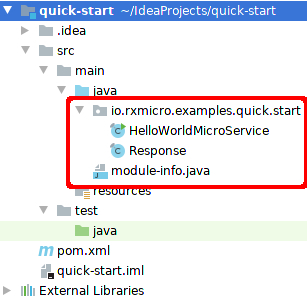
3.3.4. A Structure of the Microservice Project
The above-mentioned components of the microservice project should be located in the project according to the following screenshot:
3.4. Compiling the Project
3.4.1. Using the maven
To compile a project using the maven, open the terminal in the project root folder and proceed with the following command:
mvn clean compile|
In order to run
A detailed instruction on the |
It is possible to compile the project with maven even without using the terminal.
Since any modern IDE for Java contains built-in maven, You can use this built-in maven tool.
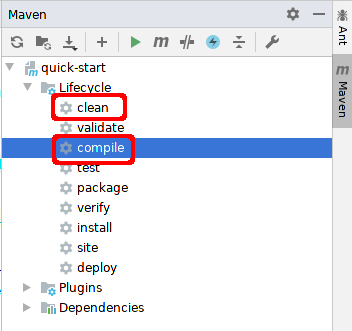
To do this, open the maven panel and execute the specified commands with a mouse or touchpad manipulator.
For example, the maven panel in IntelliJ IDEA looks like:
After successful compilation, the RxMicro Annotation Processor work results are displayed in the terminal:
[INFO] ------------------------------------------------------------------------
[INFO]  RX-MICRO ANNOTATIONS PROCESSING
[INFO] ------------------------------------------------------------------------
[INFO]
[INFO] Current environment context is:
  RxMicro version: 0.11
  Current module:
    examples.quick.start
  Available RxMicro modules:
    rxmicro.common;
    rxmicro.reflection;
    rxmicro.model;
    rxmicro.runtime;
    rxmicro.config;
    rxmicro.logger;
    rxmicro.files;
    rxmicro.http;
    rxmicro.rest;
    rxmicro.rest.server;
    rxmicro.rest.server.netty;
    rxmicro.json;
    rxmicro.exchange.json;
    rxmicro.rest.server.exchange.json;
  Include packages: <none>
  Exclude packages: <none>
[INFO] Found the following REST controllers:
  io.rxmicro.examples.quick.start.HelloWorldMicroService:
    'GET /' -> sayHelloWorld();
[INFO] Generating java classes...
[INFO] All java classes generated successful in 0.031 seconds. (1)
[INFO] ------------------------------------------------------------------------
[INFO] Annotations processing completed successful.
[INFO] ------------------------------------------------------------------------| 1 | The given information indicates that all files needed to run the microservice have been generated. |
|
In the To understand how the RxMicro framework works, please go to Section 4.1, “How It Works?” section. |
3.4.2. Using the IntelliJ IDEA
The IntelliJ IDEA allows annotation processors to be launched automatically when building a project.
So if You want to compile a microservice project using IntelliJ IDEA rather than maven, You need to set up the Annotation Processors section in the IntelliJ IDEA.
3.4.2.1. Enable Annotation Processing
To enable annotation processing while building a project with IntelliJ IDEA, You need to set up the Annotation Processors section.
To do so, open the menu: File → Settings and get to the tab:`Build, Execution, Deployment` → Compiler → Annotation Processors.
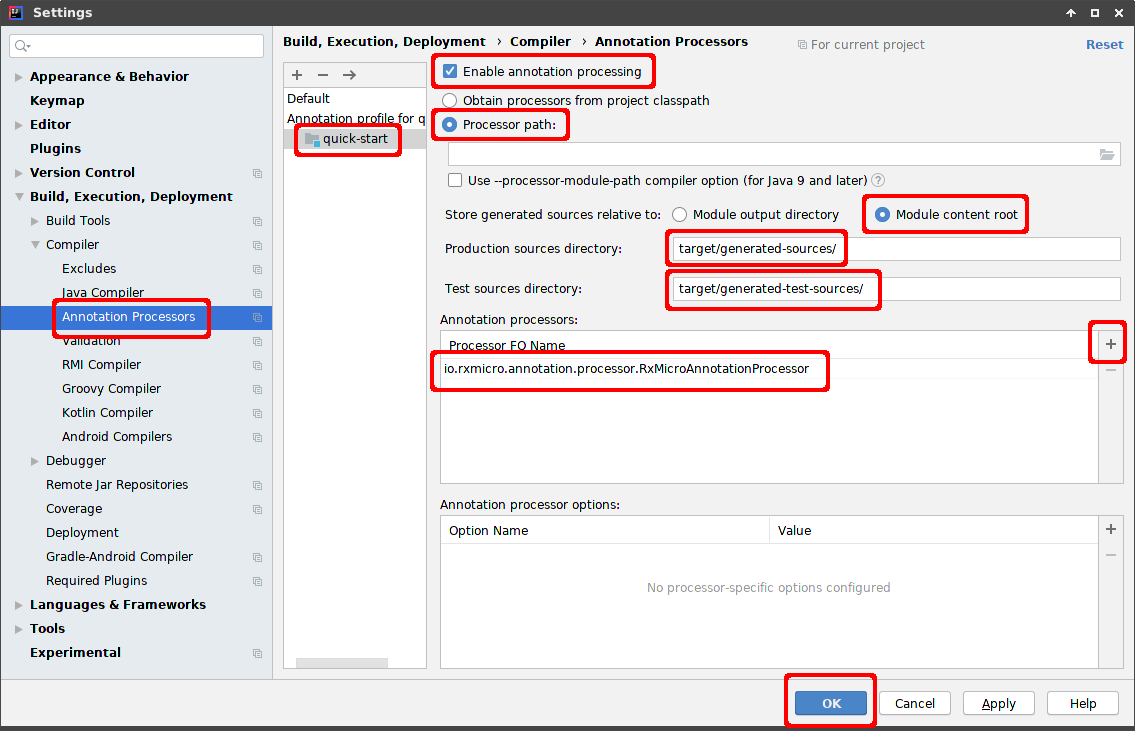
|
Make sure that all Your settings of the |
3.4.2.2. Rebuilding the Project
After setting up the Annotation Processors section, the project must be rebuilt.
To do so, run the following command from the main menu: Build → Rebuild project.
3.5. Starting the Microservice
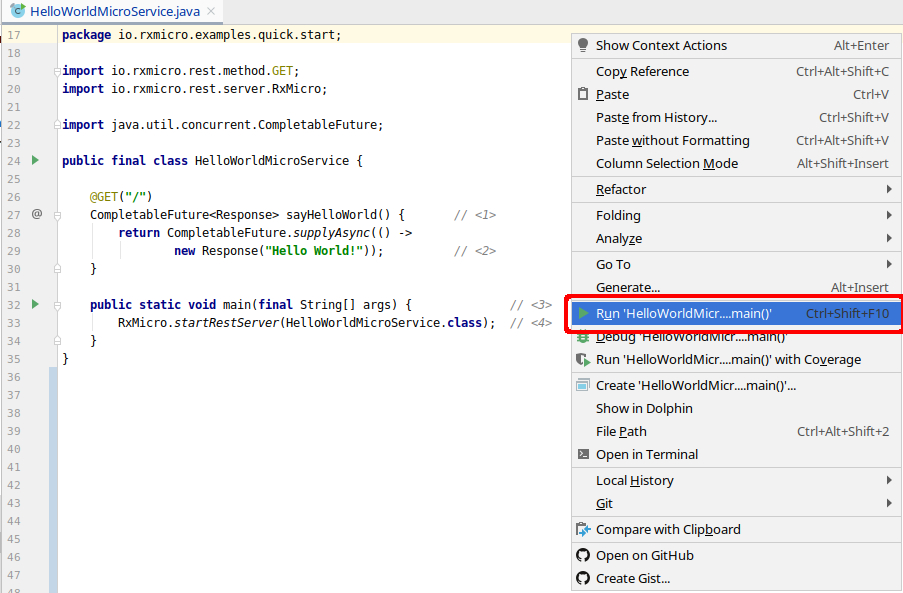
3.5.1. Using the IDE:
You can run the REST-based microservice using the IntelliJ IDEA launch context menu
|
If You get the following error while starting the REST-based 
rebuild the project! (To do this, run the command Rebuild project from the main menu: |
After starting, the console will display the following information:
2020-02-02 20:14:11.707 [INFO] io.rxmicro.rest.server.netty.internal.component.NettyServer :
Server started at 0.0.0.0:8080 using NETTY transport in 500 millis (1)| 1 | The Server started in … millis message means that the RxMicro HTTP server has been successfully started. |
|
If an error occurs during the starting process, the console will display a stack trace of this error. |
3.5.2. Using the Terminal:
Go to the target folder of the microservice project, open the terminal in this folder and run the following command:
java -Dfile.encoding=UTF-8 -p ./classes:$M2_REPO/io/rxmicro/rxmicro-rest-server-netty/0.11/rxmicro-rest-server-netty-0.11.jar:$M2_REPO/io/rxmicro/rxmicro-rest-server/0.11/rxmicro-rest-server-0.11.jar:$M2_REPO/io/rxmicro/rxmicro-rest/0.11/rxmicro-rest-0.11.jar:$M2_REPO/io/rxmicro/rxmicro-model/0.11/rxmicro-model-0.11.jar:$M2_REPO/io/rxmicro/rxmicro-http/0.11/rxmicro-http-0.11.jar:$M2_REPO/io/rxmicro/rxmicro-logger/0.11/rxmicro-logger-0.11.jar:$M2_REPO/io/rxmicro/rxmicro-common/0.11/rxmicro-common-0.11.jar:$M2_REPO/io/rxmicro/rxmicro-config/0.11/rxmicro-config-0.11.jar:$M2_REPO/io/rxmicro/rxmicro-runtime/0.11/rxmicro-runtime-0.11.jar:$M2_REPO/io/rxmicro/rxmicro-files/0.11/rxmicro-files-0.11.jar:$M2_REPO/io/netty/netty-codec-http/4.1.85.Final/netty-codec-http-4.1.85.Final.jar:$M2_REPO/io/netty/netty-common/4.1.85.Final/netty-common-4.1.85.Final.jar:$M2_REPO/io/netty/netty-buffer/4.1.85.Final/netty-buffer-4.1.85.Final.jar:$M2_REPO/io/netty/netty-codec/4.1.85.Final/netty-codec-4.1.85.Final.jar:$M2_REPO/io/netty/netty-handler/4.1.85.Final/netty-handler-4.1.85.Final.jar:$M2_REPO/io/netty/netty-transport/4.1.85.Final/netty-transport-4.1.85.Final.jar:$M2_REPO/io/netty/netty-resolver/4.1.85.Final/netty-resolver-4.1.85.Final.jar:$M2_REPO/io/rxmicro/rxmicro-rest-server-exchange-json/0.11/rxmicro-rest-server-exchange-json-0.11.jar:$M2_REPO/io/rxmicro/rxmicro-exchange-json/0.11/rxmicro-exchange-json-0.11.jar:$M2_REPO/io/rxmicro/rxmicro-json/0.11/rxmicro-json-0.11.jar -m examples.quick.start/io.rxmicro.examples.quick.start.HelloWorldMicroService|
It is assumed that the By default, the local repository is located in the
|
|
The above example of launching a microservice project using a terminal won’t work on Inoperability is caused by the use of different special symbols on Unix (Linux and MacOS) and Windows platforms:
Therefore, in order to launch a microservice project on the |
After starting, the console will display the following information:
java -p ./classes: \
        $M2_REPO/io/rxmicro/rxmicro-rest-server-netty/0.11/rxmicro-rest-server-netty-0.11.jar: \
        $M2_REPO/io/rxmicro/rxmicro-rest-server/0.11/rxmicro-rest-server-0.11.jar: \
        $M2_REPO/io/rxmicro/rxmicro-rest/0.11/rxmicro-rest-0.11.jar: \
        $M2_REPO/io/rxmicro/rxmicro-model/0.11/rxmicro-model-0.11.jar: \
        $M2_REPO/io/rxmicro/rxmicro-http/0.11/rxmicro-http-0.11.jar: \
        $M2_REPO/io/rxmicro/rxmicro-logger/0.11/rxmicro-logger-0.11.jar: \
        $M2_REPO/io/rxmicro/rxmicro-common/0.11/rxmicro-common-0.11.jar: \
        $M2_REPO/io/rxmicro/rxmicro-config/0.11/rxmicro-config-0.11.jar: \
        $M2_REPO/io/rxmicro/rxmicro-runtime/0.11/rxmicro-runtime-0.11.jar: \
        $M2_REPO/io/rxmicro/rxmicro-files/0.11/rxmicro-files-0.11.jar: \
        $M2_REPO/io/rxmicro/rxmicro-rest-server-exchange-json/0.11/rxmicro-rest-server-exchange-json-0.11.jar: \
        $M2_REPO/io/rxmicro/rxmicro-exchange-json/0.11/rxmicro-exchange-json-0.11.jar: \
        $M2_REPO/io/rxmicro/rxmicro-json/0.11/rxmicro-json-0.11.jar: \
        $M2_REPO/io/netty/netty-codec-http/4.1.85.Final/netty-codec-http-4.1.85.Final.jar: \
        $M2_REPO/io/netty/netty-common/4.1.85.Final/netty-common-4.1.85.Final.jar: \
        $M2_REPO/io/netty/netty-buffer/4.1.85.Final/netty-buffer-4.1.85.Final.jar: \
        $M2_REPO/io/netty/netty-codec/4.1.85.Final/netty-codec-4.1.85.Final.jar: \
        $M2_REPO/io/netty/netty-handler/4.1.85.Final/netty-handler-4.1.85.Final.jar: \
        $M2_REPO/io/netty/netty-transport/4.1.85.Final/netty-transport-4.1.85.Final.jar: \
        $M2_REPO/io/netty/netty-resolver/4.1.85.Final/netty-resolver-4.1.85.Final.jar \
    -m examples.quick.start/io.rxmicro.examples.quick.start.HelloWorldMicroService

2020-02-02 20:14:11.707 [INFO] io.rxmicro.rest.server.netty.internal.component.NettyServer :
Server started at 0.0.0.0:8080 using NETTY transport in 500 millis (1)| 1 | The Server started in … millis message means that the RxMicro HTTP server has been successfully started. |
When starting the microservice via the terminal, it’s quite inconvenient to list all dependencies and their versions.
To solve this problem, You can use the maven-dependency-plugin, which can copy all project dependencies.
To activate the maven-dependency-plugin, You must add it to pom.xml:
<plugin>
    <artifactId>maven-dependency-plugin</artifactId>
    <version>${maven-dependency-plugin.version}</version>(1)
    <executions>
        <execution>
            <id>copy-dependencies</id>
            <phase>package</phase>(2)
            <goals>
                <goal>copy-dependencies</goal>
            </goals>
            <configuration>
                <outputDirectory>${project.build.directory}/lib</outputDirectory>(3)
                <includeScope>compile</includeScope>(4)
            </configuration>
        </execution>
    </executions>
</plugin>| 1 | The latest stable version of the maven-dependency-plugin. |
| 2 | The plugin is invoked during the package phase. |
| 3 | Target folder all dependencies should be copied to. (In the example above, this is the target/lib folder.) |
| 4 | This setting specifies what scope of dependencies should be copied. (This option allows excluding libraries required for testing or libraries, those already present on the client’s computer.) |
After adding the plugin, You need to execute the command:
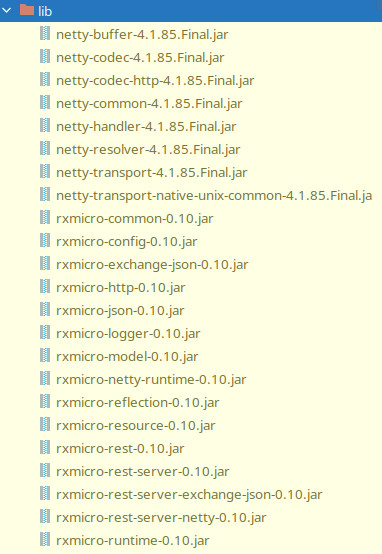
mvn clean packageAs a result of running the command, the maven-dependency-plugin will copy all the dependencies to the target/lib folder:
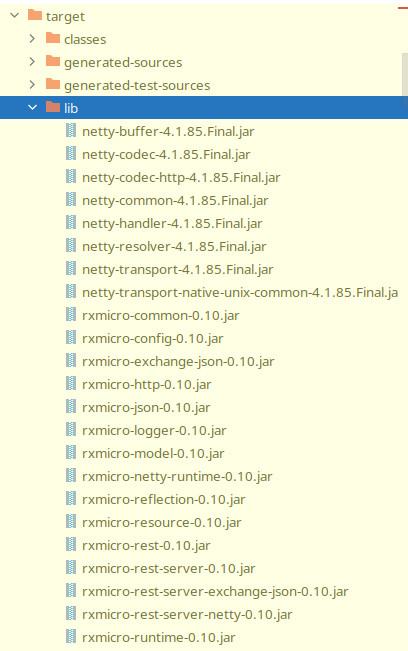
Now You can simplify the start command
(Instead of listing all the libraries, specify the lib folder):
java -p ./classes:lib -m examples.quick.start/io.rxmicro.examples.quick.start.HelloWorldMicroService|
The above example of launching a microservice project using a terminal won’t work on Inoperability is caused by the use of different special symbols on Unix (Linux and MacOS) and Windows platforms:
Therefore, in order to launch a microservice project on the |
3.6. Verifying the Microservice
To receive the "Hello World!" message from the created REST-based microservice, execute GET request to localhost:8080 endpoint:
:$ curl -v localhost:8080

* Rebuilt URL to: localhost:8080/
*   Trying 127.0.0.1...
* TCP_NODELAY set
* Connected to localhost (127.0.0.1) port 8080 (#0)

> GET / HTTP/1.1 (1)
> Host: localhost:8080
> User-Agent: curl/7.58.0
> Accept: /
>

< HTTP/1.1 200 OK (2)
< Server: RxMicro-NettyServer/0.11
< Date: Thu, 2 Jan 2020 11:48:13 GMT
< Content-Type: application/json
< Content-Length: 25
< Request-Id: 62jJeu8x1310662
<
* Connection #0 to host localhost left intact
{"message":"Hello World!"} (3)| 1 | curl sends a GET request. |
| 2 | HTTP server successfully returns a response. |
| 3 | The HTTP body contains a JSON response with the "Hello World!" message. |
Therefore, the created REST-based microservice works correctly!
|
You can also use Your favorite browser instead of |
3.7. Automated Test
The RxMicro framework provides modules for effective writing of any type of tests. Among all supported test types, a REST-based microservice test is required for the current project.
3.7.1. Configuring the Project
Before writing a REST-based microservice test, You need to configure pom.xml of Your project by performing the following steps:
-
Add the required dependencies to
pom.xml. -
Configure the
maven-compiler-plugin. -
Configure the
maven-surefire-plugin.
3.7.1.1. Adding the Required Dependencies
Before using RxMicro modules for testing, You need to add the following dependencies to the project:
<dependencies>
    <dependency>
        <groupId>io.rxmicro</groupId>
        <artifactId>rxmicro-test-junit</artifactId> (1)
        <version>${rxmicro.version}</version>
        <scope>test</scope>
    </dependency>
    <dependency>
        <groupId>io.rxmicro</groupId>
        <artifactId>rxmicro-rest-client-exchange-json</artifactId> (2)
        <version>${rxmicro.version}</version>
        <scope>test</scope>
    </dependency>
</dependencies>| 1 | Unit testing library based on the JUnit 5 framework |
| 2 | Library for Java model conversion to JSON format and vice versa on the HTTP client side; |
The REST-based microservice testing process consists in launching the REST-based microservice and sending a request to the microservice via HTTP client.
(Therefore, in maven dependencies it’s necessary to add the library supporting the JSON
format on the HTTP client side (rxmicro-rest-client-exchange-json)).
After receiving a response from the microservice, the response is compared to the expected one.
3.7.1.2. Configuring the maven-compiler-plugin
Since the RxMicro framework uses the Java annotation processors, You need to configure maven-compiler-plugin:
<plugin>
    <artifactId>maven-compiler-plugin</artifactId>
    <version>${maven-compiler-plugin.version}</version>
    <configuration>
        <release>11</release>
        <annotationProcessorPaths>
            <annotationProcessorPath>
                <groupId>io.rxmicro</groupId>
                <artifactId>rxmicro-annotation-processor</artifactId>
                <version>${rxmicro.version}</version>
            </annotationProcessorPath>
        </annotationProcessorPaths>
    </configuration>
    <executions>
        <execution>
            <id>source-compile</id>
            <goals>
                <goal>compile</goal>
            </goals>
            <configuration>
                <annotationProcessors>
                    <annotationProcessor>
            io.rxmicro.annotation.processor.RxMicroAnnotationProcessor
                    </annotationProcessor>
                </annotationProcessors>
                <generatedSourcesDirectory>
                    ${project.build.directory}/generated-sources/
                </generatedSourcesDirectory>
            </configuration>
        </execution>
        <execution>
            <id>test-compile</id> (1)
            <goals>
                <goal>testCompile</goal>
            </goals>
            <configuration>
                <annotationProcessors>
                    <annotationProcessor>
            io.rxmicro.annotation.processor.RxMicroTestsAnnotationProcessor (2)
                    </annotationProcessor>
                </annotationProcessors>
                <generatedTestSourcesDirectory>
                    ${project.build.directory}/generated-test-sources/ (3)
                </generatedTestSourcesDirectory>
            </configuration>
        </execution>
    </executions>
</plugin>| 1 | The tests require a separate configuration, so a new execution must be added. |
| 2 | The annotation processor class that handles test configuration. |
| 3 | Location of Java-generated classes by the test annotation processor. |
|
To learn more about how the |
3.7.1.3. Configuring the maven-surefire-plugin
For a successful tests launch while building a project with maven it is necessary to update maven-surefire-plugin:
<plugin>
    <artifactId>maven-surefire-plugin</artifactId>
    <version>${maven-surefire-plugin.version}</version> (1)
    <configuration>
        <properties>
            <!-- https://junit.org/junit5/docs/5.5.1/api/org/junit/jupiter/api/Timeout.html -->
            <configurationParameters>
                junit.jupiter.execution.timeout.default = 60                (2)
                junit.jupiter.execution.timeout.mode = disabled_on_debug    (3)
                junit.jupiter.execution.parallel.enabled = false            (4)
            </configurationParameters>
        </properties>
    </configuration>
</plugin>| 1 | Last stable version of maven-surefire-plugin.(The plugin version must be 2.22.1 or higher, otherwise maven will ignore the tests!.) |
| 2 | In case of an error in the code which uses reactive programming, an infinite function execution may occur. In order to detect such cases, it is necessary to set a global timeout for all methods in the tests. (By default, timeout is set in seconds. More detailed information on timeouts configuration is available in official JUnit5 documentation.) |
| 3 | While debugging, timeouts can be turned off. |
| 4 | This property is useful for the tests debugging from IDE or maven.(By setting this property the speed of test performance will decrease, so use this property for debugging only!) |
3.7.2. Creating a Test Class
REST-based microservice test is a one class containing one test method:
package io.rxmicro.examples.quick.start;

import io.rxmicro.test.BlockingHttpClient;
import io.rxmicro.test.ClientHttpResponse;
import io.rxmicro.test.junit.RxMicroRestBasedMicroServiceTest;
import org.junit.jupiter.api.Test;

import static io.rxmicro.test.json.JsonFactory.jsonObject;
import static org.junit.jupiter.api.Assertions.assertEquals;

@RxMicroRestBasedMicroServiceTest(HelloWorldMicroService.class) (1)
final class HelloWorldMicroServiceTest {

    private BlockingHttpClient blockingHttpClient; (2)

    @Test
    void Should_return_Hello_World_message() {
        final ClientHttpResponse response = blockingHttpClient.get("/"); (3)
        assertEquals(
                jsonObject("message", "Hello World!"), (4)
                response.getBody()
        );
        assertEquals(200, response.getStatusCode()); (5)
    }
}| 1 | The RxMicro Test Annotation indicating which microservice should be run for testing. |
| 2 | The BlockingHttpClient is a basic HTTP client interface designed for use in tests.
This interface allows executing blocking requests to the microservice via the HTTP protocol.
This field is initialized automatically when running the test with reflection.
Upon initialization it refers to the test HTTP server that was automatically started for the test. |
| 3 | Blocking request to the microservice. |
| 4 | Comparing the contents of an HTTP body with an expected value. |
| 5 | Comparing the HTTP status code with an expected value. |
|
For low-level and effective work with JSON format, the RxMicro framework provides a separate To get a common idea of the capabilities of this module, which are required when writing tests, go to the following section: Section 4.10, “JSON”. |
In microservice tests it is recommended to compare the HTTP request body before comparing the HTTP status, when the microservice constantly returns a text error message! (This will make it easier to understand the error in case it occurred during the testing.)
If the microservice returns ONLY the status when an error occurs, the HTTP body comparison should be skipped!
|
For further information on how to test REST-based microservices, go to the following section: Section 14.6, “REST-based Microservice Testing”. |
3.7.3. Starting the Test Class
To start the tests, You need to run the command:
mvn clean testAfter starting, the console will display the following information:
...
[INFO] ------------------------------------------------------------------------
[INFO]  RX-MICRO ANNOTATIONS PROCESSING (1)
[INFO] ------------------------------------------------------------------------
[INFO]
[INFO] Current environment context is:
  RxMicro version: 0.11
  Current module:
    examples.quick.start
  Available RxMicro modules:
    ...
  Include packages: <none>
  Exclude packages: <none>
[INFO] Found the following REST controllers:
  io.rxmicro.examples.quick.start.HelloWorldMicroService:
    'GET /' -> sayHelloWorld();
[INFO] Generating java classes...
[INFO] All java classes generated successful in 0.030 seconds. (2)
[INFO] ------------------------------------------------------------------------
[INFO] Annotations processing completed successful.
[INFO] ------------------------------------------------------------------------
...
[INFO] ------------------------------------------------------------------------
[INFO]  RX-MICRO TEST ANNOTATIONS PROCESSING (3)
[INFO] ------------------------------------------------------------------------
[INFO]
[INFO] Current environment context is:
  RxMicro version: 0.11
  Current module:
    examples.quick.start
  Available RxMicro modules:
    ...
  Include packages: <none>
  Exclude packages: <none>
[INFO] Generating java classes...
[INFO] Test fixer class generated successfully: rxmicro.$$RestBasedMicroServiceTestFixer (4)
[INFO] All java classes generated successful in 0.009 seconds. (4)
[INFO] ------------------------------------------------------------------------
[INFO] Annotations processing completed successful.
[INFO] ------------------------------------------------------------------------
...
[INFO] -------------------------------------------------------
[INFO]  T E S T S
[INFO] -------------------------------------------------------
...
[INFO] Fix the environment for REST based microservice test(s)... (5)
[INFO] opens examples.quick.start/rxmicro to ALL-UNNAMED (5)
[INFO] opens examples.quick.start/io.rxmicro.examples.quick.start to ALL-UNNAMED (5)
[INFO] opens examples.quick.start/rxmicro to rxmicro.reflection (5)
[INFO] opens examples.quick.start/io.rxmicro.examples.quick.start to rxmicro.reflection (5)
[INFO] opens rxmicro.rest.server.netty/io.rxmicro.rest.server.netty.local to ALL-UNNAMED (5)
[INFO] opens rxmicro.runtime/io.rxmicro.runtime.local to ALL-UNNAMED (5)
[INFO] opens rxmicro.runtime/io.rxmicro.runtime.local.error to ALL-UNNAMED (5)
[INFO] opens rxmicro.runtime/io.rxmicro.runtime.local.provider to ALL-UNNAMED (5)
[INFO] opens rxmicro.config/io.rxmicro.config.local to ALL-UNNAMED (5)
[INFO] opens rxmicro.rest.server/io.rxmicro.rest.server.local.model to ALL-UNNAMED (5)
[INFO] opens rxmicro.rest.server/io.rxmicro.rest.server.local.component to ALL-UNNAMED (5)
[INFO] opens rxmicro.common/io.rxmicro.common.local to ALL-UNNAMED (5)
[INFO] opens rxmicro.http/io.rxmicro.http.local to ALL-UNNAMED (5)
[INFO] Running io.rxmicro.examples.quick.start.HelloWorldMicroServiceTest (6)
[INFO] ...NettyServer: Server started at 0.0.0.0:38751 using NETTY transport. (7)
[INFO] ...Router: Mapped "GET '/'  onto ...HelloWorldMicroService.sayHelloWorld()
[INFO] ...Router: Mapped "GET '/bad-request'  onto ...BadHttpRequestRestController.handle(...)
[INFO] ...HelloWorldMicroServiceTest: JdkHttpClient released (8)
[INFO] ...NettyServer: Retrieved shutdown request ...
[INFO] ...NettyServer: Server stopped (9)
[INFO]
[INFO] Results:
[INFO]
[INFO] Tests run: 1, Failures: 0, Errors: 0, Skipped: 0 (10)
[INFO]
[INFO] ------------------------------------------------------------------------
[INFO] BUILD SUCCESS
[INFO] ------------------------------------------------------------------------| 1 | Starting of the RxMicro Annotation Processor. |
| 2 | RxMicro Annotation Processor has successfully completed its work. |
| 3 | Starting of the RxMicro Tests Annotation Processor. |
| 4 | RxMicro Tests Annotation Processor has successfully completed its work. |
| 5 | For the test configuration, missing exports were automatically added using the capabilities of the java.lang.Module class. |
| 6 | REST-based microservice test starting. |
| 7 | HTTP server has started automatically on random free port. |
| 8 | The resources of the BlockingHttpClient component have been released. |
| 9 | HTTP server has stopped successfully. |
|
For further information on how the |
3.8. The Project at the Github
The REST-based HelloWorldMicroService microservice project is available at the following link:
|
The DON’T FORGET to remove the link to the parent project: and add the |
4. Core Concepts
This section will describe the basic working concepts of the RxMicro framework.
4.1. How It Works?
The RxMicro framework uses the
Java annotation processor, which generates standard code using RxMicro Annotations.
Thus, the RxMicro framework is a framework of declarative programming.
Using the RxMicro framework, the developer focuses on writing the business logic of a microservice.
Then he configures the desired standard behavior with RxMicro Annotations.
When compiling a project, the RxMicro Annotation Processor generates additional classes.
Generated classes contain a standard logic that ensures the functionality of the created microservice.
4.1.1. A Common Work Schema
The common work schema can be presented as follows:
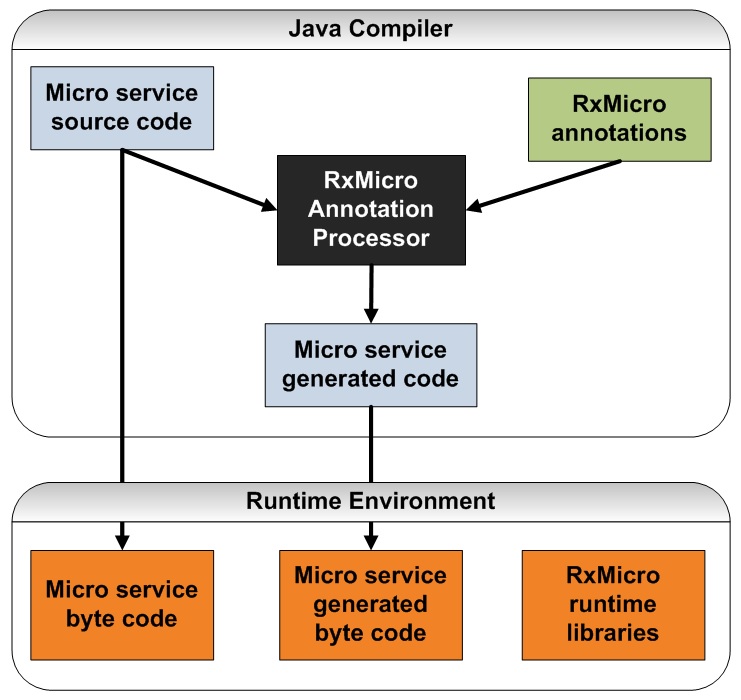
While solving a business task, the developer writes Micro service source code.
Then the developer configures the desired standard microservice behavior via RxMicro Annotations.
After that, the developer compiles the project.
Since the RxMicro Annotation Processor is configured in maven, when compiling a project this processor handles the source code of the microservice and generates the additional classes: Micro service generated code.
After that, the compiler compiles the source and generated microservice codes: Micro service byte code and Micro service generated byte code.
The compiled source and generated codes along with the RxMicro runtime libraries perform useful work.
4.1.2. Generating of Additional Classes.
Let’s have a look at the RxMicro framework common work schema, by the example of the REST-based microservice project, which displays the "Hello World!" message in JSON format.
(This project was considered in the Section 3, “Quick Start” section.)
While implementing a business task (in this example, it’s a task of displaying the "Hello World!" message in JSON format) the developer wrote the following Micro service source code:
In order to inform the RxMicro framework about the need to generate additional classes by which a written Micro service source code can be built into an HTTP server to handle the desired HTTP requests, the developer added the following RxMicro Annotation:
@GET("/")Since the RxMicro Annotation Processor is configured in maven:
<configuration>
<annotationProcessors>
<annotationProcessor>
io.rxmicro.annotation.processor.RxMicroAnnotationProcessor
</annotationProcessor>
</annotationProcessors>
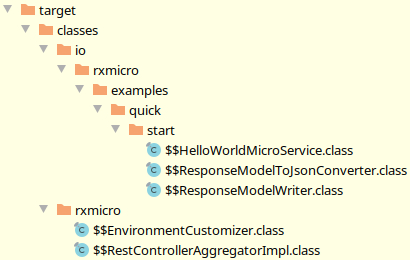
</configuration>then when compiling a project this processor handles the source code of the REST-based microservice and generates the Micro service generated code additional classes:
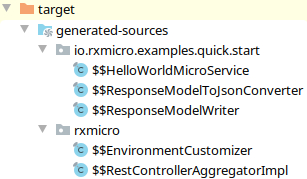
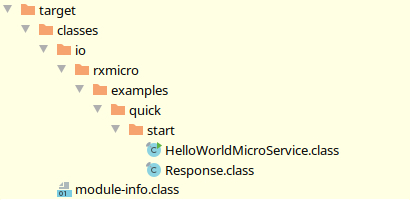
After the source code of additional classes was successfully generated by the RxMicro Annotation Processor, the compiler compiles:
-
REST-based microservice source code in
Micro service byte code:
-
Generated code of additional classes in
Micro service byte code:
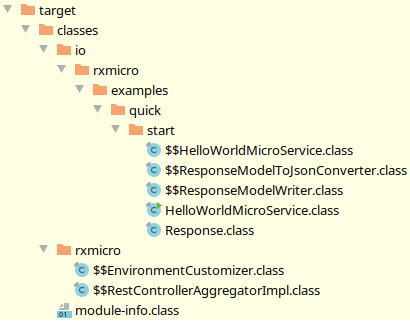
As a result of the compiler’s work, the REST-based microservice byte code and the byte code of the generated additional classes will be stored jointly in the same jar archive:
For successful start of the compiled classes, the RxMicro runtime libraries are required:
The Micro service byte code, Micro service byte code and RxMicro runtime libraries are the program components of microservice, which perform useful work.
Below we will look closely at each generated additional class and what functions it performs.
|
The names of all classes generated by the RxMicro framework start with the |
4.1.2.1. An Additional Class for the REST Controller.
Any REST-based microservice, contains at least one REST controller. For the simplest project, REST-based microservice and REST controller are the same class.
Therefore, when analyzing such projects, such terms as REST controller, REST-based microservice and microservice are synonymous, because physically they are the same class.
The considered REST-based microservice, which displays the "Hello World!" message, is the simplest project, therefore the HelloWorldMicroService class is a REST controller.
|
For more information on the differences between REST controller, REST-based microservice and microservice, refer to the {microservice}.html section. |
For each REST controller class the RxMicro framework generates an additional class that performs the following functions:
-
Creates a REST controller object.
(In case ofrxmicro.cdimodule activation, after creation it also injects the required dependencies.) -
Creates
ModelReaderobjects that convert HTTP request parameters, headers and body to Java model. -
Creates
ModelWriterobjects that convert the Java response model to HTTP response headers and body; -
Registers all HTTP request handlers of current REST controller in the router.
-
When receiving an HTTP request via the
ModelReaderobject, converts the HTTP request to the Java request model and invokes the corresponding REST controller handler. -
After receiving the resulting Java response model via the
ModelWriterobject, converts the Java model into an HTTP response and sends the response to the client.
Such an additional class for the HelloWorldMicroService class is the $$HelloWorldMicroService class:
public final class $$HelloWorldMicroService extends AbstractRestController {

    private HelloWorldMicroService restController;

    private $$ResponseModelWriter responseModelWriter;

    @Override
    protected void postConstruct() {
        restController = new HelloWorldMicroService(); (1)
        responseModelWriter =
                new $$ResponseModelWriter(restServerConfig.isHumanReadableOutput()); (2)
    }

    @Override
    public void register(final RestControllerRegistrar registrar) { (3)
        registrar.register(
                this,
                new Registration(
                        "",
                        "sayHelloWorld()",
                        this::sayHelloWorld, (4)
                        false,
                        new ExactUrlRequestMappingRule( (5)
                                "GET",
                                "/",
                                false
                        )
                )
        );
    }

    private CompletionStage<HttpResponse> sayHelloWorld(final PathVariableMapping mapping,
                                                        final HttpRequest request) {
        final HttpHeaders headers = HttpHeaders.of();
        return restController.sayHelloWorld() (6)
                .thenApply(response -> buildResponse(response, 200, headers)); (7)
    }

    private HttpResponse buildResponse(final Response model,
                                       final int statusCode,
                                       final HttpHeaders headers) {
        final HttpResponse response = httpResponseBuilder.build();
        response.setStatus(statusCode);
        response.setOrAddHeaders(headers);
        responseModelWriter.write(model, response); (8)
        return response;
    }

}| 1 | The $$HelloWorldMicroService component creates an instance of the REST controller class. |
| 2 | The $$HelloWorldMicroService component creates an instance of the ModelWriter that converts the Java response model to the HTTP response headers and body. |
| 3 | The $$HelloWorldMicroService component registers all HTTP request handlers of the current REST controller. |
| 4 | The registration object contains a reference to the HTTP request handler of the current REST controller. |
| 5 | The registration object contains a rule, according to which the router determines whether to invoke this HTTP request handler. |
| 6 | When receiving HTTP request, the $$HelloWorldMicroService invokes REST controller method. |
| 7 | After invoking the REST controller method, an asynchronous result handler is added. (When using the reactive approach, the current thread cannot be blocked, so the thenApply method is used for delayed result handling.) |
| 8 | After receiving the Java response model object, the result handler creates an HTTP response based on the data received from the model, which is subsequently sent to the client. |
4.1.2.2. An ModelWriter Class.
To convert a Java model to an HTTP response, You will need a separate component that performs the following functions:
-
Defines in what format to return an HTTP response depending on the project settings.
-
Creates converter objects that support the specified messaging format.
-
When converting a Java model to an HTTP response, manages the conversion process by delegating invocations to the appropriate components.
Such a separate component for the Response model class is the $$ResponseModelWriter class:
|
The code of the Since the format of message exchange with the client is set in Therefore, if several handlers from different REST controllers will return the |
public final class $$ResponseModelWriter extends ModelWriter<Response> {

    private final $$ResponseModelToJsonConverter responseModelToJsonConverter; (1)

    private final ExchangeDataFormatConverter<Object> exchangeDataFormatConverter; (2)

    private final String outputMimeType;

    public $$ResponseModelWriter(final boolean humanReadableOutput) {
        exchangeDataFormatConverter =
            new JsonExchangeDataFormatConverter(humanReadableOutput); (3)
        responseModelToJsonConverter = new $$ResponseModelToJsonConverter();
        outputMimeType = exchangeDataFormatConverter.getMimeType();
    }

    @Override
    public void write(final Response model,
                      final HttpResponse response) {
        response.setHeader(HttpHeaders.CONTENT_TYPE, outputMimeType); (4)
        final Map<String, Object> json = responseModelToJsonConverter.toJsonObject(model); (5)
        response.setContent(exchangeDataFormatConverter.toBytes(json)); (6)
    }

}| 1 | Since the JSON message exchange format is specified in the settings, a component that can convert the Java response model to a JSON response model is required.
(This task is specific for each response model, so to avoid using reflection, You need to generate a separate converter component.) |
| 2 | To convert any low-level model (in this example, it’s a JSON response model) into a byte array, You also need a separate converter component. |
| 3 | Since the JSON messaging format is specified in the settings, it is assumed that the JSON model will be converted to an byte array, which will be created from the Java response model. |
| 4 | Since the JSON message exchange format is specified in the settings, it is necessary to set the HTTP header: Content-Type = application/json. |
| 5 | When the HTTP response is formed, it is necessary to convert Java response model to JSON model. |
| 6 | The last step is to convert the JSON model to a byte array, that will be written to the HTTP response body. |
4.1.2.3. A Java Model Converter.
To avoid using reflection, You need a component that can convert Java model to JSON model.
This component must support the following functions:
-
Convert Java model to JSON model of any complexity.
-
Support all possible class field access models to be an all-purpose tool.
(Supported class field access models are described in details in the Section 4.7, “Encapsulation”.)
Such a separate component for the Response model class is the $$ResponseModelToJsonConverter class:
public final class $$ResponseModelToJsonConverter extends ModelToJsonConverter<Response> {

    @Override
    (1)
    public Map<String, Object> toJsonObject(final Response model) {
        final JsonObjectBuilder builder = new JsonObjectBuilder();
        putValuesToBuilder(model, builder);
        return builder.build();
    }

    public void putValuesToBuilder(final Response model,
                                   final JsonObjectBuilder builder) {
        builder.put("message", model.message); (2)
    }
}| 1 | JSON object is presented as Map<String, Object>.(More information about JSON format support by the RxMicro framework can be found in the Section 4.10, “JSON”.) |
| 2 | The value of the message field is read from the Java model by direct reference to the field.(Supported class field access models are described in details in the Section 4.7, “Encapsulation”.) |
4.1.2.4. An Aggregator of the REST Controllers.
To integrate developer code into the RxMicro framework infrastructure, You need aggregators.
The aggregators perform the following functions:
-
Register all generated additional classes for REST controllers;
-
Customize the runtime environment;
The aggregators are invoked by the RxMicro framework using reflection.
(That' s why aggregators have a permanent and predefined names and are located in the special package: rxmicro.)
An Aggregator of the REST Controllers for any project is always the rxmicro.MODULE_NAME.$$RestControllerAggregatorImpl class:
package rxmicro.MODULE_NAME; (1)

public final class $$RestControllerAggregatorImpl extends RestControllerAggregator { (2)

    static {
        $$EnvironmentCustomizer.customize(); (3)
    }

    protected List<AbstractMicroService> listAllRestControllers() {
        return List.of(
                new io.rxmicro.examples.quick.start.$$HelloWorldMicroService() (4)
        );
    }

}| 1 | All aggregators are always generated in the special package: rxmicro.MODULE_NAME, where MODULE_NAME is the module name or unnamed constant if the current project does not declare the module-info.java descriptor (Read more: Unnamed Modules Support). |
| 2 | The predefined name of the REST controller aggregator class is always $$RestControllerAggregatorImpl. |
| 3 | When the aggregator class is loaded by the RxMicro framework, the component of the current environment customization is invoked. |
| 4 | The aggregator registers all generated additional classes for REST controllers; |
4.1.2.5. An Environment Customizer.
Java 9 has introduced the JPMS.
This system requires that a developer configures access to classes in the module-info.java file of the microservice project.
To enable the RxMicro framework to load aggregator classes, You must export the rxmicro.MODULE_NAME package to the rxmicro.reflection module:
module examples.quick.start {
    requires rxmicro.rest.server.netty;
    requires rxmicro.rest.server.exchange.json;

    exports rxmicro.MODULE_NAME to rxmicro.reflection; (1)
}| 1 | Allow access of reflection util classes from the rxmicro.reflection module to all classes from the rxmicro.MODULE_NAME package. |
But the rxmicro.MODULE_NAME package is created automatically and after deleting all the generated files, it won’t be possible to compile the module-info.java because of the following error:
package is empty or does not exist: rxmicro.MODULE_NAME.
To solve this problem, the RxMicro framework generates the rxmicro.MODULE_NAME.$$EnvironmentCustomizer class:
package rxmicro.MODULE_NAME; (1)

final class $$EnvironmentCustomizer {

    static {
        exportTheRxmicroPackageToReflectionModule(); (2)
        invokeAllStaticSections($$EnvironmentCustomizer.class.getModule(), "$$EnvironmentCustomizer"); (3)
        // All required customization must be here
    }

    public static void customize() {
        //do nothing. All customization is done at the static section
    }

    private static void exportTheRxmicroPackageToReflectionModule() {
        final Module currentModule = $$EnvironmentCustomizer.class.getModule();
        currentModule.addExports("rxmicro.MODULE_NAME", RX_MICRO_REFLECTION_MODULE); (4)
    }

    private $$EnvironmentCustomizer() {
    }
}| 1 | All customizers are always generated in the special package: rxmicro.MODULE_NAME, where MODULE_NAME is the module name or unnamed constant if the current project does not declare the module-info.java descriptor (Read more: Unnamed Modules Support). |
| 2 | When the class is loaded, the exportTheRxmicroPackageToReflectionModule() static method is invoked. |
| 3 | Finds all $$EnvironmentCustomizer classes that are defined in other modules in the current module path and invokes static sections. |
| 4 | In this method body, the export of the rxmicro.MODULE_NAME package to the rxmicro.reflection module is performed dynamically using the capabilities of the java.lang.Module class. |
Due to this additional class, all necessary settings for the JPMS are created automatically.
|
If the RxMicro framework needs additional automatic settings for its correct work, these settings will be automatically added by the |
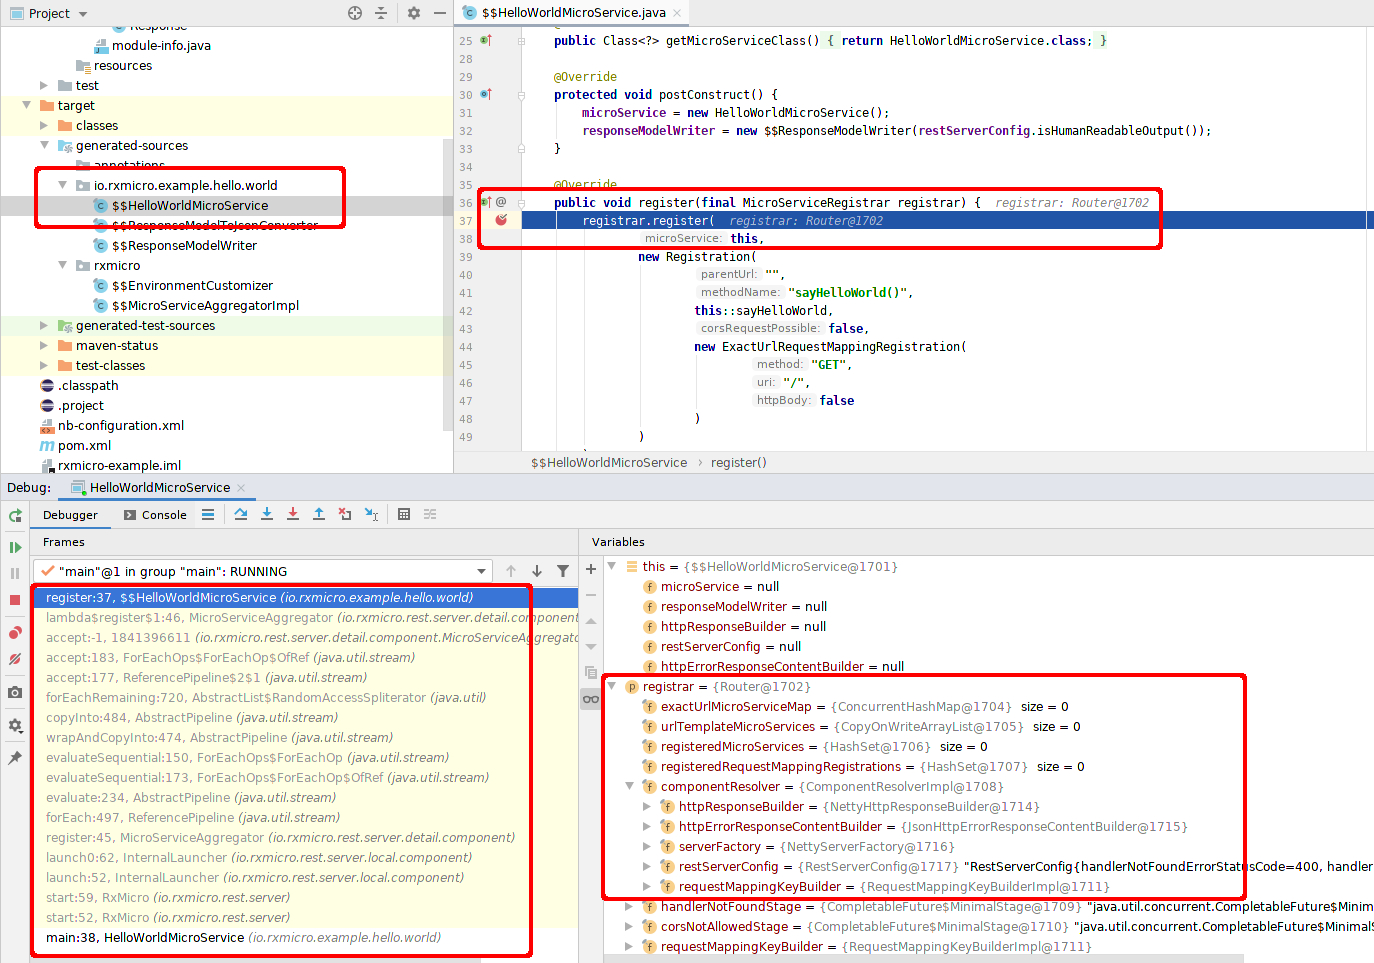
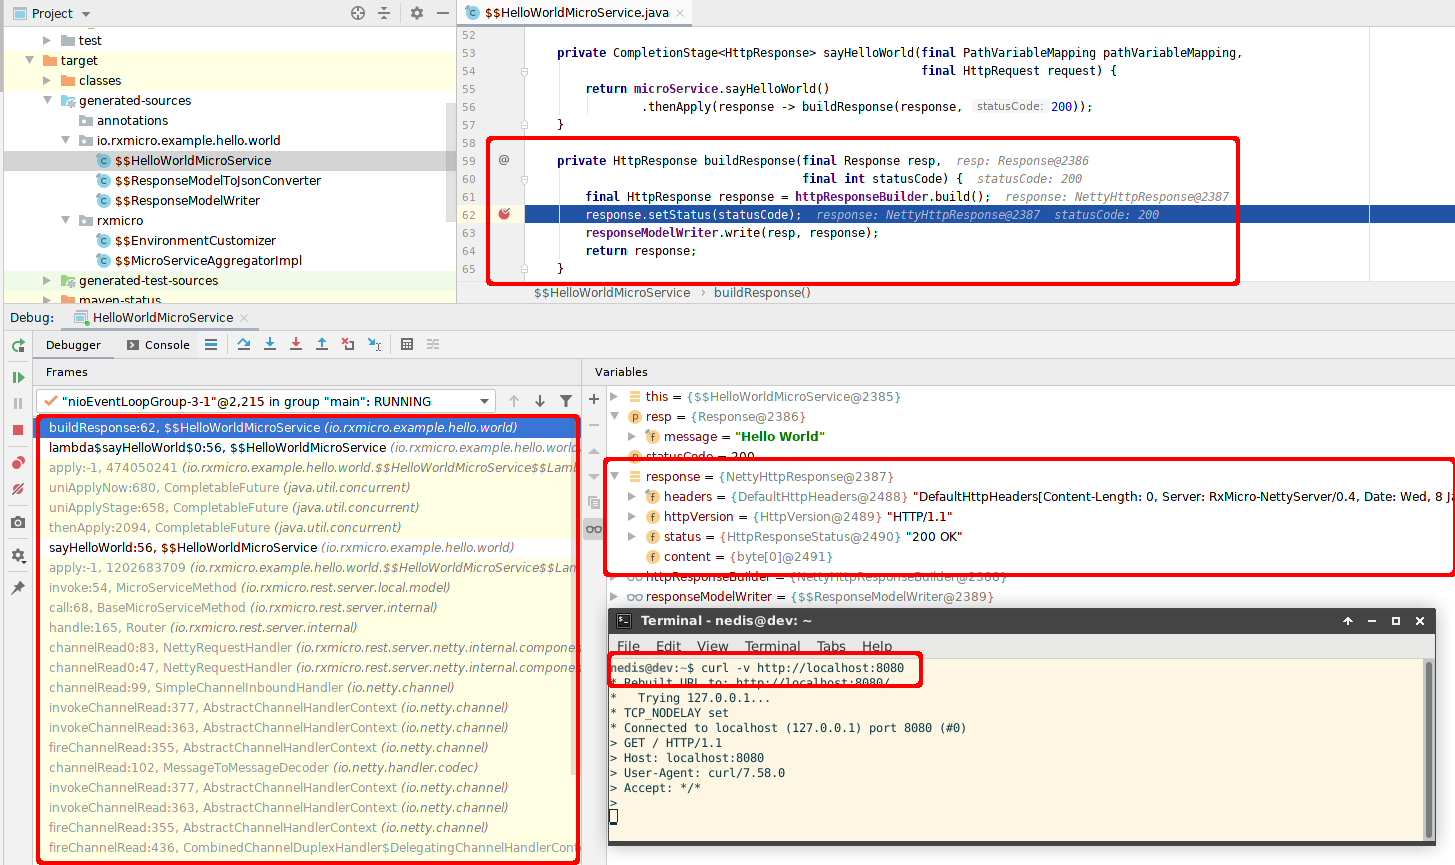
4.1.3. Using the Debug Mode
To get a better idea of how the RxMicro framework works, You can use the debug mode.
To do this, set breakpoints and start the microservice in debug mode.
|
The code generated by the |
4.2. RxMicro Annotation Processor Options
The RxMicro Annotation Processor supports the following options:
| Option | Description | Type | Default value |
|---|---|---|---|
|
maximum stack size for recursive invocations when analyzing models containing JSON nested objects. |
|
|
|
|
Enum { |
|
|
the resulting directory for generated documentation. |
|
Asciidoc: |
|
the |
|
|
|
this option allows analyzing parent |
|
|
|
activates additional validation rules during compilation process. The RxMicro team strong recommends enabling the strict mode for your production code. |
|
|
These options are set using the compiler arguments in maven-compiler-plugin:
<plugin>
    <artifactId>maven-compiler-plugin</artifactId>
    <version>${maven-compiler-plugin.version}</version>
    <configuration>
        <release>11</release>
        <compilerArgs>
            <arg>-ARX_MICRO_MAX_JSON_NESTED_DEPTH=20</arg>
            <arg>-ARX_MICRO_LOG_LEVEL=INFO</arg>
            <arg>-ARX_MICRO_DOC_DESTINATION_DIR=./src/main/asciidoc</arg>
            <arg>-ARX_MICRO_BUILD_UNNAMED_MODULE=false</arg>
            <arg>-ARX_MICRO_DOC_ANALYZE_PARENT_POM=true</arg>
            <arg>-ARX_MICRO_STRICT_MODE=false</arg>
        </compilerArgs>
    </configuration>
</plugin>|
Note that it is necessary to add the The common format is as follows: |
4.3. Don’t Block Current Thread!
In modern computer architecture, IO operations are the slowest ones. As a result, when using multithreading programming model, the use of CPU and RAM is extremely inefficient. For a single-user monolithic application such inefficiency is imperceptible. But for a multi-user distributed application with a much higher number of IO operations, this problem generates huge financial costs for additional hardware and coordination between client data streams (Read more: C10k problem).
Therefore, the Event-driven architecture (EDA) is used for efficient use of the hardware resources of a multi-user distributed application.
The most popular Java framework that uses Event-driven architecture for IO operations is Netty. To write efficient programs using Netty, it is necessary to comply with certain rules and restrictions. The most important of these is the following requirement: Don’t block current thread!
The RxMicro framework is a framework that runs on Netty. Therefore, all requirements for applications that utilize Netty also cover the RxMicro framework.
4.3.1. Prohibited Operations
Consequently, when writing microservice applications based on the RxMicro framework, the following operations are prohibited:
-
Data reading from a socket or file in a blocking style using
java.io.InputStreamand child classes. -
Data writing to a socket or file in a blocking style using
java.io.OutputStreamand child classes. -
Interaction with a database using of the blocking driver (all
JDBCdrivers). -
Waiting on a lock or a monitor (
java.util.concurrent.locks.Lock,Object.wait). -
Putting the thread into sleep mode (
Thread.sleep,TimeUnit.sleep). -
Any other blocking operations.
4.3.2. Recommended Approach
The absence of blocking operations in the microservice allows handling many concurrent connections, using a small number of threads and, as a result, to effectively use hardware resources of the computer.
Therefore, when designing microservices via the RxMicro framework, You must follow by the following rule:
When implementing a microservice, if the result can be obtained immediately, it must be returned immediately.
Otherwise, You must return Publisher or CompletableFuture, which will generate the result later.
4.4. Reactive Libraries Support
The RxMicro framework supports the following reactive programming libraries:
4.4.1. Expected Business Process Results
When writing reactive programs, the following 4 expected results of any business process are possible:
-
It is important to complete the business process, but the result is missing or unimportant.
-
The business process returns the result in a single instance or nothing.
-
The business process returns the required result in a single instance.
-
The business process returns the result as
(0 .. n)object stream.
When writing a business service using reactive libraries, it is recommended to comply with the following agreements:
| Reactive Library | java.util.concurrent | Project Reactor | RxJava3 |
|---|---|---|---|
Without result |
CompletableFuture<Void> CompletionStage<Void> |
Mono<Void> |
Completable |
Optional result |
CompletableFuture<Optional<MODEL>> CompletionStage<Optional<MODEL>> |
Mono<MODEL> |
Maybe<MODEL> |
Required result |
CompletableFuture<MODEL> CompletionStage<MODEL> |
Mono<MODEL> |
Single<MODEL> |
Stream result |
CompletableFuture<List<MODEL>> CompletionStage<List<MODEL>> |
Flux<MODEL>, Mono<List<MODEL>> |
Flowable<MODEL>, Single<List<MODEL>> |
|
The following types of results For the Whereas for |
4.4.2. Recommendations for Choosing a Library
General recommendation for choosing a reactive programming library when using the RxMicro framework:
-
If Your microservice contains simple logic, You can use the lightweight and Java-provided java.util.concurrent library, represented by the
CompletableFutureclass and theCompletionStageinterface. -
If Your microservice contains more complex logic, to describe which You need to use complex operators, it is recommended to choose Project Reactor or RxJava.
-
When choosing between the Project Reactor and RxJava follow the recommendations:
-
If You are more familiar with the Project Reactor, then use it, otherwise use RxJava.
-
If You need
r2dbcbased reactive SQL repositories (rxmicro.data.sql.r2dbcmodule), then use the Project Reactor.
(Sincer2dbcdrivers already use the Project Reactor.)
-
Thus, when writing microservices via the RxMicro framework, You can use any Java reactive programming library that You prefer!
|
FYI All libraries support a blocking getting of the result: |
4.5. Base Model
Java applications use java.lang.Object.toString() method very often for debug purposes.
Thus a developer must override this method for all model classes in his(her) project.
To help with overriding of this method for all model classes the RxMicro framework introduces the BaseModel class.
This class uses the reflection to generate string representation of the model class on fly.
public class CustomModel extends BaseModel {

    String string;

    Integer integer;

    //...

    //toString method not necessary!
}|
The |
|
According to where But the |
4.6. Strings Formatting
While developing a software product it is necessary to format strings.
For this purpose, Java provides different approaches:
Mono<? extends Result> executeQuery(final Connection connection,
                                    final Long id) {
    final String sql = "SELECT * FROM account WHERE id = $1"; (1)
    SLF4J_LOGGER.info("SQL: {}", sql); (2)
    return Mono.from(connection.createStatement(sql)
            .bind(0, id)
            .execute())
            .onErrorResume(e -> Mono.error(
                    new IllegalArgumentException(
                            String.format(
                                    "SQL '%s' contains syntax error: %s", sql, e.getMessage() (3)
                            ))
                    )
            );
}| 1 | To generate an SQL query, You need to use $1 placeholder.(This placeholder depends on the used R2DBC driver. For postgresql, it’s a $1 symbol.) |
| 2 | To generate a logging message, You need to use {} placeholder.(This placeholder depends on the logging library used. For SLF4J, it’s a {} symbol.) |
| 3 | To generate an error message, You need to use %s placeholder from a separate utility class, for example
String.format. |
While writing the code, a developer can easily confuse the required placeholder.
To avoid such a problem, the RxMicro framework recommends using the universal ? placeholder
Mono<? extends Result> executeQuery(final Connection connection,
                                    final Long id) {
    final String sql = "SELECT * FROM account WHERE id = ?"; (1)
    RX_MICRO_LOGGER.info("SQL: ?", sql); (2)
    return Mono.from(connection.createStatement(sql)
            .bind(0, id)
            .execute())
            .onErrorResume(e -> Mono.error(
                    new InvalidStateException(
                            "SQL '?' contains syntax error: ?", sql, e.getMessage()) (3)
                    )
            );
}| 1 | To generate an SQL query, You need to use ? placeholder. |
| 2 | To generate a logging message, You need to use ? placeholder. |
| 3 | To generate an error message, You need to use ? placeholder. |
4.7. Encapsulation
When designing Java request and response models, there is a need to protect data from unauthorized modification.
4.7.1. A private Modifier Usage
The standard solution to this problem in Java is using the private modifier:
final class Response {

    private final String message; (1)

    Response(final String message) {
        this.message = requireNonNull(message);
    }
}| 1 | By declaring the message field as private, the developer allows access to this field only from inside the class. |
To violate encapsulation principles when necessary, Java provides powerful reflection mechanism.
The RxMicro framework is aware of this mechanism, so when generating a converter, the framework uses it:
import static rxmicro.$$Reflections.getFieldValue; (1)

public final class $$ResponseModelToJsonConverter extends ModelToJsonConverter<Response> {

    @Override
    public Map<String, Object> toJsonObject(final Response model) {
        final JsonObjectBuilder builder = new JsonObjectBuilder();
        putValuesToBuilder(model, builder);
        return builder.build();
    }

    public void putValuesToBuilder(final Response model,
                                   final JsonObjectBuilder builder) {
        builder.put("message", getFieldValue(model, "message")); (2)
    }
}| 1 | Static import of method that allows reading field value with reflection. |
| 2 | Reading the value of the message field from the response model. |
Using reflection when converting from Java model to JSON model while processing each request can reduce microservice performance, where this problem can be avoided.
Therefore, when compiling this class, the RxMicro Annotation Processor generates a warning message:
[WARNING] Response.java:[27,26] PERFORMANCE WARNING: To read a value from io.rxmicro.example.hello.world.Response.message rxmicro will use the reflection.
It is recommended to add a getter or change the field modifier: from private to default, protected or public.|
If the By default the reflection usage for model classes is not allowed for strict mode! |
4.7.2. A Separate Package Usage
The best and recommended solution to this problem is to create a separate package (e.g. model) and declare all fields of the model classes without any access modifier (i.e. default/package).
Under this approach, fields can be accessed only from classes of the same package.
And the package contains only classes of models without any business logic:
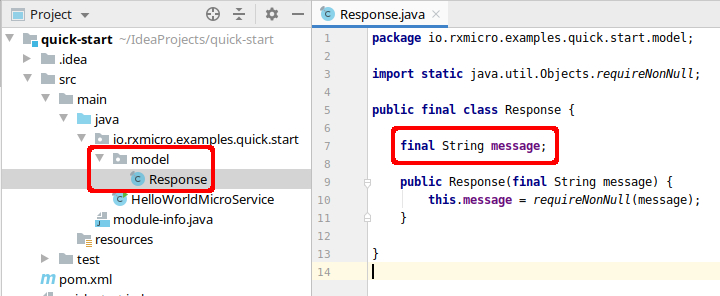
Using model class fields without any access modifier (i.e. default/package) allows You to generate a converter that can read or write a value using direct access to the field by . operator.
4.7.3. A getters Usage
If the simplest logic is required when reading a value from a model field, You can use getter.
To do this, declare the field as private and add getter:
public final class Response {

    private final String message;

    public Response(final String message) {
        this.message = requireNonNull(message);
    }

    public String getMessage() {
        if (message.isEmpty()) {
            return "<Empty>";
        } else {
            return message;
        }
    }
}
In this case, getter will be used in the generated converter to get the result:
public final class $$ResponseModelToJsonConverter extends ModelToJsonConverter<Response> {

    @Override
    public Map<String, Object> toJsonObject(final Response model) {
        final JsonObjectBuilder builder = new JsonObjectBuilder();
        putValuesToBuilder(model, builder);
        return builder.build();
    }

    public void putValuesToBuilder(final Response model,
                                   final JsonObjectBuilder builder) {
        builder.put("message", model.getMessage()); (1)
    }
}| 1 | getter invoking to get the value of the response model field. |
4.7.4. Performance Comparison
Performance test source code:
@Warmup(iterations = 5)
@Measurement(iterations = 5)
@Fork(value = 2, jvmArgsAppend = "-server")
@BenchmarkMode({
        Mode.Throughput,
        Mode.AverageTime,
        Mode.SingleShotTime
})
@State(Scope.Benchmark)
@OutputTimeUnit(MILLISECONDS)
@Threads(1)
public class ReadWriteFieldBenchmark {

    private final CustomClass customClass = new CustomClass("text");

    private final Map<Class<?>, Map<String, Field>> cache = new HashMap<>();

    public ReadWriteFieldBenchmark() {
        try {
            final Field field = CustomClass.class.getDeclaredField("value");
            if (!field.canAccess(customClass)) {
                field.setAccessible(true);
            }
            cache.put(CustomClass.class, new HashMap<>(Map.of("value", field)));
        } catch (final NoSuchFieldException e) {
            throw new RuntimeException(e);
        }
    }

    @Benchmark
    public void readDirectField() {
        var v = customClass.value;
    }

    @Benchmark
    public void writeDirectField() {
        customClass.value = "string";
    }

    @Benchmark
    public void readUsingGetter() {
        var v = customClass.getValue();
    }

    @Benchmark
    public void writeUsingSetter() {
        customClass.setValue("string");
    }

    @Benchmark // read field value using reflection with field search at the cache
    public void readUsingReflection() throws IllegalAccessException {
        var v = cache.get(CustomClass.class).get("value").get(customClass);
    }

    @Benchmark // write field value using reflection with field search at the cache
    public void writeUsingReflection() throws IllegalAccessException {
        cache.get(CustomClass.class).get("value").set(customClass, "string");
    }
}
Performance test results:
Benchmark                                       Mode  Cnt       Score       Error   Units
ReadWriteFieldBenchmark.readDirectField         thrpt   10  753348.188 ± 90286.947  ops/ms
ReadWriteFieldBenchmark.readUsingGetter         thrpt   10  764112.155 ± 94525.371  ops/ms
ReadWriteFieldBenchmark.readUsingReflection     thrpt   10   26241.478 ±  3838.172  ops/ms
ReadWriteFieldBenchmark.writeDirectField        thrpt   10  344623.904 ± 18961.759  ops/ms
ReadWriteFieldBenchmark.writeUsingReflection    thrpt   10   19430.735 ±  2135.813  ops/ms
ReadWriteFieldBenchmark.writeUsingSetter        thrpt   10  323596.205 ± 28416.707  ops/ms
ReadWriteFieldBenchmark.readDirectField          avgt   10      ≈ 10⁻⁶               ms/op
ReadWriteFieldBenchmark.readUsingGetter          avgt   10      ≈ 10⁻⁶               ms/op
ReadWriteFieldBenchmark.readUsingReflection      avgt   10      ≈ 10⁻⁴               ms/op
ReadWriteFieldBenchmark.writeDirectField         avgt   10      ≈ 10⁻⁶               ms/op
ReadWriteFieldBenchmark.writeUsingReflection     avgt   10      ≈ 10⁻⁴               ms/op
ReadWriteFieldBenchmark.writeUsingSetter         avgt   10      ≈ 10⁻⁶               ms/op
ReadWriteFieldBenchmark.readDirectField            ss   10       0.001 ±     0.001   ms/op
ReadWriteFieldBenchmark.readUsingGetter            ss   10       0.001 ±     0.001   ms/op
ReadWriteFieldBenchmark.readUsingReflection        ss   10       0.008 ±     0.005   ms/op
ReadWriteFieldBenchmark.writeDirectField           ss   10       0.002 ±     0.001   ms/op
ReadWriteFieldBenchmark.writeUsingReflection       ss   10       0.011 ±     0.008   ms/op
ReadWriteFieldBenchmark.writeUsingSetter ss 10 0.001 ± 0.001 ms/op|
Test results show that reading/writing by a direct reference or via |
4.7.5. Approach Selection Recommendations
|
Thus, the RxMicro framework uses the following algorithm to read (write) from the fields of the Java model:
|
To benefit from the encapsulation advantages when designing microservices via the RxMicro framework, follow the recommendations:
When creating request and response models, use a separate package and default/package access modifier!
If the simplest logic of reading (writing) the value of the model field is required, use getter (setter) and
private field access modifier.
Do not use the private modifier to access the model field without getter (setter)!
This approach offers no benefits!
|
If the By default the reflection usage for model classes is not allowed for strict mode! |
4.8. Configuration
The RxMicro framework provides the rxmicro.config module for flexible configuration of microservices to any environment.
This module provides the following features:
-
Support for different types of configuration sources: files, classpath resources, environment variables, command line arguments, etc.;
-
Inheritance and redefinition of settings from different configuration sources;
-
Changing the order in which the configuration sources are read;
-
Configuration using annotations and Java classes.
4.8.1. Basic Structure of the Config Module
Each class that extends the
Config
abstract class is a configuration class.
Each configuration class defines its own namespace. Each namespace clearly defines the corresponding configuration class. The namespace is necessary to set the settings of the configuration class fields in text form. (Further details will be described below.)
To work with configurations, the RxMicro framework provides the
Configs configuration manager.
To read the current settings, You must use the
Configs.getConfig(Class<T>) method:
public final class ReadConfigMicroService {

    @GET("/")
    void readHttpServerPort() {
        final HttpServerConfig config = getConfig(HttpServerConfig.class); (1)
        System.out.println("HTTP server port: " + config.getPort());
    }

    public static void main(final String[] args) {
        startRestServer(ReadConfigMicroService.class);
    }
}| 1 | Getting the current HTTP server configuration using the Configs.getConfig static method. |
To change the standard configuration settings, You must use the
Configs.Builder class:
public final class CustomizeConfigMicroService {

    @GET("/")
    void test() {
        // do something
    }

    public static void main(final String[] args) {
        new Configs.Builder()
                .withConfigs(new HttpServerConfig()
                        .setPort(9090)) (1)
                .build(); (2)
        startRestServer(CustomizeConfigMicroService.class); (3)
    }
}| 1 | Setting the HTTP server custom port. |
| 2 | Creating the configuration manager object. |
| 3 | REST-based microservice should be started after configuration manager settings, otherwise changes will not take effect. |
|
Each subsequent invocation of the It means that if the developer creates several |
|
The project source code used in the current subsection is available at the following link: |
|
When compiling, the RxMicro framework searches for When changing the |
|
Settings customization via the |
4.8.2. Configuration Types
The RxMicro framework supports the following configuration types:
-
Configuration using
classpathresources. -
Configuration using
propertiesfiles. -
Configuration using environment variables.
-
Configuration using Java system properties.
-
Configuration using Java classes.
-
Configuration using Java annotations.
-
Configuration using command line arguments.
4.8.2.1. Configuration Using classpath Resources.
The RxMicro framework supports shared and separate classpath resources for the external configuration in relation to the microservice source code.
The only supported classpath resource format is the properties file format.
4.8.2.1.1. Configuration Using Separate classpath Resource.
If the classpath of the current project contains the http-server.properties resource with the following content:
port=9090 (1)| 1 | Custom port for HTTP server. |
then the RxMicro framework when reading the HttpServerConfig class configuration will read this resource:
2020-01-11 12:44:27.518 [INFO] io.rxmicro.rest.server.netty.internal.component.NettyServer :
Server started at 0.0.0.0:9090 using NETTY transport in 500 millis. (1)| 1 | The HTTP server has started at the 9090 port instead of the standard 8080 port. |
|
The The default namespace for the configuration class is calculated using the
|
4.8.2.1.2. Configuration Using Shared classpath Resource.
If the classpath of the current project contains the rxmicro.properties resource with the following content:
http-server.port=9090 (1)| 1 | Custom port for HTTP server. |
then the RxMicro framework when reading the HttpServerConfig class configuration will read this resource:
2020-01-11 12:44:27.518 [INFO] io.rxmicro.rest.server.netty.internal.component.NettyServer :
Server started at 0.0.0.0:9090 using NETTY transport in 500 millis. (1)| 1 | The HTTP server has started at the 9090 port instead of the standard 8080 port. |
|
The The |
Since the rxmicro.properties resource is a shared resource for any configuration, You must specify a namespace when specifying the settings.
|
That’s why when specifying the HTTP server port, You should specify the That means instead of |
4.8.2.2. Configuration Using properties Files.
Similar to classpath resources, the RxMicro framework also supports shared and separate properties files for the external configuration in relation to the microservice source code.
Configuration files can be located:
-
in the current directory in relation to the microservice;
-
in the
$HOMEdirectory:-
for Linux platform the
$HOMEdirectory is/home/$USERNAME; -
for MacOS platform the
$HOMEdirectory is/Users/$USERNAME; -
for Windows platform the
$HOMEdirectory isC:\Documents and Settings\%USERNAME%orC:\Users\%USERNAME%.
-
-
in the default rxmicro config directory:
$HOME/.rxmicro/(predefined name and location).
(Using$HOME/.rxmicro/directory instead of$HOMEone allows configuring this directory as docker or kubernetes volume.)
|
To find out the location of the |
By default, the function of searching and reading configuration files is disabled in the RxMicro framework!
To activate this function, You must use the Configs.Builder class:
new Configs.Builder()
        .withAllConfigSources() (1)
.build();| 1 | Activation of all available configuration sources for the current microservice. |
|
Besides activating all available sources, it is possible to activate only configuration files in a given location. For details on how to do this, go to the Section 4.8.3.2, “Custom Reading Order of Config Sources.”. |
4.8.2.2.1. Configuration Using Separate properties File.
If the current directory (or $HOME, or $HOME/.rxmicro/) directory contains the http-server.properties file with the following content
port=9090 (1)| 1 | Custom port for HTTP server. |
then the RxMicro framework when reading the HttpServerConfig class configuration will read this file:
2020-01-11 12:44:27.518 [INFO] io.rxmicro.rest.server.netty.internal.component.NettyServer :
Server started at 0.0.0.0:9090 using NETTY transport in 500 millis. (1)| 1 | The HTTP server has started at the 9090 port instead of the standard 8080 port. |
|
The The default namespace for the configuration class is calculated using the
|
4.8.2.2.2. Configuration Using Shared properties File.
If the current directory (or $HOME, or $HOME/.rxmicro/) directory contains the rxmicro.properties file with the following content
http-server.port=9090 (1)| 1 | Custom port for HTTP server. |
then the RxMicro framework when reading the HttpServerConfig class configuration will read this resource:
2020-01-11 12:44:27.518 [INFO] io.rxmicro.rest.server.netty.internal.component.NettyServer :
Server started at 0.0.0.0:9090 using NETTY transport in 500 millis. (1)| 1 | The HTTP server has started at the 9090 port instead of the standard 8080 port. |
|
The The |
Since the rxmicro.properties file is a shared file for any configuration, You must specify a namespace when specifying the settings.
|
That’s why when specifying the HTTP server port, You should specify the That means instead of |
4.8.2.3. Configuration Using Environment Variables.
When using environment variables, the format of configurations matches the following format:
export ${name-space}.${property-name} = ${value}:
export http-server.port=9090 (1)

java -p ./classes:lib -m examples.quick.start/io.rxmicro.examples.quick.start.HelloWorldMicroService
2020-01-02 18:49:58.372 [INFO] io.rxmicro.rest.server.netty.internal.component.NettyServer :
Server started at 0.0.0.0:9090 using NETTY transport in 500 millis. (2)| 1 | Setting the http-server.port environment variable = 9090 (custom port for HTTP server). |
| 2 | The HTTP server has started at the 9090 port instead of the standard 8080 port. |
|
Thus, the format of configurations using environment variables corresponds to the format of |
|
Allowed characters in environment variable names! From The Open Group: These strings have the form name=value; names shall not contain the character '='. For values to be portable across systems conforming to IEEE Std 1003.1-2001, the value shall be composed of characters from the portable character set (except NUL and as indicated below). So names may contain any character except Environment variable names used by the utilities in the Shell and Utilities volume of IEEE Std 1003.1-2001 consist solely of uppercase letters, digits, and the '' (underscore) from the characters defined in Portable Character Set and do not begin with a digit. Other characters may be permitted by an implementation; applications shall tolerate the presence of such names._ So for such restricted environment the RxMicro framework supports the following format for environment variable mapping as well:
|
Configuring with environment variables is very convenient when using docker containers!
|
To protect Your secret data, use configuration via properties files instead of environment variables.
The config directory with secret config files (for example |
If it is necessary to separate environment variables used for the configuration of the RxMicro environment from other environment variables,
You must define the standard environment variable with name RX_MICRO_CONFIG_ENVIRONMENT_VARIABLE_PREFIX!
For example if You runtime contains the following environment variable RX_MICRO_CONFIG_ENVIRONMENT_VARIABLE_PREFIX=MY_RUNTIME_
than it is necessary to use
export MY_RUNTIME_HTTP_SERVER_PORT=9090instead of
export HTTP_SERVER_PORT=9090setting for configuring a port for the HTTP server!
4.8.2.4. Configuration Using Java System Properties
When using the Java System Properties, the format of configurations matches the following format:
${name-space}.${property-name} = ${value}:
java -p ./classes:lib \
    -Dhttp-server.port=9090 \ (1)
    -m examples.quick.start/io.rxmicro.examples.quick.start.HelloWorldMicroService

2020-01-02 18:49:58.372 [INFO] io.rxmicro.rest.server.netty.internal.component.NettyServer :
Server started at 0.0.0.0:9090 using NETTY transport in 500 millis. (2)| 1 | Setting the http-server.port Java system variable = 9090 (custom port for HTTP server). |
| 2 | The HTTP server has started at the 9090 port instead of the standard 8080 port. |
|
Thus, the format of configurations using Java system variables corresponds to the format of configuration using environment variables, and also to the format of |
4.8.2.5. Configuration Using Java Classes.
Configuring with Java classes is the easiest and most explicit configuration method:
public static void main(final String[] args) {
    new Configs.Builder()
            .withConfigs(new HttpServerConfig()
                    .setPort(9090)) (1)
            .build();
    startRestServer(MicroService.class);
}| 1 | Changing the HTTP server port. |
2020-01-02 18:49:58.372 [INFO] io.rxmicro.rest.server.netty.internal.component.NettyServer :
Server started at 0.0.0.0:9090 using NETTY transport in 500 millis. (1)| 1 | The HTTP server has started at the 9090 port instead of the standard 8080 port. |
|
The main difference between this type of configuration and the others is that when using Java classes, other configuration sources are always ignored! |
Therefore this type is recommended to be used ONLY for test purposes!
(It does not have enough flexibility for the production environment!)
For the production environment, use the configuration with annotations instead of the configuration with Java classes!
4.8.2.6. Configuration Using Java Annotations.
To override the default value, the RxMicro framework provides the
@DefaultConfigValue annotation.
@DefaultConfigValue(
        configClass = HttpServerConfig.class,   (1)
        name = "port",                          (2)
        value = "9090"
)
@DefaultConfigValue(
        name = "http-server.host",  (3)
        value = "localhost"
)
module examples.config.annotations { (4)
    requires rxmicro.rest.server.netty;
    requires rxmicro.rest.server.exchange.json;
}| 1 | When overriding the configuration value, You must specify the configuration class. |
| 2 | If the configuration class is specified, the namespace may not be specified. (It means the field of the specified configuration class.) |
| 3 | If no configuration class is specified, the name must contain a namespace. (The namespace allows You to clearly define to which configuration class the specified setting belongs.) |
| 4 | When configuring a microservice project, the annotation must be specified on the module-info.java descriptor.(A microservice project may contain several classes of REST controllers, so the common settings are configured using the module-info.java descriptor rather than the REST controller class.) |
|
Please, pay attention when overriding the default value with the annotations! If You make a mistake when specifying a setting name (this refers to the namespace and field name), no error will occur upon starting! The overridden value will be simply ignored! |
By overriding the default values using the module-info.java descriptor, You can start the microservice.
While reading the configuration of the HttpServerConfig class, the RxMicro framework reads the default values set with annotations:
2020-01-13 13:09:44.236 [INFO] io.rxmicro.rest.server.netty.internal.component.NettyServer :
Server started at localhost:9090 using NETTY transport in 500 millis. (1)| 1 | HTTP server started on localhost:9090 |
|
The project source code used in the current subsection is available at the following link: |
|
The main difference between configuring with annotations and configuring with Java classes is support of the settings inheritance and overriding. In other words, when using configuration via annotations, the RxMicro framework can also read other configuration sources. When using configuration via Java classes, other configuration sources are always ignored. |
|
For the test environment only, the RxMicro framework provides special The source code of the project using the |
@DefaultConfigValue
annotation can be applied to override primitive values only:
-
strings, -
booleans, -
numbers, -
dates, -
times, -
enums.
If You need to override a complex value, it is necessary to use
@DefaultConfigValueSupplier
annotation instead.
|
The source code of the project using the
|
|
When compiling, the RxMicro framework searches for When changing the |
4.8.2.7. Configuration Using Command Line Arguments.
To override configs You can use command line arguments.
This type of configuration has the highest priority and overrides all other types. (Except of configuration using Java classes.)
Configuration using command line arguments is disabled by default.
To enable it is necessary to configure the
Configs configuration manager:
public static void main(final String[] args) {
    new Configs.Builder()
            .withCommandLineArguments(args) (1)
            .build();
    startRestServer(MicroService.class);
}| 1 | Use withCommandLineArguments(args) method to enable the configuration using command line arguments. |
For example, If You want to start HTTP server at 9191 port, You can pass the following command line argument:
java -p ./classes:lib -m examples.quick.start/io.rxmicro.examples.quick.start.HelloWorldMicroService http-server.port=9191Result:
2020-01-02 18:49:58.372 [INFO] io.rxmicro.rest.server.netty.internal.component.NettyServer :
Server started at 0.0.0.0: 9191 using NETTY transport in 500 millis.
4.8.3. Config Sources Setting
The RxMicro framework allows You to customize the order in which the configuration sources are read.
With this feature, the RxMicro framework automatically supports inheritance and redefinition of launch configurations.
4.8.3.1. Default Reading Order of Config Sources.
By default, the RxMicro framework reads configuration sources in the following order:
-
Configuration using
@DefaultConfigValueannotations; -
Configuration using the
rxmicro.propertiesclasspath resource; -
Configuration using the separate (
${name-space}.properties) classpath resource; -
Configuration using environment variables;
-
Configuration using Java system variables;
Thus, if there are two classpath resources for a microservice:
The rxmicro.properties resource with the following content:
http-server.port=9090
http-server.host=localhost
and the http-server.properties resource with the following content:
port=9876then the result will be as follows:
2020-01-11 16:52:26.797 [INFO] io.rxmicro.rest.server.netty.internal.component.NettyServer :
Server started at localhost:9876 using NETTY transport in 500 millis. (1)| 1 | HTTP server has started at localhost:9876. |
The configuration reading algorithm for the above example is as follows:
-
By default, the HTTP server should start at
0.0.0.0:8080. -
But in the
rxmicro.propertiesclasspath resource there is a different IP address and port:localhost:9090. -
If the
http-server.propertiesclasspath resource had not existed, the HTTP server would have run atlocalhost:9090. -
But in the
http-server.propertiesclasspath resource it is specified the9876port. -
Therefore, when starting, the IP address is inherited from the
rxmicro.propertiesresource and the overridden port value is read from thehttp-server.propertiesresource.
(This behavior corresponds to the order of reading the default configurations.)
4.8.3.2. Custom Reading Order of Config Sources.
To change the order of the configuration reading it is necessary to use the
Configs.Builder.withOrderedConfigSources(ConfigSource…) method:
public static void main(final String[] args) {
    new Configs.Builder()
            .withOrderedConfigSources(
                    SEPARATE_CLASS_PATH_RESOURCE, (1)
                    RXMICRO_CLASS_PATH_RESOURCE   (2)
            )
            .build();
    startRestServer(MicroService.class);
}| 1 | First, it is necessary to read the configuration from the ${name-space}.properties classpath resource (In our case, it’s a http-server.properties) |
| 2 | and then from the rxmicro.properties classpath resource. |
Thus, the order of the configuration reading from classpath resources has been changed in comparison with the default order.
When starting the microservice, the settings from the http-server.properties classpath resource will be overwritten by the settings from the rxmicro.properties classpath resource:
2020-01-11 16:52:26.797 [INFO] io.rxmicro.rest.server.netty.internal.component.NettyServer :
Server started at localhost:9090 using NETTY transport in 500 millis. (1)| 1 | HTTP server has started at localhost:9090. |
|
The
In the above example, the RxMicro framework will ignore any configuration sources except classpath resources! |
The
Configs.Builder.withOrderedConfigSources(ConfigSource…)
method is universal.
The RxMicro framework also provides other additional methods:
-
Configs.Builder.withAllConfigSources()- activation of all configuration types in the order given by the list:ConfigSource -
Configs.Builder.withContainerConfigSources()- this combination is recommended for microservices operating in docker or kubernetes.
|
The
If You plan to use only
The order of reading is set by the argument order of the
|
|
If You know exactly which configuration sources should be used by the microservice, ALWAYS specify them explicitly! With this approach, at the microservice starting, the RxMicro framework won’t try to search for non-existent sources, spending precious microseconds! |
4.8.3.3. Logging the Config Reading Process
To debug the configuration reading process You can activate the logger:
.level=INFO
io.rxmicro.config.level=DEBUG (1)| 1 | For all classes and subpackages of the io.rxmicro.config package activate the DEBUG(FINE) logging level. |
After activating the logger, the start of the microservice with default settings will be as follows:
[DEBUG] Discovering properties for 'rest-server' namespace from sources: [DEFAULT_CONFIG_VALUES, RXMICRO_CLASS_PATH_RESOURCE, SEPARATE_CLASS_PATH_RESOURCE, ENVIRONMENT_VARIABLES, JAVA_SYSTEM_PROPERTIES]

[DEBUG] Classpath resource not found: rest-server.properties

[DEBUG] All properties discovered for 'rest-server' namespace (1)

[DEBUG] Discovering properties for 'http-server' namespace from sources: [DEFAULT_CONFIG_VALUES, RXMICRO_CLASS_PATH_RESOURCE, SEPARATE_CLASS_PATH_RESOURCE, ENVIRONMENT_VARIABLES, JAVA_SYSTEM_PROPERTIES]

[DEBUG] Discovered properties from 'rxmicro.properties' classpath resource: [http-server.port=9090, http-server.host=localhost] (2)

[DEBUG] Discovered properties from 'http-server.properties' classpath resource: [port=9876] (3)

[DEBUG] All properties discovered for 'http-server' namespace

[DEBUG] Discovering properties for 'netty-rest-server' namespace from sources: [DEFAULT_CONFIG_VALUES, RXMICRO_CLASS_PATH_RESOURCE, SEPARATE_CLASS_PATH_RESOURCE, ENVIRONMENT_VARIABLES, JAVA_SYSTEM_PROPERTIES]

[DEBUG] Classpath resource not found: netty-rest-server.properties

[DEBUG] All properties discovered for 'netty-rest-server' namespace (4)

[INFO] Server started at 0.0.0.0:9876 using NETTY transport in 500 millis. (5)| 1 | There is no configuration customization for the rest-server namespace, so the default configuration will be used. |
| 2 | Configuration reading for the http-server namespace from the rxmicro.properties classpath resource (Read values: http-server.port=9090, http-server.host=localhost). |
| 3 | Configuration reading for the http-server namespace from the http-server.properties classpath resource (Read value: port=9876). |
| 4 | There is no configuration customization for the netty-rest-server namespace, so the default configuration will be used. |
| 5 | HTTP server has started at localhost:9876. |
Additional debugging information will show the order of reading the configuration sources and overriding the configuration parameter values!
4.8.4. Dynamic Configuration
If Your runtime environment can contain dynamic properties You can use AsMapConfig configuration:
public final class DynamicAsMapConfig extends AsMapConfig {
}
If the rxmicro.properties classpath resource with the following content exists:
dynamic.bigDecimal=3.1423456676
dynamic.bigInteger=9999999999999999999999999999999999999999999999999
dynamic.boolean=true
dynamic.integer=34
dynamic.string=staging
then the following code will return configured dynamic parameters:
public static void main(final String[] args) {
    final DynamicAsMapConfig config = getConfig(DynamicAsMapConfig.class);

    System.out.println(config.getBigDecimal("bigDecimal"));
    System.out.println(config.getBigInteger("bigInteger"));
    System.out.println(config.getBoolean("boolean"));
    System.out.println(config.getInteger("integer"));
    System.out.println(config.getString("string"));
}
4.8.5. User Defined Configurations
The developer can use the configuration module for custom configurations.
To do this, it is necessary to create a separate class:
public final class BusinessServiceConfig extends Config {

    private boolean production = true;

    public boolean isProduction() {
        return production;
    }

    public BusinessServiceConfig setProduction(final boolean production) {
        this.production = production;
        return this;
    }
}|
The custom configuration class must meet the following requirements: |
Since this class will be created and initialized by the reflection util classes from rxmicro.reflection module automatically, it is necessary to export the package of the custom config class to this module in the module-info.java descriptor.
(These are the JPMS requirements.)
module examples.config.custom {
    requires rxmicro.rest.server.netty;
    requires rxmicro.rest.server.exchange.json;

    exports io.rxmicro.examples.config.custom to
            rxmicro.reflection;  (1)
}| 1 | Allow the access of reflection util classes from rxmicro.reflection module to config classes from the io.rxmicro.example.config.custom package. |
After these changes, a class of custom configurations is available for use:
final class MicroService {

    @GET("/")
    void test() {
        final BusinessServiceConfig config = getConfig(BusinessServiceConfig.class);
        System.out.println("Production: " + config.isProduction());
    }
}
The production flag can now be set using any type of configuration, for example using the classpath of the business-service.properties resource:
production=false|
The project source code used in the current subsection is available at the following link: |
|
When compiling, the RxMicro framework searches for When changing the |
4.8.6. Supported Parameter Types
The RxMicro framework supports the primitive, custom and container types, which can be config parameters for any configuration.
4.8.6.1. Supported Primitive Parameter Types
The RxMicro framework supports the following primitive Java types:
-
? extends Enum<?>; -
boolean; -
java.lang.Boolean; -
byte; -
java.lang.Byte; -
short; -
java.lang.Short; -
int; -
java.lang.Integer; -
long; -
java.lang.Long; -
java.math.BigInteger; -
float; -
java.lang.Float; -
double; -
java.lang.Double; -
java.math.BigDecimal; -
char; -
java.lang.Character; -
java.lang.CharSequence; -
java.lang.String; -
java.time.Instant; -
java.time.LocalDate; -
java.time.LocalDateTime; -
java.time.LocalTime; -
java.time.MonthDay; -
java.time.OffsetDateTime; -
java.time.OffsetTime; -
java.time.Year; -
java.time.YearMonth; -
java.time.ZonedDateTime; -
java.time.Duration; -
java.time.ZoneOffset; -
java.time.ZoneId; -
java.time.Period; -
java.nio.file.Path;
|
For temporal classes the RxMicro framework uses |
4.8.6.2. Supported Custom Parameter Types
The RxMicro framework supports a custom type as valid config parameter type.
For example if Your project contain the following custom type:
public interface CustomType {

    String getValue();
}
then Your custom config class can use this type as valid config parameter type:
public final class ExampleConfig extends Config {

    private CustomType type = () -> "DEFAULT_CONSTANT";

    public CustomType getType() {
        return type;
    }

    public void setType(final CustomType type) {
        this.type = type;
    }
}
Instances of the custom type can be created as:
-
Enum constant:
public enum CustomEnum implements CustomType {

    ENUM_CONSTANT;

    @Override
    public String getValue() {
        return "ENUM_CONSTANT";
    }
}-
Class
public static finalconstant:
public class CustomClass {

    public static final CustomType CLASS_CONSTANT = () -> "CLASS_CONSTANT";
}-
Interface constant:
public interface CustomInterface {

    CustomType INTERFACE_CONSTANT = () -> "INTERFACE_CONSTANT";
}-
Annotation constant:
public @interface CustomAnnotation {

    CustomType ANNOTATION_CONSTANT = () -> "ANNOTATION_CONSTANT";
}
To inform the RxMicro framework which instance must be created and injected to config parameter, it is necessary to use the following syntax:
@${FULL_CLASS_NAME}:${CONSTANT_FIELD_NAME}For example if Your environment contains the following Java system properties:
System.setProperty(
        "enum-constant.type",
        "@io.rxmicro.examples.config.custom.type._enum.CustomEnum:ENUM_CONSTANT"
);
System.setProperty(
        "class-constant.type",
        "@io.rxmicro.examples.config.custom.type._class.CustomClass:CLASS_CONSTANT"
);
System.setProperty(
        "interface-constant.type",
        "@io.rxmicro.examples.config.custom.type._interface.CustomInterface:INTERFACE_CONSTANT"
);
System.setProperty(
        "annotation-constant.type",
        "@io.rxmicro.examples.config.custom.type._annotation.CustomAnnotation:ANNOTATION_CONSTANT"
);
and Your application read configuration for all configured namespaces:
System.out.println(
        "Default constant: " +
                getConfig(ExampleConfig.class).getType().getValue()
);
System.out.println(
        "Enum constant: " +
                getConfig("enum-constant", ExampleConfig.class).getType().getValue()
);
System.out.println(
        "Class constant: " +
                getConfig("class-constant", ExampleConfig.class).getType().getValue()
);
System.out.println(
        "Interface constant: " +
                getConfig("interface-constant", ExampleConfig.class).getType().getValue()
);
System.out.println(
        "Annotation constant: " +
                getConfig("annotation-constant", ExampleConfig.class).getType().getValue()
);
Result will be the following:
Default constant: DEFAULT_CONSTANT
Enum constant: ENUM_CONSTANT
Class constant: CLASS_CONSTANT
Interface constant: INTERFACE_CONSTANT
Annotation constant: ANNOTATION_CONSTANT|
For class or interface or annotation constants the RxMicro framework uses the The RxMicro team recommends using an enum for custom type injection to config instances! |
4.8.6.3. Supported Container Parameter Types
The RxMicro framework supports the following container Java types:
-
java.util.List<V>; -
java.util.Set<V>; -
java.util.SortedSet<V>; -
java.util.Map<K, V>;
where K and V can be:
-
java.lang.Boolean; -
java.lang.Long; -
java.math.BigDecimal; -
java.lang.String; -
CUSTOM_TYPE.
|
The RxMicro framework uses |
The RxMicro framework uses reflection to initialize config instances.
But container parametrization types are not available for the reflection reading.
Thus the RxMicro framework tries to guess which type must be created using the following algorithm:
-
Try to convert to
java.lang.Booleantype. If failed then goto2step. -
Try to convert to
java.math.BigDecimaltype. If failed then goto3step. -
Try to convert to
java.lang.Longtype. If failed then goto4step. -
Try to convert to
CUSTOM_TYPE. If failed then goto5step. -
Return
java.lang.Stringinstance.
This means that if You provide a config list with different types, the RxMicro framework create a java.util.List with different types:
For example:
list=red,1.2,4,truethe result will be:
java.util.List.of(new String("red"), new BigDecimal("1.2"), Long.valueOf(4), Boolean.valueOf(true));and the ClassCastException will be thrown if Your config parameter is not of java.util.List<java.lang.Object> type.
To avoid the ClassCastException use the following recommendation:
-
For
booleanlists usejava.util.List<java.lang.Boolean>type. -
For
integer numberlists usejava.util.List<java.lang.Long>type. -
For
decimal numberlists usejava.util.List<java.math.BigDecimal>type. -
For
stringlists usejava.util.List<java.lang.String>type. -
For
custom typelists usejava.util.List<CUSTOM_TYPE>type.
|
DON’T USE ANY OTHER TYPES FOR COLLECTION PARAMETRIZATION! |
4.8.7. Configuration Verifiers
If Your runtime has complex configuration the RxMicro team strong recommends enabling runtime strict mode.
If the runtime strict mode activated the RxMicro runtime invokes additional checks to find unused or redundant configurations.
To enable the runtime strict mode set RX_MICRO_RUNTIME_STRICT_MODE environment variable to the true value!
(Instead of environment variable You can use Java System property as well.)
If runtime strict mode successful activated the following log message can be found:
[INFO] RxMicroRuntime !!! RxMicro Runtime Strict Mode is activated !!!4.9. Logger
Logger is an integral component of any software system.
The RxMicro framework provides the rxmicro.logger module for logging important events during the work of microservices.
Creation and usage of a logger in the source code is no different from other logging frameworks:
final class MicroService {

    private static final Logger LOGGER = LoggerFactory.getLogger(MicroService.class); (1)

    @GET("/")
    void test() {
        LOGGER.info("test message"); (2)
    }
}| 1 | Logger creation for the current microservice class. |
| 2 | Logging of a message with INFO level. |
The Logger interface is an abstraction over the real logger.
At the moment, there is only one implementation of this interface that delegates logging to the
java.logging module.
4.9.1. Logger Configuration
4.9.1.1. Using Configuration File
The main configuration file of the java.logging logger is the jul.properties classpath resource.
|
If classpath contains the This function allows configuring the logger for a test environment. |
The jul.properties classpath resource must contain a configuration in the standard format for the java.logging module.
Example of logger configuration:
.level=INFO
io.rxmicro.config.level=DEBUG|
The Therefore, in the This option makes it possible to use unsupported but widely used in other logging frameworks logging levels for the |
4.9.1.2. Default Reading Order of Config Sources.
By default, the rxmicro.logger module reads configuration sources in the following order (From the lowest to the highest priority):
-
Default config.
-
Configuration from the
jul.propertiesclasspath resource if the resource found. -
Configuration from the
jul.test.propertiesclasspath resource if the resource found.
4.9.1.3. Using Additional Config Sources for Logging Configuration
Besides jul.properties and jul.test.properties classpath resources the rxmicro.logger module supports the following configuration sources:
-
Configuration using environment variables;
-
Configuration using Java system properties;
-
Configuration using properties file that is located at the following paths:
-
./jul.properties; -
$HOME/jul.properties; -
$HOME/.rxmicro/jul.properties;
-
|
where
|
To enable the additional config sources use the
LoggerConfigSources class:
(1)
static {
    LoggerConfigSources.setLoggerConfigSources(
            LoggerConfigSource.DEFAULT,
            LoggerConfigSource.CLASS_PATH_RESOURCE,
            LoggerConfigSource.TEST_CLASS_PATH_RESOURCE,
            LoggerConfigSource.FILE_AT_THE_HOME_DIR,
            LoggerConfigSource.FILE_AT_THE_CURRENT_DIR,
            LoggerConfigSource.FILE_AT_THE_RXMICRO_CONFIG_DIR,
            LoggerConfigSource.ENVIRONMENT_VARIABLES,
            LoggerConfigSource.JAVA_SYSTEM_PROPERTIES
    );
}

private static final Logger LOGGER = LoggerFactory.getLogger(LoggerConfigSourceTest.class);

public static void main(final String[] args) {
    LOGGER.info("Hello World!");
}| 1 | - The logger config sources must be configured before the first usage of the
LoggerFactory,
otherwise these config settings will be ignored. |
|
If You know exactly which configuration sources should be used by the microservice, ALWAYS specify them explicitly! With this approach, at the microservice starting, the RxMicro framework won’t try to search for non-existent sources, spending precious microseconds! |
4.9.1.4. Using Environment Variables And Java System Properties
After activation of the configuration using environment variables and(or) Java system properties, the RxMicro framework parses environment variables and(or) Java system properties.
If Your runtime contains an environment variable and (or) java system property with name that starts with logger. phrase, the rxmicro.logger module interprets it as configuration.
For example to enable TRACE logger level for MicroServiceLauncher it is necessary to provide one of the following configurations:
-
Example of the configuration using environment variable:
export logger.io.rxmicro.rest.server.level=TRACE

java -p lib:. -m module/package.MicroServiceLauncher
or
-
Example of the configuration using Java system property:
java -p lib:. -Dlogger.io.rxmicro.rest.server.level=TRACE -m module/package.MicroServiceLauncher4.9.2. Logger Handler
By default the INFO logging level is activated for the all loggers.
All logger events are sent to the SystemConsoleHandler
appender, which outputs:
-
Logger events with
ERRORlevel intoSystem.err; -
Logger events with other levels into
System.out.
|
The If these functions are not enough You can use any other logging framework:
P.S. You can use also the |
If the SystemConsoleHandler
appender must output all logging information into System.out or System.err it is necessary to set stream parameter:
-
To enable
System.erroutput for the all log levels use the following configuration:
io.rxmicro.logger.jul.SystemConsoleHandler.stream=stderror
-
To enable
System.outoutput for the all log levels use the following configuration:
io.rxmicro.logger.jul.SystemConsoleHandler.stream=stdout
|
To get more information about the configuration of the
|
4.9.3. Pattern Formatter
The current version of the rxmicro.logger module is supported only one logger formatter:
PatternFormatter with the default configuration:
io.rxmicro.logger.jul.PatternFormatter.pattern=%d{yyyy-MM-dd HH:mm:ss.SSS} [%p] %c: %m%nThis class supports conversion specifiers that can be used as format control expressions.
Each conversion specifier starts with a percent sign % and is followed by optional format modifiers, a conversion word and optional parameters between braces.
The conversion word controls the data field to convert, e.g. logger name or date format.
The PatternFormatter supports the following conversion specifiers:
| Conversion specifiers | Description | |||||||||||||||
|---|---|---|---|---|---|---|---|---|---|---|---|---|---|---|---|---|
c |
Outputs the name of the logger at the origin of the logging event. The following table describes option usage results:
|
|||||||||||||||
C |
Outputs the fully-qualified class name of the caller issuing the logging request. The following table describes option usage results:
Generating the caller class information is not particularly fast. Thus, its use should be avoided unless execution speed is not an issue! |
|||||||||||||||
d |
Used to output the date of the logging event. The following table describes option usage results:
If pattern is missing (For example: |
|||||||||||||||
F |
Outputs the file name of the Java source file where the logging request was issued. Generating the file information is not particularly fast. Thus, its use should be avoided unless execution speed is not an issue! |
|||||||||||||||
L |
Outputs the line number from where the logging request was issued. Generating the file information is not particularly fast. Thus, its use should be avoided unless execution speed is not an issue! |
|||||||||||||||
m |
Outputs the application-supplied message associated with the logging event. |
|||||||||||||||
M |
Outputs the method name where the logging request was issued. Generating the method name is not particularly fast. Thus, its use should be avoided unless execution speed is not an issue. |
|||||||||||||||
n |
Outputs the platform dependent line separator character or characters. This conversion word offers practically the same performance as using non-portable line separator strings such as |
|||||||||||||||
p |
Outputs the level of the logging event. |
|||||||||||||||
r |
Outputs the number of milliseconds elapsed since the start of the application until the creation of the logging event. |
|||||||||||||||
t |
Outputs the name of the thread that generated the logging event. |
|||||||||||||||
id |
Outputs the request id if specified. This specifier displays the request id that retrieved from HTTP request if the request tracing is enabled. |
|
For request tracing feature usage Your code must use the overloaded logger methods with |
4.9.4. Custom Log Event
The RxMicro framework provides a factory method to build a custom logger event:
private static final Logger LOGGER = LoggerFactory.getLogger(LoggerEventBuilderTest.class);

public static void main(final String[] args) {
    final LoggerEventBuilder builder = LoggerFactory.newLoggerEventBuilder();
    builder.setMessage("Hello World!");
    LOGGER.info(builder.build());
}
A custom logger event can be useful if Your log message depends on some parameter.
For example, the following methods implement the same logic:
public void log1(final Throwable throwable,
                 final boolean withStackTrace) {
    final LoggerEventBuilder builder = LoggerFactory.newLoggerEventBuilder()
            .setMessage("Some error message: ?", throwable.getMessage());
    if (withStackTrace) {
        builder.setThrowable(throwable);
    }
    LOGGER.error(builder.build());
}

public void log2(final Throwable throwable,
                 final boolean withStackTrace) {
    if (withStackTrace) {
        LOGGER.error(throwable, "Some error message: ?", throwable.getMessage());
    } else {
        LOGGER.error("Some error message: ?", throwable.getMessage());
    }
}
Besides that a custom logger event allows customizing the following auto detect parameters:
-
Thread id;
-
Thread name;
-
Source class name;
-
Source method name;
-
Source file name;
-
Source line number.
LOGGER.info(
        LoggerFactory.newLoggerEventBuilder()
                .setMessage("Some error message")
                .setThreadName("Test-Thread-Name")
                .setThreadId(34L)
                .setStackFrame("package.Class", "method", "Test.java", 85)
                .setThrowable(throwable)
                .build()
);
4.9.5. Multiline Logs Issue For Docker Environment
By default the docker log driver does not support multiline log data.
It means that if Your microservice prints a stacktrace of any exception to the System.out or System.err each stack trace element will be processed as separate log event.
There are several standard solutions to this problem. The RxMicro framework adds the one of them.
4.9.5.1. Solution From RxMicro Framework
If Your logger configuration contains the following setting:
io.rxmicro.logger.jul.PatternFormatter.singleLine=truethan all multiline log events are processed by the RxMicro framework as single line ones:
i.e. the PatternFormatter
component replaces '\n' character by the "\\n" string before printing it to the System.out or System.err.
(For Windows platform the "\r\n"" character combination will be replaced by "\\r\\n" string!)
4.9.5.2. How To View Original Log Events?
To view original logs You can use the sed util:
docker logs microservice-container | sed -e 's/\\n/\n/g'or
kubectl logs microservice-pod | sed -e 's/\\n/\n/g'To view original logs on Your log aggregation tool if fluentd
open source data collector is used, it is necessary to add the following filter:
<filter exampleTag>
    @type record_transformer
    enable_ruby true
    <record>
        # --- Replace "\n" string by '\n' character ---
        log ${record["log"].gsub("\\n", "\n")}
    </record>
</filter>|
FYI: This filter requires that your log messages are parsed and converted to the json property with |
4.10. JSON
JSON is a widely used message exchange format for distributed applications.
The RxMicro framework provides the rxmicro.json module for low-level and efficient work with this format.
|
Unfortunately JSON format is defined in at least seven different documents: (Read more at Parsing JSON is a Minefield article). So the RxMicro framework implementation of JSON parser can be described using the following test suites: |
|
The RxMicro framework uses classes from the Therefore, a developer should not explicitly use this module! However, the common idea about the capabilities of this module is needed for correct test writing! |
4.10.1. A Mapping Between JSON and Java Types
Since this module is used automatically, it is optimized for machine operations. Therefore, this module doesn’t provide separate classes for JSON types. Instead, standard Java classes are used:
| JSON type | Java type |
|---|---|
|
|
|
|
|
|
|
|
|
|
|
| Java type | JSON type |
|---|---|
|
|
|
|
|
|
|
|
|
|
|
|
|
|
|
|
4.10.2. rxmicro.json Module Usage
To write tests correctly, it is necessary to have a common idea about the rxmicro.json module.
Let’s look at a microservice that returns the result in JSON object format:
final class MicroService {

    @GET("/")
    CompletionStage<Response> produce() {
        return completedStage(new Response());
    }
}
The Response class - Java model of HTTP response in JSON format:
public final class Response {

    final Child child = new Child(); (1)

    final List<Integer> values = List.of(25, 50, 75, 100); (2)

    final String string = "text"; (3)

    final Integer integer = 10; (4)

    final BigDecimal decimal = new BigDecimal("0.1234"); (5)

    final Boolean logical = true; (6)
}| 1 | Nested JSON object. |
| 2 | JSON numeric array. |
| 3 | String data type. |
| 4 | Integer numeric data type. |
| 5 | Floating-point numeric data type. |
| 6 | Logical data type. |
The Child class - Java model of the nested JSON object:
public final class Child {

    final Integer integer = 20;
}|
For simplicity, each response model field is immediately initialized with test data. |
As a result, the microservice returns the following JSON object:
{
  "child": {
    "integer": 20
  },
  "values": [
    25,
    50,
    75,
    100
  ],
  "string": "text",
  "integer": 10,
  "decimal": 0.1234,
  "logical": true
}
While writing REST-based microservice test or integration test, it is necessary to compare the expected JSON response with the one returned by REST-based microservice.
(The response returned by the microservice is available through the
ClientHttpResponse.getBody()method):
@RxMicroRestBasedMicroServiceTest(MicroService.class)
final class MicroServiceTest {
    //..
    @Test
    void Should_return_Response() {
        final ClientHttpResponse response = httpClient.get("/").join();
        final Object actualBody = response.getBody(); (1)
        // ...
    }
}| 1 | The ClientHttpResponse.getBody() method returns the HTTP response body.
Since the REST-based microservice returns a JSON object, this method returns the result as the java.util.Map<String, Object> object. |
Therefore, to compare JSON objects, You need to create the java.util.Map<String, Object> object containing the expected properties of the JSON object:
@RxMicroRestBasedMicroServiceTest(MicroService.class)
final class MicroServiceTest {
    //..
    @Test
    void Should_return_Response() {
        final ClientHttpResponse response = httpClient.get("/").join();
        final Object actualBody = response.getBody(); (1)
        final Object expectedBody = Stream.of(
                Map.entry("child", Map.of(
                        "integer", new io.rxmicro.json.JsonNumber("20")
                )),
                Map.entry("values", List.of(
                        new io.rxmicro.json.JsonNumber("25"),
                        new io.rxmicro.json.JsonNumber("50"),
                        new io.rxmicro.json.JsonNumber("75"),
                        new io.rxmicro.json.JsonNumber("100")
                )),
                Map.entry("string", "text"),
                Map.entry("integer", new io.rxmicro.json.JsonNumber("10")),
                Map.entry("decimal", new io.rxmicro.json.JsonNumber("0.1234")),
                Map.entry("logical", true)
        ).collect(Collectors.toMap(
                Map.Entry::getKey,
                Map.Entry::getValue,
                (u, v) -> u, LinkedHashMap::new
        )); (2)
        assertEquals(expectedBody, actualBody); (3)
    }
}| 1 | A JSON object returned by microservice. |
| 2 | Expected JSON object. |
| 3 | Comparison of JSON objects using the
java.lang.Object.equals() method. |
|
According to the JSON specification, the property order in JSON object is undefined. Thus, the following JSON objects: and are considered to be the same. The RxMicro framework always arranges JSON object properties! Thus, the order of JSON properties always corresponds to the order of fields in the Java model! This allows You to compare JSON objects in the form of |
|
If Your microservice returns the JSON object with unordered properties, use
|
For convenient creation of the expected JSON object, it is recommended to use the
JsonFactory utility class.
This class arranges JSON properties and automatically converts all
java.lang.Number types into the
io.rxmicro.json.JsonNumber type:
@RxMicroRestBasedMicroServiceTest(MicroService.class)
final class MicroServiceTest {

    private BlockingHttpClient blockingHttpClient;

    @Test
    void Should_return_Response() {
        final ClientHttpResponse response = blockingHttpClient.get("/");

        final Object actualBody = response.getBody(); (1)
        final Object expectedBody = jsonObject(
                "child", jsonObject("integer", 20), (4)
                "values", jsonArray(25, 50, 75, 100),   (5)
                "string", "text",
                "integer", 10,
                "decimal", new BigDecimal("0.1234"),
                "logical", true
        ); (2)
        assertEquals(expectedBody, actualBody); (3)
    }
}| 1 | A JSON object returned by microservice. |
| 2 | Expected JSON object. |
| 3 | Comparison of JSON objects using the
java.lang.Object.equals() method. |
| 4 | To create JSON object, it is recommended to use the
JsonFactory.jsonObject method. |
| 5 | To create JSON array, it is recommended to use the
JsonFactory.jsonArray method. |
|
The Therefore in the test You can compare JSON objects by comparing their string representation or using a third-party Java library that supports the JSON format.
(For example, Thus, the RxMicro framework recommends using the |
|
The project source code used in the current subsection is available at the following link: |
4.10.3. Json Wrappers
If you want to work with JSON format using usual Java style, the RxMicro framework provides wrapper classes for JSON object and array:
@RxMicroRestBasedMicroServiceTest(MicroService.class)
final class MicroServiceTestWithWrappers {

    private BlockingHttpClient blockingHttpClient;

    static Stream<Function<ClientHttpResponse, JsonObject>> toJsonObjectWrapperConverterProvider() {
        return Stream.of(
                (1)
                response -> JsonWrappers.toJsonObject(response.getBody()),
                (2)
                response -> JsonWrappers.readJsonObject(response.getBodyAsString(UTF_8))
        );
    }

    @ParameterizedTest
    @MethodSource("toJsonObjectWrapperConverterProvider")
    void Should_return_Response(final Function<ClientHttpResponse, JsonObject> converter) {
        final ClientHttpResponse response = blockingHttpClient.get("/");

        final JsonObject actualBody = converter.apply(response);

        assertEquals(
                new JsonObject()
                        .set("integer", 20),
                actualBody.getJsonObject("child")
        );
        assertEquals(
                new JsonArray()
                        .add(25).add(50).add(75).add(100),
                actualBody.getJsonArray("values")
        );
        assertEquals(
                "text",
                actualBody.getString("string")
        );
        assertEquals(
                10,
                actualBody.getNumber("integer").intValueExact()
        );
        assertEquals(
                new BigDecimal("0.1234"),
                actualBody.getNumber("decimal").bigDecimalValueExact()
        );
        assertTrue(
                actualBody.getBoolean("logical")
        );
    }
}| 1 | - To convert a internal view of JSON object to the JSON wrapper use JsonWrappers.toJsonObject method. |
| 2 | - To convert a string view of JSON object to the JSON wrapper use JsonWrappers.readJsonObject method. |
4.11. Native Transports
The RxMicro framework uses Netty to perform asynchronous non-blocking IO operations.
To increase productivity, Netty allows the use of native transports.
To enable native transports feature, add one of the following dependencies:
<dependency>
    <groupId>io.rxmicro</groupId>
    <artifactId>rxmicro-netty-native-linux</artifactId>
    <version>${rxmicro.version}</version>
</dependency>
<dependency>
<groupId>io.rxmicro</groupId>
<artifactId>rxmicro-netty-native-osx</artifactId>
<version>${rxmicro.version}</version>
</dependency><dependency>
<groupId>io.rxmicro</groupId>
<artifactId>rxmicro-netty-native</artifactId>
<version>${rxmicro.version}</version>
</dependency><dependency>
<groupId>io.rxmicro</groupId>
<artifactId>rxmicro-netty-native-all</artifactId>
<version>${rxmicro.version}</version>
</dependency>-
The
rxmicro-netty-native-linuxdependency adds thenetty-transport-native-epollartifact; -
The
rxmicro-netty-native-osxdependency adds thenetty-transport-native-kqueueartifact; -
The
rxmicro-netty-nativedependency activatesnative transportsfor the current platform:-
in case of the
Linuxcurrent platform, thenetty-transport-native-epollartifact is added; -
in case of the
MacOScurrent platform, thenetty-transport-native-kqueueartifact is added; -
otherwise
native transportsis not activated for the current platform;
-
-
the
rxmicro-netty-native-alldependency adds thenetty-transport-native-epollandnetty-transport-native-kqueueartifacts.
|
Adding a dependency to the microservice project: instead of allows using the Therefore, the |
If native transports has been successfully activated, the information message about the start of the HTTP server will display the corresponding type of transport.
2020-02-02 20:14:11.707 [INFO] io.rxmicro.rest.server.netty.internal.component.NettyServer :
Server started at 0.0.0.0:8080 using EPOLL transport in 500 millis. (1)| 1 | The using EPOLL transport message format means that Netty will use the netty-transport-native-epoll library. |
2020-02-02 20:14:11.707 [INFO] io.rxmicro.rest.server.netty.internal.component.NettyServer :
Server started at 0.0.0.0:8080 using KQUEUE transport in 500 millis. (1)| 1 | The using KQUEUE transport message format means that Netty will use the netty-transport-native-kqueue library. |
5. REST Controller
REST Controller is a class that contains at least one declarative HTTP request handler.
Each REST-based microservice project must contain at least one REST Controller.
(The REST Controller is the entry point for the client.)
To create REST controllers, the RxMicro framework provides the following modules:
-
The
rxmicro.restis a basic module that defines basicRxMicro Annotations, required when using theRESTarchitecture of building program systems; -
The
rxmicro.rest.serveris a basic HTTP server module used to create REST controllers and run REST-based microservices; -
The
rxmicro.rest.server.nettyis an HTTP server implementation module based onNetty; -
The
rxmicro.rest.server.exchange.jsonis a module for converting Java models toJSONformat and vice versa;
|
Due to transit dependencies only two modules usually need to be added to a project:
|
5.1. REST Controller Implementation Requirements.
5.1.1. REST Controller Class Requirements.
REST Controller is a Java class:
import io.rxmicro.rest.method.GET;

final class MicroService {

    @GET("/")
    void requestHandler() {

    }
}
that must meet the following requirements:
-
The class must extend the
java.lang.Objectone. -
The class couldn’t be an
abstractone. -
The class couldn’t be a nested one.
-
The class must contain an accessible (not private) constructor without parameters.
(The last requirement can be ignored if Your project depends onrxmicro.cdimodule.)
|
A REST Controller class must be a public one, only if it contains the method: |
5.1.2. HTTP Request Handler Requirements.
HTTP request handler is a method, that must meet the following requirements:
-
The method couldn’t be a
privateone. -
The method couldn’t be an
abstractone. -
The method couldn’t be a
synchronizedone. -
The method couldn’t be a
staticone. -
The method couldn’t be a
nativeone. -
The method must be annotated by at least one of the following annotations:
-
The method must return a
voidtype or one of the following reactive types: -
If the method returns a reactive type, that this type must be parametrized by a HTTP response model type. (The additional types such as
java.lang.Voidandjava.util.Optionalare supported also. (Read more: Table 2, “Which class from a reactive library must be choose?”)).
|
The
For such cases the HTTP protocol provides the special |
The RxMicro framework supports the following parameter types for the HTTP request handler:
-
Handler without parameters.
(This type is recommended for the simpleststatelessmicroservices without parameters.) -
List of primitive parameters.
(This type is recommended for microservices, the behavior of which depends on 1-2 parameters.) -
Custom class modeling an HTTP request.
(This type is recommended for microservices, the behavior of which depends on 3 or more parameters.)
|
When using the Project Reactor and RxJava reactive libraries, You need:
Adding dependencies to
Adding modules to
|
5.2. RxMicro Annotations
The RxMicro framework supports the following RxMicro Annotations, which are used to create and configure REST Controllers.
| Annotation | Description |
|---|---|
Denotes a method, that must handle a |
|
Denotes a method, that must handle a |
|
Denotes a method, that must handle a |
|
Denotes a method, that must handle a |
|
Denotes a method, that must handle a |
|
Denotes a method, that must handle a |
|
Denotes a method, that must handle a |
|
Denotes a base URL path for the all request handlers at the REST controller. |
|
Denotes a version of the REST controller. |
|
Denotes that a field of Java model class is a HTTP header. |
|
Declares a strategy of header name formation based on Java model field name analysis. (By default, the
|
|
Denotes a static HTTP header that must be added to the response, created by the request handler. |
|
Denotes a static HTTP header that must be set to the response, created by the request handler. |
|
Denotes the header, which name needs to be repeated for each element in the list. (This annotation applies only to fields with the |
|
Denotes that a field of Java model class is a HTTP parameter. |
|
Declares a strategy of parameter name formation based on Java model field name analysis. (By default, the
|
|
Denotes that a field of Java model class is a |
|
Declares the Java model field as a field, in which the RxMicro framework must inject the remote client connection address. |
|
Declares the Java model field as a field, in which the RxMicro framework must inject a method of the received request. (This feature is useful for request logging when one handler supports different HTTP methods.) |
|
Declares the Java model field as a field, in which the RxMicro framework must inject (This feature is useful for request logging using |
|
Declares the Java model field as a field, in which the RxMicro framework must inject a body of the received request. |
|
Indicates to the RxMicro framework that the value of the Java model field should be used as a status code to be sent to the client. |
|
Indicates to the RxMicro framework that the value of the Java model field should be used as a body to be sent to the client. |
|
Declares the Java model field as a field, in which the RxMicro framework must inject a unique request ID. |
|
Declares a status code, which should be sent to the client in case of successful execution of the HTTP request handler. |
|
Declares a message returned by the handler in case of no result. |
|
Allows to configure the process of code generation by the |
|
Activates the |
5.3. Return Types
The HTTP request handler supports two categories of returned results:
-
HTTP response without body;
-
HTTP response with body;
5.3.1. Supported Return Types for HTTP Response without Body
The RxMicro framework supports the following return result types for an HTTP response without body:
final class RestControllerWithoutBody {

    (1)
    @GET("/void/void1")
    void void1() {
        //do something
    }

    @GET("/void/void2")
    void void2(final Request request) {
        //do something with request
    }

    @GET("/void/void3")
    void void3(final String requestParameter) {
        //do something with requestParameter
    }

    (2)

    @GET("/jse/completedFuture1")
    CompletableFuture<Void> completedFuture1() {
        return CompletableFuture.completedFuture(null);
    }

    @GET("/jse/completedFuture2")
    CompletableFuture<Void> completedFuture1(final Request request) {
        return CompletableFuture.completedFuture(null);
    }

    @GET("/jse/completedFuture3")
    CompletableFuture<Void> completedFuture1(final String requestParameter) {
        return CompletableFuture.completedFuture(null);
    }

    (3)

    @GET("/jse/completionStage1")
    CompletionStage<Void> completionStage1() {
        return CompletableFuture.completedStage(null);
    }

    @GET("/jse/completionStage2")
    CompletionStage<Void> completionStage2(final Request request) {
        return CompletableFuture.completedStage(null);
    }

    @GET("/jse/completionStage3")
    CompletionStage<Void> completionStage3(final String requestParameter) {
        return CompletableFuture.completedStage(null);
    }

    (4)

    @GET("/spring-reactor/mono1")
    Mono<Void> mono1() {
        return Mono.just("").then();
    }

    @GET("/spring-reactor/mono2")
    Mono<Void> mono2(final String requestParameter) {
        return Mono.just("").then();
    }

    @GET("/spring-reactor/mono3")
    Mono<Void> mono4(final Request request) {
        return Mono.just("").then();
    }

    (5)

    @GET("/rxjava3/completable1")
    Completable completable1() {
        return Completable.complete();
    }

    @GET("/rxjava3/completable2")
    Completable completable2(final Request request) {
        return Completable.complete();
    }

    @GET("/rxjava3/completable3")
    Completable completable3(final String requestParameter) {
        return Completable.complete();
    }
}| 1 | The void type is supported mainly for test purposes.(The void type can also be applied when the request handler does not use any blocking operations.
In cases where the request handler uses blocking operations, one of the reactive types must be used instead of the void type.) |
| 2 | The CompletableFuture<Void>
type is recommended when using the java.util.concurrent library. |
| 3 | Instead of the CompletableFuture<Void> type, can also be used the
CompletionStage<Void> type. |
| 4 | When using the Project Reactor library, only the
Mono<Void> type can be used. |
| 5 | When using the RxJava library, only the
Completable type can be used. |
All the above mentioned handlers return an HTTP response without body:
@RxMicroRestBasedMicroServiceTest(RestControllerWithoutBody.class)
final class RestControllerWithoutBodyTest {

    private BlockingHttpClient blockingHttpClient;

    @ParameterizedTest
    @ValueSource(strings = {
            "/void/void1",
            "/void/void2",
            "/void/void3",

            "/jse/completedFuture1",
            "/jse/completedFuture2",
            "/jse/completedFuture3",

            "/jse/completionStage1",
            "/jse/completionStage2",
            "/jse/completionStage3",

            "/spring-reactor/mono1",
            "/spring-reactor/mono2",
            "/spring-reactor/mono3",

            "/rxjava3/completable1",
            "/rxjava3/completable2",
            "/rxjava3/completable3"
    })
    void Should_support_HTTP_responses_without_body(final String urlPath) {
        final ClientHttpResponse response = blockingHttpClient.get(urlPath);

        assertTrue(response.isBodyEmpty(), "Body not empty: " + response.getBody()); (1)
    }
}| 1 | When testing all RestControllerWithoutBody class handlers, each handler returns an HTTP response without body. |
|
The RxMicro framework recommends for request handlers that depend on 3 or more
HTTP headers, HTTP parameters or Upon implementation of
HTTP headers, HTTP parameters or |
|
The project source code used in the current subsection is available at the following link: |
|
When compiling, the RxMicro framework searches for When changing the |
5.3.2. Supported Return Types for HTTP Response with Body
The RxMicro framework supports the following return result types for an HTTP response with body:
final class RestControllerWithBody {

    (1)

    @GET("/jse/completedFuture1")
    CompletableFuture<Response> completedFuture1() {
        return CompletableFuture.completedFuture(new Response());
    }

    @GET("/jse/completedFuture2")
    CompletableFuture<Response> completedFuture2(final Request request) {
        return CompletableFuture.completedFuture(new Response());
    }

    @GET("/jse/completedFuture3")
    CompletableFuture<Response> completedFuture3(final String requestParameter) {
        return CompletableFuture.completedFuture(new Response());
    }

    @GET("/jse/completedFuture4")
    CompletableFuture<Optional<Response>> completedFuture4() {
        return CompletableFuture.completedFuture(Optional.of(new Response()));
    }

    @GET("/jse/completedFuture5")
    CompletableFuture<Optional<Response>> completedFuture5(final Request request) {
        return CompletableFuture.completedFuture(Optional.of(new Response()));
    }

    @GET("/jse/completedFuture6")
    CompletableFuture<Optional<Response>> completedFuture6(final String requestParameter) {
        return CompletableFuture.completedFuture(Optional.of(new Response()));
    }

    (2)

    @GET("/jse/completionStage1")
    CompletionStage<Response> completionStage1() {
        return CompletableFuture.completedStage(new Response());
    }

    @GET("/jse/completionStage2")
    CompletionStage<Response> completionStage2(final Request request) {
        return CompletableFuture.completedStage(new Response());
    }

    @GET("/jse/completionStage3")
    CompletionStage<Response> completionStage3(final String requestParameter) {
        return CompletableFuture.completedStage(new Response());
    }

    @GET("/jse/completionStage4")
    CompletionStage<Optional<Response>> completionStage4() {
        return CompletableFuture.completedStage(Optional.of(new Response()));
    }

    @GET("/jse/completionStage5")
    CompletionStage<Optional<Response>> completionStage5(final Request request) {
        return CompletableFuture.completedStage(Optional.of(new Response()));
    }

    @GET("/jse/completionStage6")
    CompletionStage<Optional<Response>> completionStage6(final String requestParameter) {
        return CompletableFuture.completedStage(Optional.of(new Response()));
    }

    (3)

    @GET("/spring-reactor/mono1")
    Mono<Response> mono1() {
        return Mono.just(new Response());
    }

    @GET("/spring-reactor/mono2")
    Mono<Response> mono2(final Request request) {
        return Mono.just(new Response());
    }

    @GET("/spring-reactor/mono3")
    Mono<Response> mono3(final String requestParameter) {
        return Mono.just(new Response());
    }

    (4)

    @GET("/rxjava3/single1")
    Single<Response> single1() {
        return Single.just(new Response());
    }

    @GET("/rxjava3/single2")
    Single<Response> single2(final Request request) {
        return Single.just(new Response());
    }

    @GET("/rxjava3/single3")
    Single<Response> single3(final String requestParameter) {
        return Single.just(new Response());
    }

    @GET("/rxjava3/maybe1")
    Maybe<Response> maybe1() {
        return Maybe.just(new Response());
    }

    @GET("/rxjava3/maybe2")
    Maybe<Response> maybe2(final Request request) {
        return Maybe.just(new Response());
    }

    @GET("/rxjava3/maybe3")
    Maybe<Response> maybe3(final String requestParameter) {
        return Maybe.just(new Response());
    }
}| 1 | The CompletableFuture<MODEL>
type is recommended when using the java.util.concurrent library. |
| 2 | Instead of the CompletableFuture<MODEL> type, can also be used the
CompletionStage<MODEL> type. |
| 3 | When using the Project Reactor library, only the
Mono<MODEL> type can be used. |
| 4 | When using the RxJava library, the
Single<MODEL> or
Maybe<MODEL> can be used. |
|
Note that the reactive types must be parameterized by the HTTP response model class! |
All the above mentioned handlers return an HTTP response with body:
@RxMicroRestBasedMicroServiceTest(RestControllerWithBody.class)
final class RestControllerWithBodyTest {

    private BlockingHttpClient blockingHttpClient;

    @ParameterizedTest
    @ValueSource(strings = {
            "/jse/completedFuture1",
            "/jse/completedFuture2",
            "/jse/completedFuture3",
            "/jse/completedFuture4",
            "/jse/completedFuture5",
            "/jse/completedFuture6",

            "/jse/completionStage1",
            "/jse/completionStage2",
            "/jse/completionStage3",
            "/jse/completionStage4",
            "/jse/completionStage5",
            "/jse/completionStage6",

            "/spring-reactor/mono1",
            "/spring-reactor/mono2",
            "/spring-reactor/mono3",

            "/rxjava3/single1",
            "/rxjava3/single2",
            "/rxjava3/single3",

            "/rxjava3/maybe1",
            "/rxjava3/maybe2",
            "/rxjava3/maybe3"
    })
    void Should_support_HTTP_responses_with_body(final String urlPath) {
        final ClientHttpResponse response = blockingHttpClient.get(urlPath);

        assertEquals(
                jsonObject("message", "Hello World!"), (1)
                response.getBody()
        );
    }
}| 1 | When testing all RestControllerWithBody class handlers, each handler returns an HTTP response containing a JSON object, with the Hello World! message. |
|
The project source code used in the current subsection is available at the following link: |
|
When compiling, the RxMicro framework searches for When changing the |
5.4. Routing of Requests
The RxMicro framework supports request routing based on HTTP method, URL Path and HTTP body:
5.4.1. Routing of Requests Based on HTTP Method
The RxMicro framework allows handling identical HTTP requests, differing only in HTTP method, by different handlers:
final class RoutingUsingHTTPMethod {

    @GET("/")
    void get() {
        System.out.println("GET");
    }

    @HEAD("/")
    void head() {
        System.out.println("HEAD");
    }

    @OPTIONS("/")
    void options() {
        System.out.println("OPTIONS");
    }
}
@RxMicroRestBasedMicroServiceTest(RoutingUsingHTTPMethod.class)
final class RoutingUsingHTTPMethodTest {
private BlockingHttpClient blockingHttpClient;
private SystemOut systemOut;
@ParameterizedTest
@ValueSource(strings = {"GET", "HEAD", "OPTIONS"})
void Should_route_to_valid_request_handler(final String method) {
blockingHttpClient.send(method, "/");
assertEquals(method, systemOut.asString());
}
}|
The project source code used in the current subsection is available at the following link: |
|
When compiling, the RxMicro framework searches for When changing the |
5.4.2. Routing of Requests Based on URL Path
The RxMicro framework allows handling HTTP requests on different URL Paths by different handlers:
final class RoutingUsingUrlPath {

    @GET("/urlPath1")
    void get1() {
        System.out.println("/urlPath1");
    }

    @GET("/urlPath2")
    void get2() {
        System.out.println("/urlPath2");
    }

    @GET("/${type}")
    void get3(final @PathVariable String type) { (1)
        System.out.println("/${type}: " + type);
    }
}| 1 | In addition to static URL Paths, the RxMicro framework also supports path variables. |
@RxMicroRestBasedMicroServiceTest(RoutingUsingUrlPath.class)
final class RoutingUsingUrlPathTest {

    private BlockingHttpClient blockingHttpClient;

    private SystemOut systemOut;

    @ParameterizedTest
    @CsvSource({
            "/urlPath1,     /urlPath1",
            "/urlPath2,     /urlPath2",
            "/urlPath3,     /${type}: urlPath3",
            "/put,          /${type}: put",
            "/get,          /${type}: get"
    })
    void Should_route_to_valid_request_handler(final String urlPath,
                                               final String expectedOut) {
        blockingHttpClient.get(urlPath);
        assertEquals(expectedOut, systemOut.asString());
    }
}|
The project source code used in the current subsection is available at the following link: |
|
When compiling, the RxMicro framework searches for When changing the |
5.4.3. Routing of Requests Based on HTTP Body
Some HTTP methods allows transferring request parameters both in the start line and in the request body.
Therefore, in addition to standard routing types, the RxMicro framework also supports routing based on the HTTP body availability:
final class RoutingUsingHttpBody {

    @GET("/")
    @HEAD("/")
    @OPTIONS("/")
    @DELETE("/")
    @PATCH("/")
    @POST(value = "/", httpBody = false)
    @PUT(value = "/", httpBody = false)
    void handleRequestsWithoutBody(final String parameter) { (1)
        System.out.println("without body");
    }

    @PATCH(value = "/", httpBody = true)
    @POST("/")
    @PUT("/")
    void handleRequestsWithBody(final String parameter) { (2)
        System.out.println("with body");
    }
}| 1 | The request handler with parameters transferred in the start line. |
| 2 | The request handler with parameters transferred in the request body. |
|
For the For the |
@RxMicroRestBasedMicroServiceTest(RoutingUsingHttpBody.class)
final class RoutingUsingHttpBodyTest {

    private BlockingHttpClient blockingHttpClient;

    private SystemOut systemOut;

    @ParameterizedTest
    @ValueSource(strings = {"GET", "HEAD", "POST", "PUT", "PATCH", "OPTIONS", "DELETE"})
    void Should_route_to_handleRequestsWithoutBody(final String method) {
        blockingHttpClient.send(
                method,
                "/?parameter=test" (1)
        );
        assertEquals("without body", systemOut.asString());
    }

    @ParameterizedTest
    @ValueSource(strings = {"POST", "PUT", "PATCH"})
    void Should_route_to_handleRequestsWithBody(final String method) {
        blockingHttpClient.send(
                method,
                "/",
                jsonObject("parameter", "test") (2)
        );
        assertEquals("with body", systemOut.asString());
    }
}| 1 | Parameter transfer in the start line. |
| 2 | Parameter transfer in the request body as JSON object. |
|
The project source code used in the current subsection is available at the following link: |
|
When compiling, the RxMicro framework searches for When changing the |
5.5. Not Found Logic
The RxMicro framework supports Not Found Logic for HTTP request handlers.
To activate this feature it’s necessary to return a reactive type that supports optional result:
final class NotFoundMicroService {

    @GET("/get1")
    CompletableFuture<Optional<Response>> getOptional1(final Boolean found) { (1)
        return completedFuture(found ? Optional.of(new Response()) : Optional.empty());
    }

    @GET("/get2")
    Mono<Response> getOptional2(final Boolean found) { (2)
        return found ? Mono.just(new Response()) : Mono.empty();
    }

    @GET("/get3")
    Maybe<Response> getOptional3(final Boolean found) { (3)
        return found ? Maybe.just(new Response()) : Maybe.empty();
    }
}| 1 | When using CompletableFuture/CompletionStage it is necessary to use the
java.util.Optional contract, since the CompletableFuture/CompletionStage reactive types do not support optional result by default. |
| 2 | Unlike CompletableFuture/CompletionStage, the Mono reactive type supports optional result. |
| 3 | Unlike CompletableFuture/CompletionStage, the Maybe reactive type also supports optional result. |
When handling requests, the RxMicro framework checks the handler result:
-
If the handler returns a response model, the RxMicro framework will convert it to an HTTP response with the
200status and JSON representation of this model. -
If the handler returns an empty result, the RxMicro framework generates an HTTP response with the
404and the standard"Not Found"error message.
@RxMicroRestBasedMicroServiceTest(NotFoundMicroService.class)
final class NotFoundMicroServiceTest {

    private BlockingHttpClient blockingHttpClient;

    @ParameterizedTest
    @ValueSource(strings = {"/get1", "/get2", "/get3"})
    void Should_return_found_response(final String urlPath) {
        final ClientHttpResponse response = blockingHttpClient.get(urlPath + "?found=true");

        assertEquals(jsonObject("message", "Hello World!"), response.getBody()); (1)
        assertEquals(200, response.getStatusCode()); (1)
    }

    @ParameterizedTest
    @ValueSource(strings = {"/get1", "/get2", "/get3"})
    void Should_return_not_found_response(final String urlPath) {
        final ClientHttpResponse response = blockingHttpClient.get(urlPath + "?found=false");

        assertEquals(jsonErrorObject("Not Found"), response.getBody()); (2)
        assertEquals(404, response.getStatusCode()); (2)
    }
}| 1 | In case there is a result, the result is returned in JSON format, and the HTTP response status is 200. |
| 2 | If there is no result, a standard error message is returned, and the HTTP response status is 404. |
The RxMicro framework provides an option to customize the Not Found message:
final class CustomizeNotFoundMicroService {

    @GET("/")
    (1)
    @NotFoundMessage("Custom not found message")
    CompletableFuture<Optional<Response>> getOptional1(final Boolean found) {
        return completedFuture(found ? Optional.of(new Response()) : Optional.empty());
    }
}| 1 | The @NotFoundMessage
annotation allows You to specify a message that will be displayed to the client in case of missing result instead of the standard "Not Found" message. |
@Test
void Should_return_custom_not_found_message() {
    final ClientHttpResponse response = blockingHttpClient.get("/?found=false");

    assertEquals(jsonErrorObject("Custom not found message"), response.getBody()); (1)
    assertEquals(404, response.getStatusCode()); (2)
}| 1 | If there is no result, the
@NotFoundMessage message, which is set by the annotation, is returned. |
| 2 | The HTTP status is 404.(The RxMicro framework does not allow overriding the HTTP status for Not Found logic!) |
|
For more control over the HTTP response generated in case of an error, use exception instead of |
|
The project source code used in the current subsection is available at the following link: |
|
When compiling, the RxMicro framework searches for When changing the |
5.6. Exceptions Usage
Each reactive type of returned request handler result supports two states:
-
Successful completion signal.
-
Completion signal with an error.
The feature of a successful completion signal consists in its uniqueness, i.e. if such a signal has occurred, it ensures successful completion of the business task. The feature of a completion signal with an error is that different types of errors may occur during the execution of the business task:
-
validation error;
-
data source connection error;
-
computational algorithm error, etc.
It means that each request handler can return only one successful result and several results with errors.
So the RxMicro framework introduces the error concept.
An error means any unsuccessful result.
For simplified error handling, the RxMicro framework recommends using HTTP status codes for each error category!
In case the HTTP code status is not sufficient, the RxMicro framework recommends using an additional text description.
For this purpose, the RxMicro framework defines a standard JSON model which is returned in case of any error:
{
  "message": "Not Found"
}
Thus, in case of an error, the client determines the error category basing on HTTP status code analysis. For more information, the client should analyze a text message.
5.6.1. Basic Class of Exceptions
When handling an HTTP request, the RxMicro framework defines the
HttpErrorException base exception class.
All custom exception types must extend this base class!
|
For all child classes which extend the (This behavior is achieved by using the
|
5.6.2. Using the User Defined Exceptions
If the request handler must return an HTTP status code other than the successful one, a separate exception class must be created:
public final class CustomNotFoundException extends HttpErrorException { (1)

    private static final int STATUS_CODE = 404; (2)

    public CustomNotFoundException(final String message) { (3)
        super(STATUS_CODE, message);
    }
}| 1 | The custom exception class must extend the HttpErrorException class. |
| 2 | Each class must define the static int STATUS_CODE field with a status code that identifies the error category.
(This name is constant and is used by the rxmicro.documentation module when building the project documentation.) |
| 3 | If You want to display a detailed message to the client, You need to add the constructor parameter. (If You want to return to the client only the HTTP status without the HTTP body, then create a constructor without parameters.) |
|
The RxMicro framework does not support So if the |
You can use two approaches to return an HTTP status code other than successful one:
final class MicroService {

    @PUT(value = "/business-object-1", httpBody = false)
    CompletableFuture<Void> updateObject1(final Integer id) {
        return failedFuture(new CustomNotFoundException("Object not found by id=" + id)); (1)
    }

    @PUT(value = "/business-object-2", httpBody = false)
    CompletableFuture<Void> updateObject2(final Integer id) {
        throw new CustomNotFoundException("Object not found by id=" + id); (2)
    }
}| 1 | Use the reactive type method to generate a completion signal with an error. |
| 2 | Create and throw an exception instance. |
From the client’s point of view, the two above-mentioned approaches are exactly the same:
@RxMicroRestBasedMicroServiceTest(MicroService.class)
final class MicroServiceTest {

    private BlockingHttpClient blockingHttpClient;

    @ParameterizedTest
    @ValueSource(strings = {"/business-object-1", "/business-object-2"})
    void Should_return_404(final String urlPath) {
        final ClientHttpResponse response = blockingHttpClient.put(urlPath + "?id=0");

        assertEquals(jsonErrorObject("Object not found by id=0"), response.getBody()); (1)
        assertEquals(404, response.getStatusCode()); (2)
    }
}| 1 | As a detailed error message, the message passed to the exception constructor is returned. (The jsonErrorObject("…") utility method is synonymous with the jsonObject("message", "…") method.) |
| 2 | The returned status code equals the status code defined in the exception class in the int STATUS_CODE field. |
|
The project source code used in the current subsection is available at the following link: |
|
When compiling, the RxMicro framework searches for When changing the |
5.6.3. Error Signal Generation Methods
To return an HTTP response with an error it is necessary to use the appropriate reactive type method to generate the error signal.
| Reactive type | Static method |
|---|---|
|
|
|
|
|
|
|
|
|
|
|
|
Using the error signal generation method instead of throwing an exception instance requires writing more code but saves processor resources! So it’s up to You to determine which method to use in Your project! |
5.6.4. Predefined Classes of Exceptions
The RxMicro framework defines the following predefined exception classes:
| Exception class | Status code | Description |
|---|---|---|
|
A base class to inform the client about the need to perform (Instead of using a base class, it is recommended to use one of the following child ones: |
|
A class that signals the need to perform |
||
A class that signals the need to perform |
||
A class signaling that the client has sent a bad request. |
||
A class signaling that an internal error has occurred during execution. |
||
A class signaling that the HTTP response, generated by the request handler, contains validation errors. |
||
A class signaling that the HTTP client didn’t receive a response from the server in given time. |
5.7. Overriding the Status Code
By default, if there are no errors during HTTP request handling, the HTTP server returns the 200 status code.
If You need to change the status code returned by default, You must use the
@SetStatusCode annotation:
final class MicroService {

    @GET("/200")
    void success() {
    }

    @GET("/307")
    @SetStatusCode(307)
    void permanentRedirect() {
    }

    @GET("/404")
    @SetStatusCode(404)
    void notFound() {
    }

    @GET("/500")
    @SetStatusCode(500)
    void internalError() {
    }
}
@RxMicroRestBasedMicroServiceTest(MicroService.class)
final class MicroServiceTest {
private BlockingHttpClient blockingHttpClient;
@ParameterizedTest
@ValueSource(ints = {200, 307, 404, 500})
void Should_return_valid_status_codes(final int expectedStatus) {
final ClientHttpResponse response = blockingHttpClient.get("/" + expectedStatus);
assertEquals(expectedStatus, response.getStatusCode());
}
}|
The project source code used in the current subsection is available at the following link: |
|
When compiling, the RxMicro framework searches for When changing the |
5.8. Redirecting of Requests
The RxMicro framework supports request redirection:
final class MicroService {

    @PUT(value = "/old-url")
    CompletableFuture<Void> redirect() {
        return failedFuture(new PermanentRedirectException("/new-url")); (1)
    }

    (2)
    @PUT(value = "/new-url")
    void put(final String parameter) {
        System.out.println(parameter);
    }
}| 1 | To redirect a request, You need to return the PermanentRedirectException instance, indicating a new URL Path. |
| 2 | Once the HTTP response with request redirection is returned, the HTTP client will automatically repeat the request to a new URL Path. |
|
If temporary redirection is required, the |
|
The predefined redirection classes ( According to the HTTP protocol rules, the HTTP method is preserved at such redirection! |
@RxMicroRestBasedMicroServiceTest(MicroService.class)
final class MicroServiceTest {

    (1)
    @BlockingHttpClientSettings(followRedirects = ENABLED)
    private BlockingHttpClient blockingHttpClient;

    private SystemOut systemOut;

    @Test
    void Should_redirect() {
        blockingHttpClient.put(
                "/old-url",
                jsonObject("parameter", "test")
        ); (2)

        assertEquals("test", systemOut.asString()); (3)
    }
}| 1 | By default, the predefined HTTP client, that is used to perform test requests to the microservice, does not support redirection.
Therefore, automatic redirection must be activated using the @BlockingHttpClientSettings(followRedirects = ENABLED) setting. |
| 2 | The PUT request to the /put1 URL Path is performed. |
| 3 | Consequently, the MicroService.put handler is automatically performed after the MicroService.redirect handler. |
|
Besides using the
FYI: The |
|
The project source code used in the current subsection is available at the following link: |
|
When compiling, the RxMicro framework searches for When changing the |
5.9. HTTP Headers Support
5.9.1. Basic Rules
The RxMicro framework supports HTTP headers in request and response models:
(1)
@HeaderMappingStrategy
public final class Request {

    (2)
    @Header
    String endpointVersion;

    (3)
    @Header("UseProxy")
    Boolean useProxy;

    public String getEndpointVersion() {
        return endpointVersion;
    }

    public Boolean getUseProxy() {
        return useProxy;
    }
}
(1)
@HeaderMappingStrategy
public final class Response {
(2)
@Header
final String endpointVersion;
(3)
@Header("UseProxy")
final Boolean useProxy;
public Response(final Request request) {
this.endpointVersion = request.getEndpointVersion();
this.useProxy = request.getUseProxy();
}
public Response(final String endpointVersion,
final Boolean useProxy) {
this.endpointVersion = endpointVersion;
this.useProxy = useProxy;
}
}| 1 | The @HeaderMappingStrategy
annotation allows setting common conversion rules for all header names from HTTP to Java format and vice versa in the current model class.(By default, the CAPITALIZE_WITH_HYPHEN strategy is used.
The field name is used as the basic name, and then, following the rules of the specified strategy, the HTTP header name is generated.) |
| 2 | In order to declare a model field as the HTTP header field, it is necessary to use the
@Header annotation. |
| 3 | Using the @Header
annotation, it is possible to specify the HTTP header name, which does not correspond to the used strategy declared by the
@HeaderMappingStrategy annotation. |
The RxMicro framework uses the following algorithm to define the HTTP header name for the specified model field:
-
If the field is annotated by the
@Headerannotation with an explicit indication of the HTTP header name, the specified name is used; -
If no HTTP header name is specified in the
@Headerannotation, the RxMicro framework checks for the@HeaderMappingStrategyannotation above the model class; -
If the model class is annotated by the
@HeaderMappingStrategyannotation, then the specified naming strategy is used.
(The field name is used as the basic name, and then, following the rules of the specified strategy, the HTTP header name is generated.) -
If the
@HeaderMappingStrategyannotation is missing, the model class field name is used as the HTTP header name.
After creating model classes, it is necessary to create a request handler that uses the following models:
final class SimpleUsageMicroService {

    @GET("/get1")
    CompletableFuture<Response> get1(final Request request) { (1)
        return completedFuture(new Response(request));
    }

    (2)
    @GET("/get2")
    (3)
    @HeaderMappingStrategy
    CompletableFuture<Response> get2(final @Header String endpointVersion,          (4)
                                     final @Header("UseProxy") Boolean useProxy) {  (5)
        return completedFuture(new Response(endpointVersion, useProxy));
    }
}| 1 | If a separate model class has been created for an HTTP request, then this class must be passed to the method parameter that handles the HTTP request. |
| 2 | Besides supporting HTTP request model classes, the RxMicro framework supports request handlers that accept HTTP headers as method parameters. |
| 3 | To define a common naming strategy for all HTTP headers which are passed as method parameters, the request handler must be annotated by the @HeaderMappingStrategy annotation. |
| 4 | To declare a method parameter as an HTTP header field, use the @Header annotation. |
| 5 | Using the @Header annotation, it is possible to specify an HTTP header name that does not correspond to the strategy used, declared by the @HeaderMappingStrategy annotation. |
|
The RxMicro framework recommends for request handlers that depend on 3 or more HTTP headers to create separate classes of request model. Upon implementation of HTTP headers directly into the handler, the code becomes hard to read! |
Despite the different approaches to HTTP header handling support, from the client’s point of view the two above-mentioned handlers are absolutely equal:
@RxMicroRestBasedMicroServiceTest(SimpleUsageMicroService.class)
final class SimpleUsageMicroServiceTest {

    private BlockingHttpClient blockingHttpClient;

    @ParameterizedTest
    @ValueSource(strings = {"/get1", "/get2"})
    void Should_process_HTTP_headers(final String path) {
        final ClientHttpResponse response = blockingHttpClient.get(
                path, (1)
                HttpHeaders.of(
                        "Endpoint-Version", "v1",   (2)
                        "UseProxy", true            (3)
                )
        );

        final HttpHeaders responseHeaders = response.getHeaders();
        assertEquals("v1", responseHeaders.getValue("Endpoint-Version"));   (4)
        assertEquals("true", responseHeaders.getValue("UseProxy"));         (4)
    }
}| 1 | When performing a request to different URL Paths, the result is the same. |
| 2 | The Endpoint-Version name corresponds to the endpointVersion field of the request model.(This correspondence is formed basing on the default strategy use, which is defined by the @HeaderMappingStrategy annotation.) |
| 3 | The UseProxy name corresponds to the useProxy field of the request model, since this name is specified in the @Header annotation. |
| 4 | After executing the request in the resulting HTTP response, the Endpoint-Version and UseProxy headers are equal to v1 and true respectively.
(The handler returns the same header values it received from an HTTP request.) |
|
The project source code used in the current subsection is available at the following link: |
|
When compiling, the RxMicro framework searches for When changing the |
5.9.2. Supported Data Types
The RxMicro framework supports the following Java types, which can be HTTP request model headers:
-
? extends Enum<?>; -
java.lang.Boolean; -
java.lang.Byte; -
java.lang.Short; -
java.lang.Integer; -
java.lang.Long; -
java.math.BigInteger; -
java.lang.Float; -
java.lang.Double; -
java.math.BigDecimal; -
java.lang.Character; -
java.lang.String; -
java.time.Instant;
|
For floating point numbers, it is suggested to use the Using the |
and also the java.util.List<T>, java.util.Set<T> and the java.util.Map<String, T> type is parameterized by any of the above mentioned primitive types.
|
If the |
final class ListHeaderMicroService {

    @GET("/")
    @HeaderMappingStrategy
    void consume(final @Header List<Status> supportedStatuses) {
        System.out.println(supportedStatuses);
    }
}
@RxMicroRestBasedMicroServiceTest(ListHeaderMicroService.class)
final class ListHeaderMicroServiceTest {
private BlockingHttpClient blockingHttpClient;
private SystemOut systemOut;
static Stream<Arguments> supportedListProvider() {
return Stream.of(
arguments("created|approved|rejected"), (1)
arguments(new Status[]{created, approved, rejected}, 0), (2)
arguments(new String[]{"created", "approved", "rejected"}, 0), (3)
arguments(List.of(created, approved, rejected)), (4)
arguments(List.of("created", "approved", "rejected")), (5)
arguments(HttpHeaders.of( (6)
"Supported-Statuses", "created",
"Supported-Statuses", "approved",
"Supported-Statuses", "rejected"
)),
arguments(HttpHeaders.of( (6)
"Supported-Statuses", "created|approved",
"Supported-Statuses", "rejected"
))
);
}
@ParameterizedTest
@MethodSource("supportedListProvider")
void Should_support_list_headers(final Object headerValue) {
blockingHttpClient.get(
"/",
headerValue instanceof HttpHeaders ?
(HttpHeaders) headerValue :
HttpHeaders.of("Supported-Statuses", headerValue) (7)
);
assertEquals(
"[created, approved, rejected]", (8)
systemOut.asString()
);
}
}| 1 | If the HTTP header is a list of values, the list elements are transferred via the HTTP protocol as a string separated by the | symbol.(For HTTP response headers it is possible to activate the repeating headers mode.) |
| 2 | Besides transferring the list using a comma-separated string, the
BlockingHttpClient component also supports:an array of enumerations, |
| 3 | an array of string values, |
| 4 | a list of enumerations, |
| 5 | a list of string values. (The BlockingHttpClient
component converts these types to a comma-separated string automatically!) |
| 6 | Besides transferring HTTP headers as a comma-separated string, the
BlockingHttpClient component also supports repeatable HTTP headers with different values. |
| 7 | All specified value types for the HTTP header, which is a list of values, are transferred as the java.lang.Object type.
(The BlockingHttpClient
component automatically converts them to a comma-separated string and transfers via the HTTP protocol.) |
| 8 | The RxMicro framework converts different types to a list of enumerations and displays it in the console. |
5.9.3. Static HTTP headers
For setting of the static headers, the RxMicro framework provides the
@AddHeader and
@SetHeader annotations:
(1)
@SetHeader(name = "Mode", value = "Demo")
final class StaticHeadersMicroService {

    @GET("/get1")
    void get1() {
    }

    @GET("/get2")
    (2)
    @SetHeader(name = "Debug", value = "true")
    void get2() {
    }
}| 1 | If the HTTP header is set for the REST controller, it is added to the HTTP responses for each handler. |
| 2 | If the HTTP header is set for the handler, it is added to the HTTP responses only for that handler. |
From the client’s point of view, static headers do not differ from any others:
@Test
void Should_use_parent_header_only() {
    final ClientHttpResponse response = blockingHttpClient.get("/get1");

    assertEquals("Demo", response.getHeaders().getValue("Mode"));
}

@Test
void Should_use_parent_and_child_headers() {
    final ClientHttpResponse response = blockingHttpClient.get("/get2");

    assertEquals("Demo", response.getHeaders().getValue("Mode"));
    assertEquals("true", response.getHeaders().getValue("Debug"));
}|
In order to understand the differences between the |
|
The project source code used in the current subsection is available at the following link: |
|
When compiling, the RxMicro framework searches for When changing the |
5.9.4. Repeating HTTP headers
If the HTTP header of an HTTP response is a list of values, the list elements are transferred by default via the HTTP protocol as a string separated by the | symbol.
If You want the HTTP header to be repeated for each value, You need to use the
@RepeatHeader annotation:
@Header
List<Status> singleHeader = List.of(created, approved, rejected);

@Header
@RepeatHeader
List<Status> repeatingHeader = List.of(created, approved, rejected);|
The use of the For request models it makes no sense, because the RxMicro framework converts any of the supported formats into a list of values. |
As a result of converting the Java model to HTTP response, the result will be as follows:
assertEquals(
        "created|approved|rejected", (1)
        response.getHeaders().getValue("Single-Header")
);
assertEquals(
        List.of("created", "approved", "rejected"), (2)
        response.getHeaders().getValues("Repeating-Header")
);| 1 | By default, HTTP header list elements are transferred via the HTTP protocol as a string separated by the | symbol. |
| 2 | If the field is annotated by the @RepeatHeader annotation, then the header is repeated for each element of the list. |
|
The project source code used in the current subsection is available at the following link: |
|
When compiling, the RxMicro framework searches for When changing the |
5.10. HTTP Parameters Handling
5.10.1. Basic Rules
The RxMicro framework supports HTTP parameters in request and response models:
(1)
@ParameterMappingStrategy
public final class Request {

    (2)
    String endpointVersion;

    (3)
    @Parameter("use-Proxy")
    Boolean useProxy;

    public String getEndpointVersion() {
        return endpointVersion;
    }

    public Boolean getUseProxy() {
        return useProxy;
    }
}
(1)
@ParameterMappingStrategy
public final class Response {
(2)
final String endpointVersion;
(3)
@Parameter("use-Proxy")
final Boolean useProxy;
public Response(final Request request) {
this.endpointVersion = request.getEndpointVersion();
this.useProxy = request.getUseProxy();
}
public Response(final String endpointVersion,
final Boolean useProxy) {
this.endpointVersion = endpointVersion;
this.useProxy = useProxy;
}
}| 1 | The @ParameterMappingStrategy
annotation allows setting common conversion rules for all parameter names from HTTP to Java format and vice versa in the current model class.
(By default, the
LOWERCASE_WITH_UNDERSCORED strategy is used.
The field name is used as the basic name, and then, following the rules of the specified strategy, the HTTP parameter name is generated.) |
| 2 | In order to declare a model field as the HTTP parameter field, it is necessary to use the
@Parameter annotation.
(Unlike the @Header annotation, the @Parameter annotation is optional.
Thus, if the model field is not annotated by any annotation, then by default it is assumed that there is the @Parameter annotation above the model field.) |
| 3 | Using the @Parameter
annotation, it is possible to specify the HTTP parameter name, which does not correspond to the used strategy declared by the
@ParameterMappingStrategy annotation. |
The RxMicro framework uses the following algorithm to define the HTTP parameter name for the specified model field:
-
If the field is annotated by the
@Parameterannotation with an explicit indication of the HTTP parameter name, the specified name is used; -
If no HTTP parameter name is specified in the
@Parameterannotation, the RxMicro framework checks for the@ParameterMappingStrategyannotation above the model class; -
If the model class is annotated by the
@ParameterMappingStrategyannotation, then the specified naming strategy is used. (The field name is used as the basic name, and then, following the rules of the specified strategy, the HTTP parameter name is generated.) -
If the
@ParameterMappingStrategyannotation is missing, the model class field name is used as the HTTP parameter name.
|
Unlike the Thus, if the model field is not annotated by any annotation, then by default it is assumed that there is the |
After creating model classes, it is necessary to create an HTTP request handler that uses the following models:
final class SimpleUsageMicroService {

    @GET("/get1")
    @POST("/post1")
    CompletableFuture<Response> get1(final Request request) { (1)
        return completedFuture(new Response(request));
    }

    (2)
    @GET("/get2")
    @POST("/post2")
    (3)
    @ParameterMappingStrategy
    CompletableFuture<Response> get2(final String endpointVersion,                      (4)
                                     final @Parameter("use-Proxy") Boolean useProxy) {  (5)
        return completedFuture(new Response(endpointVersion, useProxy));
    }
}| 1 | If a separate model class has been created for an HTTP request, then this class must be passed by the method parameter that handles the HTTP request. |
| 2 | Besides supporting HTTP request model classes, the RxMicro framework supports request handlers that accept HTTP request parameters as method parameters. |
| 3 | To define a common naming strategy for all HTTP parameters which are passed as method parameters, the request handler must be annotated by the @ParameterMappingStrategy annotation. |
| 4 | To declare a method parameter as an HTTP parameter field, You do not need to use any additional annotations. |
| 5 | Using the @Parameter annotation, it is possible to specify an HTTP parameter name that does not correspond to the strategy used, declared by the @ParameterMappingStrategy annotation. |
|
Note that the RxMicro framework does not distinguish whether HTTP request parameters will be transferred to the handler using the start line or HTTP body! Therefore, if the parameters are the same, it is possible to use the same handler with the specified request model to handle both |
|
The RxMicro framework recommends for request handlers that depend on 3 or more HTTP parameters to create separate classes of request model. Upon implementation of HTTP parameters directly into the handler, the code becomes hard to read! |
Despite the different approaches to HTTP parameter handling support, from the client’s point of view the two above-mentioned handlers are absolutely equal to GET and POST requests respectively:
@RxMicroRestBasedMicroServiceTest(SimpleUsageMicroService.class)
final class SimpleUsageMicroServiceTest {

    private BlockingHttpClient blockingHttpClient;

    @ParameterizedTest
    @ValueSource(strings = {"/get1", "/get2"})
    void Should_process_HTTP_query_params(final String path) {
        final ClientHttpResponse response = blockingHttpClient.get(
                path, (1)
                QueryParams.of(
                        "endpoint_version", "v1",   (2)
                        "use-Proxy", true           (3)
                )
        );

        assertHttpBody(response);
    }

    @ParameterizedTest
    @ValueSource(strings = {"/post1", "/post2"})
    void Should_process_HTTP_body_params(final String path) {
        final ClientHttpResponse response = blockingHttpClient.post(
                path, (1)
                jsonObject(
                        "endpoint_version", "v1",   (2)
                        "use-Proxy", true           (3)
                )
        );

        assertHttpBody(response);
    }

    private void assertHttpBody(final ClientHttpResponse response) {
        assertEquals(
                jsonObject(
                        "endpoint_version", "v1", (4)
                        "use-Proxy", true         (4)
                ),
                response.getBody()
        );
    }
}| 1 | When performing a request to different URL Paths, the result is the same.
(Despite the differences in parameter transfer for GET and `POST`requests.) |
| 2 | The endpoint_version name corresponds to the endpointVersion field of the request model.
(This correspondence is formed basing on the default strategy use, which is defined by the @ParameterMappingStrategy annotation.) |
| 3 | The use-Proxy name corresponds to the useProxy field of the request model, since this name is specified in the @Parameter annotation. |
| 4 | After executing the request in the resulting HTTP response, the endpoint_version and use-Proxy HTTP parameters are equal to v1 and true respectively.
(The handler returns the same header values it received from an HTTP request.) |
|
The project source code used in the current subsection is available at the following link: |
|
When compiling, the RxMicro framework searches for When changing the |
5.10.2. Supported Data Types
The RxMicro framework supports the following Java types, which can be HTTP request model parameters:
-
? extends Enum<?>; -
java.lang.Boolean; -
java.lang.Byte; -
java.lang.Short; -
java.lang.Integer; -
java.lang.Long; -
java.math.BigInteger; -
java.lang.Float; -
java.lang.Double; -
java.math.BigDecimal; -
java.lang.Character; -
java.lang.String; -
java.time.Instant; -
? extends Object; -
java.util.List<? extends Object>; -
java.util.Set<? extends Object>; -
java.util.Map<java.lang.String, ? extends Object>;
|
For floating point numbers, it is suggested to use the Using the |
and also the java.util.List<T>, java.util.Set<T> and the java.util.Map<String, T> type is parameterized by any of the above mentioned primitive types.
|
If the |
final class ListQueryParamMicroService {

    @GET("/")
    @ParameterMappingStrategy
    void consume(final List<Status> supportedStatuses) {
        System.out.println(supportedStatuses);
    }
}
@RxMicroRestBasedMicroServiceTest(ListQueryParamMicroService.class)
final class ListQueryParamMicroServiceTest {
private BlockingHttpClient blockingHttpClient;
private SystemOut systemOut;
static Stream<Arguments> supportedListProvider() {
return Stream.of(
arguments("created|approved|rejected"), (1)
arguments(new Status[]{created, approved, rejected}, 0), (2)
arguments(new String[]{"created", "approved", "rejected"}, 0), (3)
arguments(List.of(created, approved, rejected)), (4)
arguments(List.of("created", "approved", "rejected")), (5)
arguments(QueryParams.of( (6)
"supported_statuses", "created",
"supported_statuses", "approved",
"supported_statuses", "rejected"
)),
arguments(QueryParams.of( (0)
"supported_statuses", "created|approved",
"supported_statuses", "rejected"
))
);
}
@ParameterizedTest
@MethodSource("supportedListProvider")
void Should_support_list_headers(final Object queryParamValue) {
blockingHttpClient.get(
"/",
queryParamValue instanceof QueryParams ?
(QueryParams) queryParamValue :
QueryParams.of("supported_statuses", queryParamValue) (7)
);
assertEquals(
"[created, approved, rejected]", (8)
systemOut.asString()
);
}
}| 1 | If the HTTP parameter is a list of values, the list elements are transferred via the HTTP protocol as a string separated by the | symbol. |
| 2 | Besides transferring the list using a comma-separated string, the
BlockingHttpClient component also supports:an array of enumerations, |
| 3 | an array of string values, |
| 4 | a list of enumerations, |
| 5 | a list of string values. (The BlockingHttpClient
component converts these types to a comma-separated string automatically!) |
| 6 | Besides transferring HTTP parameters as a comma-separated string, the
BlockingHttpClient component also supports repeatable query params with different values. |
| 7 | All specified value types for the HTTP parameter, which is a list of values, are transferred as the java.lang.Object type.
(The BlockingHttpClient
component automatically converts them to a comma-separated string and transfers via the HTTP protocol.) |
| 8 | The RxMicro framework converts different types to a list of enumerations and displays it in the console. |
5.10.3. Complex Model Support
Unlike HTTP headers, HTTP parameters can be transferred in the request body.
Therefore, besides primitives the RxMicro framework also supports nested JSON objects and arrays.
|
Therefore, the list of supported types includes the following types:
|
Nested Model Example:
@ParameterMappingStrategy
public final class NestedModel {

    String stringParameter;

    BigDecimal bigDecimalParameter;

    Instant instantParameter;
}
As well as examples of more complex Java models that use a nested model:
@ParameterMappingStrategy
public final class ComplexRequest {

    Integer integerParameter; (1)

    Status enumParameter; (1)

    List<Status> enumsParameter; (2)

    NestedModel nestedModelParameter; (3)

    List<NestedModel> nestedModelsParameter; (4)
}
@ParameterMappingStrategy
public final class ComplexResponse {
final Integer integerParameter; (1)
final Status enumParameter; (1)
final List<Status> enumsParameter; (2)
final NestedModel nestedModelParameter; (3)
final List<NestedModel> nestedModelsParameter; (4)
public ComplexResponse(final ComplexRequest request) {
this.integerParameter = request.integerParameter;
this.enumParameter = request.enumParameter;
this.enumsParameter = request.enumsParameter;
this.nestedModelParameter = request.nestedModelParameter;
this.nestedModelsParameter = request.nestedModelsParameter;
}
}| 1 | Primitive JSON type field. |
| 2 | Primitive JSON array type. |
| 3 | Nested JSON object. |
| 4 | JSON array of JSON nested objects. |
After creating model classes, it is necessary to create a request handler that uses the following models:
final class ComplexModelMicroService {

    @POST("/")
    CompletableFuture<ComplexResponse> handle(final ComplexRequest request) {
        return completedFuture(new ComplexResponse(request));
    }
}
Since the request is transferred in an HTTP body, the sent and received JSON objects must be the same:
@RxMicroRestBasedMicroServiceTest(ComplexModelMicroService.class)
final class ComplexModelMicroServiceTest {

    private BlockingHttpClient blockingHttpClient;

    @Test
    void Should_support_complex_models() {
        final Object jsonObject = jsonObject(
                "integer_parameter", 1,
                "enum_parameter", created,
                "enums_parameter", jsonArray(created, approved),
                "nested_model_parameter", jsonObject(
                        "string_parameter", "test",
                        "big_decimal_parameter", new BigDecimal("3.14"),
                        "instant_parameter", Instant.now()
                ),
                "nested_models_parameter", jsonArray(
                        jsonObject(
                                "string_parameter", "test1",
                                "big_decimal_parameter", new BigDecimal("1.1"),
                                "instant_parameter", Instant.now()
                        ),
                        jsonObject(
                                "string_parameter", "test2",
                                "big_decimal_parameter", new BigDecimal("1.2"),
                                "instant_parameter", Instant.now()
                        )
                )
        );
        final ClientHttpResponse response = blockingHttpClient.post("/", jsonObject);

        assertEquals(jsonObject, response.getBody());
    }
}|
For automatic conversion of Java types to JSON types, it is recommended to use the
|
|
The project source code used in the current subsection is available at the following link: |
|
When compiling, the RxMicro framework searches for When changing the |
5.11. The path variables Support
5.11.1. Basic Rules
The RxMicro framework supports path variables in request models:
public final class Request {

    (1)
    @PathVariable
    String category;

    (2)
    @PathVariable("class")
    String type;

    @PathVariable
    String subType;

    public String getCategory() {
        return category;
    }

    public String getType() {
        return type;
    }

    public String getSubType() {
        return subType;
    }
}| 1 | In order to declare a model field as the path variable, it is necessary to use the
@PathVariable annotation. |
| 2 | Using the @PathVariable annotation, it is possible to specify the path variable name.(If no name is specified, the model field name is used as the path variable name.) |
|
Unlike HTTP headers and parameters that are available also on the client side, So for simplicity it is recommended to always use the model field name as the |
After creating model classes, it is necessary to create an HTTP request handler that uses the following model:
final class MicroService {

    (1)
    @GET("/1/${category}/${class}/${subType}")
    @GET("/1/${category}/${class}_${subType}")
    @GET("/1/${category}-${class}-${subType}")
    @GET("/1-${category}-${class}-${subType}")
    void consume(final Request request) {
        System.out.println(format(
                "?-?-?",
                request.getCategory(), request.getType(), request.getSubType()
        ));
    }

    (1)
    @GET("/2/${category}/${class}/${subType}")
    @GET("/2/${category}/${class}_${subType}")
    @GET("/2/${category}-${class}-${subType}")
    @GET("/2-${category}-${class}-${subType}")
    void consume(final @PathVariable String category,       (2)
                 final @PathVariable("class") String type,  (3)
                 final @PathVariable String subType) {
        System.out.println(format(
                "?-?-?",
                category, type, subType
        ));
    }
}| 1 | When using path variables in request models, be sure to use all path variables in the URL Path.
(Based on the analysis of the URL Path, and considering all path variables, the RxMicro framework selects the required HTTP request handler.) |
| 2 | In order to declare a method parameter as path variable, You must use the @PathVariable annotation. |
| 3 | Using @PathVariable annotation it is possible to specify the path variable name, which does not match the name of the method parameter. |
|
The RxMicro framework recommends for request handlers that depend on 3 or more
Upon implementation of
|
Despite the different approaches to path variables handling support, from the client’s point of view the two above-mentioned handlers are absolutely equal:
@RxMicroRestBasedMicroServiceTest(MicroService.class)
final class MicroServiceTest {

    private BlockingHttpClient blockingHttpClient;

    private SystemOut systemOut;

    @ParameterizedTest
    @CsvSource({
            "/1/category/class/subType,     category-class-subType",
            "/1/category/class_subType,     category-class-subType",
            "/1/category-class-subType,     category-class-subType",
            "/1-category-class-subType,     category-class-subType",

            "/2/category/class/subType,     category-class-subType",
            "/2/category/class_subType,     category-class-subType",
            "/2/category-class-subType,     category-class-subType",
            "/2-category-class-subType,     category-class-subType",

            "/1/5/6/7,                      5-6-7",
            "/1/5/6_7,                      5-6-7",
            "/1/5-6-7,                      5-6-7",
            "/1-5-6-7,                      5-6-7",

            "/2/5/6/7,                      5-6-7",
            "/2/5/6_7,                      5-6-7",
            "/2/5-6-7,                      5-6-7",
            "/2-5-6-7,                      5-6-7",
    })
    void Should_support_path_variables(final String path,           (1)
                                       final String expectedOut) {  (2)
        blockingHttpClient.get(path);

        assertEquals(expectedOut, systemOut.asString());
    }
}| 1 | The current path, which corresponds to one of the specified path templates. |
| 2 | The expected string containing all extracted path variables from the current path, displayed in the console. |
|
The project source code used in the current subsection is available at the following link: |
|
When compiling, the RxMicro framework searches for When changing the |
5.11.2. Supported Data Types
The RxMicro framework supports the following Java types, which can be path variables of the request model:
-
? extends Enum<?>; -
java.lang.Boolean; -
java.lang.Byte; -
java.lang.Short; -
java.lang.Integer; -
java.lang.Long; -
java.math.BigInteger; -
java.lang.Float; -
java.lang.Double; -
java.math.BigDecimal; -
java.lang.Character; -
java.lang.String; -
java.time.Instant;
|
For floating point numbers, it is suggested to use the Using the |
5.12. Support of Internal Data Types
5.12.1. Basic Rules
The RxMicro framework works with internal data. Due to this, the developer can extract additional information about the HTTP request and gain more control over the generated HTTP response.
To work with internal data, it is necessary to create request and response models:
public final class Request {

    (1)
    @RemoteAddress
    String remoteAddress1;

    (2)
    @RequestUrlPath
    String urlPath;

    (3)
    @RequestMethod
    String method;

    (4)
    HttpVersion httpVersion;

    (5)
    HttpHeaders headers;

    (6)
    @RequestBody
    byte[] bodyBytes;

    public String getRemoteAddress1() {
        return remoteAddress1;
    }

    public String getUrlPath() {
        return urlPath;
    }

    public String getMethod() {
        return method;
    }

    public HttpVersion getHttpVersion() {
        return httpVersion;
    }

    public HttpHeaders getHeaders() {
        return headers;
    }

    public byte[] getBodyBytes() {
        return bodyBytes;
    }
}| 1 | To extract the remote address of the client connection, it is necessary to use the
@RemoteAddress annotation. |
| 2 | To extract the current URL path, it is necessary to use the
@RequestUrlPath annotation.(This feature is useful for request logging using path-variables.) |
| 3 | To extract the current HTTP method, it is necessary to use the
@RequestMethod annotation.(This feature is useful for request logging when one handler supports different HTTP methods.) |
| 4 | To extract the HTTP protocol version, it is necessary to use the
HttpVersion type. |
| 5 | To extract all HTTP headers, it is necessary to use the
HttpHeaders type. |
| 6 | To extract the request body content as a byte array, it is necessary to use the
@RequestBody annotation. |
public final class Response {

    (1)
    @ResponseStatusCode
    final Integer status;

    (2)
    final HttpVersion version;

    (3)
    final HttpHeaders headers;

    (4)
    @ResponseBody
    final byte[] body;

    public Response(final Integer status,
                    final HttpVersion version,
                    final HttpHeaders headers,
                    final byte[] body) {
        this.status = status;
        this.version = version;
        this.headers = headers;
        this.body = body;
    }
}| 1 | To override the HTTP status code, it is necessary to use the
@ResponseStatusCode annotation. |
| 2 | To set the HTTP protocol version, it is necessary to use the
HttpVersion type.(Currently only 1.0 and 1.1 HTTP versions are supported.) |
| 3 | To set all HTTP headers, it is necessary to use the
HttpHeaders type. |
| 4 | To set the response body content as a byte array, it is necessary to use the
@ResponseBody annotation. |
After creating model classes, it is necessary to create an HTTP request handler that uses the following models:
final class MicroService {

    @POST("/")
    CompletableFuture<Response> handle(final Request request) {
        return completedFuture(new Response(
                201,
                request.getHttpVersion(),
                HttpHeaders.of(
                        "Remote-Address", request.getRemoteAddress1(),
                        "Url-Path", request.getUrlPath(),
                        "Method", request.getMethod(),
                        "Custom-Header", request.getHeaders().getValue("Custom-Header")
                ),
                request.getBodyBytes()
        ));
    }
}
After creating the REST controller, let’s check that everything works:
@RxMicroRestBasedMicroServiceTest(MicroService.class)
final class MicroServiceTest {

    private BlockingHttpClient blockingHttpClient;

    @Test
    void Should_support_internal_types() {
        final Object body = jsonObject("message", "Hello World!");
        final ClientHttpResponse response = blockingHttpClient.post(
                "/",
                HttpHeaders.of("Custom-Header", "Custom-Value"),
                body
        );

        assertEquals(body, response.getBody());
        assertEquals(201, response.getStatusCode());
        assertSame(HTTP_1_1, response.getVersion());
        final HttpHeaders responseHeaders = response.getHeaders();
        final String remoteAddress = responseHeaders.getValue("Remote-Address");
        assertTrue(
                remoteAddress.contains("127.0.0.1"),
                "Invalid Remote-Address: " + remoteAddress
        );
        assertEquals("/", responseHeaders.getValue("Url-Path"));
        assertEquals("POST", responseHeaders.getValue("Method"));
        assertEquals("Custom-Value", responseHeaders.getValue("Custom-Header"));
    }
}|
The project source code used in the current subsection is available at the following link: |
|
When compiling, the RxMicro framework searches for When changing the |
5.12.2. Supported Internal Data Types
| Java type | RxMicro Annotation | Is the annotation required? | Description |
|---|---|---|---|
None |
- |
HTTP request model |
|
None |
- |
HTTP protocol version |
|
None |
- |
HTTP header model |
|
No |
Remote client address |
||
Yes |
Remote client address |
||
Yes |
URL Path of the current request |
||
Yes |
HTTP request method |
||
|
Yes |
HTTP request body content |
|
Currently only |
| Java type | RxMicro Annotation | Is the annotation required? | Description |
|---|---|---|---|
None |
- |
HTTP protocol version |
|
None |
- |
HTTP header model |
|
Yes |
HTTP response status code |
||
|
Yes |
HTTP response body content |
5.13. Versioning of REST Controllers
The RxMicro framework supports versioning of REST Controllers using two strategies:
-
Versioning based on HTTP header analysis with the
Api-Versionname. -
Versioning based on URL Path fragment analysis.
5.13.1. Versioning Based on HTTP Header Analysis
The RxMicro framework allows creating identical REST controllers that differ only in version:
@Version(value = "v1", strategy = Version.Strategy.HEADER) (1)
final class OldMicroService {

    @PATCH("/patch")
    void update() {
        System.out.println("old");
    }
}| 1 | REST controller of the old v1 version, using the
Version.Strategy.HEADER strategy; |
@Version(value = "v2", strategy = Version.Strategy.HEADER) (1)
final class NewMicroService {

    @PATCH("/patch")
    void update() {
        System.out.println("new");
    }
}| 1 | REST controller of the new v2 version, using the
Version.Strategy.HEADER strategy; |
|
Note that the rules for defining a handler are the same for two different classes! |
The correct selection of the appropriate REST controller handler can be checked with the following test:
@RxMicroRestBasedMicroServiceTest({OldMicroService.class, NewMicroService.class}) (1)
final class MicroServiceTest {

    private BlockingHttpClient blockingHttpClient;

    private SystemOut systemOut;

    @ParameterizedTest
    @CsvSource({
            "v1,    old",
            "v2,    new"
    })
    void Should_route_to_valid_request_handler(final String versionHeaderValue,
                                               final String expectedOut) {
        blockingHttpClient.patch(
                "/patch",    (2)
                HttpHeaders.of(
                        API_VERSION, (3)
                        versionHeaderValue
                )
        );

        assertEquals(expectedOut, systemOut.asString());
    }
}| 1 | The @RxMicroRestBasedMicroServiceTest annotation allows You to run several REST controllers in test mode. |
| 2 | The test runs the PATCH request to a URL Path: /. |
| 3 | To specify the handler version, the standard
Api-Version HTTP header is used. |
|
If only REST controllers of a certain version need to be tested, then the
|
|
The project source code used in the current subsection is available at the following link: |
|
When compiling, the RxMicro framework searches for When changing the |
5.13.2. Versioning Based on URL Path Fragment Analysis
The RxMicro framework allows creating identical REST controllers that differ only in version:
@Version(value = "v1", strategy = Version.Strategy.URL_PATH) (1)
final class OldMicroService {

    @PATCH("/patch")
    void update() {
        System.out.println("old");
    }
}| 1 | REST controller of the old v1 version, using the
Version.Strategy.URL_PATH strategy; |
@Version(value = "v2", strategy = Version.Strategy.URL_PATH) (1)
final class NewMicroService {

    @PATCH("/patch")
    void update() {
        System.out.println("new");
    }
}| 1 | REST controller of the new v2 version, using the
Version.Strategy.URL_PATH strategy; |
|
Note that the rules for defining a handler are the same for two different classes! |
The correct selection of the appropriate REST controller handler can be checked with the following test:
@RxMicroRestBasedMicroServiceTest({OldMicroService.class, NewMicroService.class}) (1)
final class MicroServiceTest {

    private BlockingHttpClient blockingHttpClient;

    private SystemOut systemOut;

    @ParameterizedTest
    @CsvSource({
            "/v1,    old",
            "/v2,    new"
    })
    void Should_route_to_valid_request_handler(final String urlVersionPath,
                                               final String expectedOut) {
        blockingHttpClient.patch(
                urlVersionPath + "/patch"    (2)
        );

        assertEquals(expectedOut, systemOut.asString());
    }
}| 1 | The @RxMicroRestBasedMicroServiceTest annotation allows You to run several REST controllers in test mode. |
| 2 | The test runs the PATCH request to different URL Paths; |
|
If only REST controllers of a certain version need to be tested, then the
|
|
The project source code used in the current subsection is available at the following link: |
|
When compiling, the RxMicro framework searches for When changing the |
5.14. Base URL Path for All Handlers
To configure a base URL Path for all HTTP request handlers, the RxMicro framework provides the
@BaseUrlPath annotation:
@BaseUrlPath("base-url-path")
final class MicroService {

    @GET("/path")
    void path() {
    }
}
@RxMicroRestBasedMicroServiceTest(MicroService.class)
final class MicroServiceTest {
private BlockingHttpClient blockingHttpClient;
@Test
void Should_support_base_url() {
final ClientHttpResponse response = blockingHttpClient.get("/base-url-path/path");
assertEquals(200, response.getStatusCode());
}
}|
The project source code used in the current subsection is available at the following link: |
|
When compiling, the RxMicro framework searches for When changing the |
5.15. CORS Support
The RxMicro framework supports the Cross Origin Resource Sharing (CORS).
To activate this function it is necessary to add the
@EnableCrossOriginResourceSharing annotation:
@EnableCrossOriginResourceSharing (1)
final class MicroService {

    @PATCH("/")
    void handle() {
        System.out.println("handle");
    }
}| 1 | The Cross Origin Resource Sharing (CORS) feature is activated for all handlers of the specified REST controller. |
When activating this feature, the RxMicro framework automatically adds a standard handler:
@RxMicroRestBasedMicroServiceTest(MicroService.class)
final class MicroServiceTest {

    private BlockingHttpClient blockingHttpClient;

    private SystemOut systemOut;

    @Test
    void Should_handle_PATCH_request() {
        blockingHttpClient.patch("/");

        assertEquals("handle", systemOut.asString());
    }

    (1)
    @Test
    void Should_support_CORS_Options_request() {
        final ClientHttpResponse response = blockingHttpClient.options(
                "/",
                HttpHeaders.of(
                        ORIGIN, "test.rxmicro.io",
                        ACCESS_CONTROL_REQUEST_METHOD, PATCH
                )
        );

        assertEquals(ORIGIN, response.getHeaders().getValue(VARY));
        assertEquals("*", response.getHeaders().getValue(ACCESS_CONTROL_ALLOW_ORIGIN));
        assertEquals(PATCH.name(), response.getHeaders().getValue(ACCESS_CONTROL_ALLOW_METHODS));
    }
}| 1 | The standard handler can handle OPTIONS requests with additional HTTP headers. |
|
For more information on the |
|
The project source code used in the current subsection is available at the following link: |
|
When compiling, the RxMicro framework searches for When changing the |
5.16. Request ID
The Request Id feature described at Monitoring section.
5.17. Configuring the Code Generation Process
The RxMicro framework provides an ability to configure the code generation process for REST controllers.
For this purpose, it is necessary to use the
@RestServerGeneratorConfig
annotation, that annotates the module-info.java module descriptor:
import io.rxmicro.rest.model.GenerateOption;
import io.rxmicro.rest.model.ServerExchangeFormatModule;
import io.rxmicro.rest.server.RestServerGeneratorConfig;

@RestServerGeneratorConfig(
        exchangeFormat = ServerExchangeFormatModule.AUTO_DETECT, (1)
        generateRequestValidators = GenerateOption.AUTO_DETECT,  (2)
        generateResponseValidators = GenerateOption.DISABLED     (3)
)
module rest.controller.generator {
    requires rxmicro.rest.server.netty;
}| 1 | The exchangeFormat parameter allows You to specify a format for message exchange with a client.(By default, it is used the message exchange format added to the module-info.java descriptor.
If several modules supporting the message exchange format are added to the module-info.java descriptor, then using the exchangeFormat parameter, You need to specify which module should be used for REST controllers.) |
| 2 | The generateRequestValidators parameter allows enabling/disabling the option of generating HTTP request validators for all handlers in the project.
(The AUTO_DETECT value means that validators will be generated only if the developer adds the rxmicro.validation module to the module-info.java descriptor.) |
| 3 | The generateResponseValidators parameter allows enabling/disabling the option of generating HTTP response validators for all handlers in the project.
(The DISABLED value means that validators won’t be generated by the RxMicro Annotation Processor.) |
|
The RxMicro team strong recommends using the (HTTP response validation can be useful for identifying errors in business task implementation algorithms. For example, instead of returning an incorrect response model to a client, the microservice will throw an error. This approach increases the speed of error search and debugging of the source code that performs the business task.) FYI: By default the response validators are generated but not invoked!
To activate the validation of responses it is necessary to set
or
or using any other supported config types Thus the RxMicro team recommends the following approach:
|
6. REST Client
REST Client is an interface that contains at least one declarative HTTP request handler.
To create REST clients, the RxMicro framework provides the following modules:
-
The
rxmicro.restis a basic module that defines basicRxMicro Annotations, required when using theRESTarchitecture of building program systems; -
The
rxmicro.rest.clientis a basic module used to create and run REST clients; -
The
rxmicro.rest.client.jdkis an HTTP client implementation module based onJava HTTP Client; -
The
rxmicro.rest.client.exchange.jsonis a module for converting Java models toJSONformat and vice versa;
|
Due to transit dependencies only two modules usually need to be added to a project:
|
6.1. REST Client Implementation Requirements
6.1.1. REST Client Interface Requirements
REST Client is a Java interface that annotated by the
@RestClient annotation:
import java.util.concurrent.CompletableFuture;

import io.rxmicro.rest.client.RestClient;
import io.rxmicro.rest.method.GET;

@RestClient
public interface RESTClient {

    @GET("/")
    CompletableFuture<Model> getContent();
}
that must meet the following requirements:
-
The interface must be a
publicone. -
The interface must be annotated by the required
@RestClientannotation. -
The interface couldn’t extend any other interfaces.
-
The interface couldn’t be a nested one.
6.1.2. HTTP Request Handler Requirements
HTTP request handler is a method, that must meet the following requirements:
-
The method couldn’t be a
privateone. -
The method couldn’t be an
abstractone. -
The method couldn’t be a
staticone. -
The method must be annotated by only one of the following annotations:
-
The method must return one of the following reactive types:
-
If the method returns a reactive type, that this type must be parametrized by a HTTP response model type. (The additional types such as
java.lang.Voidandjava.util.Optionalare supported also. (Read more: Table 2, “Which class from a reactive library must be choose?”)).
|
A REST client can contain |
|
The
For such cases the HTTP protocol provides the special |
The RxMicro framework supports the following parameter types for the HTTP request handler:
-
Handler without parameters.
(This type is recommended for the simpleststatelessREST clients without parameters.) -
List of primitive parameters.
(This type is recommended for REST clients, the behavior of which depends on 1-2 parameters.) -
Custom class modeling an HTTP request.
(This type is recommended for REST clients, the behavior of which depends on 3 or more parameters.)
|
When using the Project Reactor and RxJava reactive libraries, You need:
Adding dependencies to
Adding modules to
|
6.2. RxMicro Annotations
The RxMicro framework supports the following RxMicro Annotations, which are used to create and configure REST Clients.
| Annotation | Description |
|---|---|
Denotes that an interface is a dynamic generated REST client. |
|
Denotes a method, that must handle a |
|
Denotes a method, that must handle a |
|
Denotes a method, that must handle a |
|
Denotes a method, that must handle a |
|
Denotes a method, that must handle a |
|
Denotes a method, that must handle a |
|
Denotes a method, that must handle a |
|
Denotes a base URL path for the all request handlers at the REST controller. |
|
Denotes a version of the REST controller. |
|
Denotes that a field of Java model class is a HTTP header. |
|
Declares a strategy of header name formation based on Java model field name analysis. (By default, the
|
|
Denotes a static HTTP header that must be added to the response, created by the request handler. |
|
Denotes a static HTTP header that must be set to the response, created by the request handler. |
|
Denotes the header, which name needs to be repeated for each element in the list. (This annotation applies only to fields with the |
|
Denotes that a field of Java model class is a HTTP parameter. |
|
Declares a strategy of parameter name formation based on Java model field name analysis. (By default, the
|
|
Denotes that a field of Java model class is a |
|
Declares the Java model field as a field, in which the RxMicro framework must inject the remote client connection address. |
|
Declares the Java model field as a field, in which the RxMicro framework must inject a method of the received request. (This feature is useful for request logging when one handler supports different HTTP methods.) |
|
Declares the Java model field as a field, in which the RxMicro framework must inject (This feature is useful for request logging using |
|
Declares the Java model field as a field, in which the RxMicro framework must inject a body of the received request. |
|
Indicates to the RxMicro framework that the value of the Java model field should be used as a status code to be sent to the client. |
|
Indicates to the RxMicro framework that the value of the Java model field should be used as a body to be sent to the client. |
|
Declares the Java model field as a field, in which the RxMicro framework must inject a unique request ID. |
|
Declares a status code, which should be sent to the client in case of successful execution of the HTTP request handler. |
|
Declares a message returned by the handler in case of no result. |
|
Allows to configure the process of code generation by the |
|
Activates the |
|
Denotes a base URL path for the all request handlers at the REST client. |
|
Denotes a version of the REST client. |
|
Denotes that a field of Java model class is a HTTP header. |
|
Declares a strategy of header name formation based on Java model field name analysis. (By default, the
|
|
Denotes a static HTTP header that must be added to the request, created by REST client implementation. |
|
Denotes a static HTTP header that must be set to the request, created by REST client implementation. |
|
Denotes the header, which name needs to be repeated for each element in the list. (This annotation applies only to fields with the |
|
Denotes that a field of Java model class is a HTTP parameter. |
|
Declares a strategy of parameter name formation based on Java model field name analysis. (By default, the
|
|
Denotes a static query parameter that must be added to the request, created by REST client implementation. |
|
Denotes a static query parameter that must be set to the request, created by REST client implementation. |
|
Denotes the query parameter, which name needs to be repeated for each element in the list. (This annotation applies only to fields with the |
|
Denotes that a field of Java model class is a |
|
Declares the Java model field as a field, that the RxMicro framework must used as a unique request ID and sent it to the server. |
|
Indicates to the RxMicro framework that the value of the Java model field should be used as a status code that received from the server. |
|
Indicates to the RxMicro framework that the value of the Java model field should be used as a body that received from the server. |
|
Denotes an abstract class that contains a partial implementation of the annotated by this annotation REST client interface. |
|
Allows to configure the process of code generation by the |
6.3. HTTP Request Handler Return Types
The HTTP request handler supports two categories of returned results:
-
HTTP response without body;
-
HTTP response with body;
6.3.1. Supported Return Result Types for HTTP Response without Body
The RxMicro framework supports the following return result types for an HTTP response without body:
@RestClient
public interface RestClientWithoutBody {

    (1)

    @GET("/jse/completedFuture1")
    CompletableFuture<Void> completedFuture1();

    @GET("/jse/completedFuture2")
    CompletableFuture<Void> completedFuture2(final Request request);

    @GET("/jse/completedFuture3")
    CompletableFuture<Void> completedFuture3(final String requestParameter);

    (2)

    @GET("/jse/completionStage1")
    CompletionStage<Void> completionStage1();

    @GET("/jse/completionStage2")
    CompletionStage<Void> completionStage2(final Request request);

    @GET("/jse/completionStage3")
    CompletionStage<Void> completionStage3(final String requestParameter);

    (3)

    @GET("/spring-reactor/mono1")
    Mono<Void> mono1();

    @GET("/spring-reactor/mono2")
    Mono<Void> mono2(final Request request);

    @GET("/spring-reactor/mono3")
    Mono<Void> mono3(final String requestParameter);

    (4)

    @GET("/rxjava3/completable1")
    Completable completable1();

    @GET("/rxjava3/completable2")
    Completable completable2(final Request request);

    @GET("/rxjava3/completable3")
    Completable completable3(final String requestParameter);
}| 1 | The CompletableFuture<Void>
type is recommended when using the java.util.concurrent library. |
| 2 | Instead of the CompletableFuture<Void> type, can also be used the
CompletionStage<Void> type. |
| 3 | When using the Project Reactor library, only the
Mono<Void> type can be used. |
| 4 | When using the RxJava library, only the
Completable type can be used. |
All the above mentioned HTTP request handlers shouldn’t throw any exceptions:
@InitMocks
@RxMicroComponentTest(RestClientWithoutBody.class)
final class RestClientWithoutBodyTest {

    private RestClientWithoutBody restClient;

    @Mock(answer = RETURNS_DEEP_STUBS)
    @Alternative
    private HttpClientFactory httpClientFactory;

    static Stream<Consumer<RestClientWithoutBody>> clientMethodsProvider() {
        return Stream.of(
                client -> client.completedFuture1().join(),
                client -> client.completedFuture2(new Request("param")).join(),
                client -> client.completedFuture3("param").join(),

                client -> client.completionStage1().toCompletableFuture().join(),
                client -> client.completionStage2(
                        new Request("param")).toCompletableFuture().join(),
                client -> client.completionStage3("param").toCompletableFuture().join(),

                client -> client.mono1().block(),
                client -> client.mono2(new Request("param")).block(),
                client -> client.mono3("param").block(),

                client -> client.completable1().blockingAwait(),
                client -> client.completable2(new Request("param")).blockingAwait(),
                client -> client.completable3("param").blockingAwait()
        );
    }

    private void prepare() {
        prepareHttpClientMock(
                httpClientFactory,
                new HttpRequestMock.Builder().setAnyRequest().build(),
                true
        );
    }

    @ParameterizedTest
    @MethodSource("clientMethodsProvider")
    @BeforeThisTest(method = "prepare")
    void Should_be_invoked_successfully(final Consumer<RestClientWithoutBody> clientMethod) {
        assertDoesNotThrow(() -> clientMethod.accept(restClient));
    }
}|
The project source code used in the current subsection is available at the following link: |
|
When compiling, the RxMicro framework searches for When changing the |
6.3.2. Supported Return Result Types for HTTP Response with Body
The RxMicro framework supports the following return result types for an HTTP response with body:
@RestClient
public interface RestClientWithBody {

    (1)

    @GET("/jse/completedFuture1")
    CompletableFuture<Response> completedFuture1();

    @GET("/jse/completedFuture2")
    CompletableFuture<Response> completedFuture2(final Request request);

    @GET("/jse/completedFuture3")
    CompletableFuture<Response> completedFuture3(final String requestParameter);

    (2)

    @GET("/jse/completionStage1")
    CompletionStage<Response> completionStage1();

    @GET("/jse/completionStage2")
    CompletionStage<Response> completionStage2(final Request request);

    @GET("/jse/completionStage3")
    CompletionStage<Response> completionStage3(final String requestParameter);

    (3)

    @GET("/spring-reactor/mono1")
    Mono<Response> mono1();

    @GET("/spring-reactor/mono2")
    Mono<Response> mono2(final Request request);

    @GET("/spring-reactor/mono3")
    Mono<Response> mono3(final String requestParameter);

    (4)

    @GET("/rxjava3/single1")
    Single<Response> single1();

    @GET("/rxjava3/single2")
    Single<Response> single2(final Request request);

    @GET("/rxjava3/single3")
    Single<Response> single3(final String requestParameter);
}| 1 | The CompletableFuture<MODEL>
type is recommended when using the java.util.concurrent library. |
| 2 | Instead of the CompletableFuture<MODEL> type, can also be used the
CompletionStage<MODEL> type. |
| 3 | When using the Project Reactor library, only the
Mono<MODEL> type can be used. |
| 4 | When using the RxJava library, only the
Single<MODEL> type can be used. |
|
Note that the reactive types must be parameterized by the HTTP response model class! |
All of the above mentioned handlers return the Response class instance with the Hello World! message:
@InitMocks
@RxMicroComponentTest(RestClientWithBody.class)
final class RestClientWithBodyTest {

    private RestClientWithBody restClient;

    @Mock(answer = RETURNS_DEEP_STUBS)
    @Alternative
    private HttpClientFactory httpClientFactory;

    static Stream<Function<RestClientWithBody, Response>> clientMethodsProvider() {
        return Stream.of(
                client -> client.completedFuture1().join(),
                client -> client.completedFuture2(new Request("param")).join(),
                client -> client.completedFuture3("param").join(),

                client -> client.completionStage1().toCompletableFuture().join(),
                client -> client.completionStage2(
                        new Request("param")).toCompletableFuture().join(),
                client -> client.completionStage3("param").toCompletableFuture().join(),

                client -> client.mono1().block(),
                client -> client.mono2(new Request("param")).block(),
                client -> client.mono3("param").block(),

                client -> client.single1().blockingGet(),
                client -> client.single2(new Request("param")).blockingGet(),
                client -> client.single3("param").blockingGet()
        );
    }

    private void prepare() {
        prepareHttpClientMock(
                httpClientFactory,
                new HttpRequestMock.Builder().setAnyRequest().build(),
                jsonObject("message", "Hello World!"),
                true
        );
    }

    @ParameterizedTest
    @MethodSource("clientMethodsProvider")
    @BeforeThisTest(method = "prepare")
    void Should_return_message_Hello_World(final Function<RestClientWithBody, Response> clientMethod) {
        final Response response = assertDoesNotThrow(() -> clientMethod.apply(restClient));

        assertEquals("Hello World!", response.getMessage());
    }
}|
The project source code used in the current subsection is available at the following link: |
|
When compiling, the RxMicro framework searches for When changing the |
6.4. HTTP Headers Handling
6.4.1. Basic Rules
The RxMicro framework supports HTTP headers in request and response models:
(1)
@HeaderMappingStrategy
public final class Request {

    (2)
    @Header
    String endpointVersion;

    (3)
    @Header("UseProxy")
    Boolean useProxy;

    public String getEndpointVersion() {
        return endpointVersion;
    }

    public Boolean getUseProxy() {
        return useProxy;
    }
}
(1)
@HeaderMappingStrategy
public final class Response {
(2)
@Header
final String endpointVersion;
(3)
@Header("UseProxy")
final Boolean useProxy;
public Response(final Request request) {
this.endpointVersion = request.getEndpointVersion();
this.useProxy = request.getUseProxy();
}
public Response(final String endpointVersion,
final Boolean useProxy) {
this.endpointVersion = endpointVersion;
this.useProxy = useProxy;
}
}| 1 | The @HeaderMappingStrategy
annotation allows setting common conversion rules for all header names from HTTP to Java format and vice versa in the current model class.(By default, the CAPITALIZE_WITH_HYPHEN strategy is used.
The field name is used as the basic name, and then, following the rules of the specified strategy, the HTTP header name is generated.) |
| 2 | In order to declare a model field as the HTTP header field, it is necessary to use the
@Header annotation. |
| 3 | Using the @Header
annotation, it is possible to specify the HTTP header name, which does not correspond to the used strategy declared by the
@HeaderMappingStrategy annotation. |
The RxMicro framework uses the following algorithm to define the HTTP header name for the specified model field:
-
If the field is annotated by the
@Headerannotation with an explicit indication of the HTTP header name, the specified name is used; -
If no HTTP header name is specified in the
@Headerannotation, the RxMicro framework checks for the@HeaderMappingStrategyannotation above the model class; -
If the model class is annotated by the
@HeaderMappingStrategyannotation, then the specified naming strategy is used.
(The field name is used as the basic name, and then, following the rules of the specified strategy, the HTTP header name is generated.) -
If the
@HeaderMappingStrategyannotation is missing, the model class field name is used as the HTTP header name.
After creating model classes, it is necessary to create a request handler that uses the following models:
@RestClient
public interface SimpleUsageRestClient {

    @GET("/get1")
    CompletableFuture<Response> get1(final Request request); (1)


    (2)
    @GET("/get2")
    (3)
    @HeaderMappingStrategy
    CompletableFuture<Response> get2(final @Header String endpointVersion,        (4)
                                     final @Header("UseProxy") Boolean useProxy); (5)
}| 1 | If a separate model class has been created for an HTTP request, then this class must be passed by the method parameter that handles the HTTP request. |
| 2 | Besides supporting HTTP request model classes, the RxMicro framework supports request handlers that accept HTTP headers as method parameters. |
| 3 | To define a common naming strategy for all HTTP headers which are passed as method parameters, the request handler must be annotated by the @HeaderMappingStrategy annotation. |
| 4 | To declare a method parameter as an HTTP header field, use the @Header annotation. |
| 5 | Using the @Header annotation, it is possible to specify an HTTP header name that does not correspond to the strategy used, declared by the @HeaderMappingStrategy annotation. |
|
The RxMicro framework recommends for request handlers that depend on 3 or more HTTP headers to create separate classes of request model. Upon implementation of HTTP headers directly into the handler, the code becomes hard to read! |
Despite the different approaches to HTTP header handling support, as to the message generated by the HTTP protocol, the two above-mentioned handlers are absolutely equal:
@InitMocks
@RxMicroComponentTest(SimpleUsageRestClient.class)
final class SimpleUsageRestClientTest {

    private static final String ENDPOINT_VERSION = "v1";

    private static final Boolean USE_PROXY = true;

    private SimpleUsageRestClient restClient;

    @Mock(answer = RETURNS_DEEP_STUBS)
    @Alternative
    private HttpClientFactory httpClientFactory;

    static Stream<Function<SimpleUsageRestClient, Response>> restClientExecutableProvider() {
        return Stream.of(
                client -> client.get1(new Request(ENDPOINT_VERSION, USE_PROXY)).join(),
                client -> client.get2(ENDPOINT_VERSION, USE_PROXY).join()
        );
    }

    private void prepare() {
        final HttpHeaders headers = HttpHeaders.of(
                "Endpoint-Version", ENDPOINT_VERSION, (2)
                "UseProxy", USE_PROXY                 (3)
        );
        prepareHttpClientMock(
                httpClientFactory,
                new HttpRequestMock.Builder()
                        .setMethod(GET)
                        .setAnyPath()
                        .setHeaders(headers)
                        .build(),
                new HttpResponseMock.Builder()
                        .setHeaders(headers)
                        .build(),
                true
        );
    }

    @ParameterizedTest
    @MethodSource("restClientExecutableProvider")
    @BeforeThisTest(method = "prepare")
    void Should_process_HTTP_headers(
            final Function<SimpleUsageRestClient, Response> clientMethod) {
        final Response response = assertDoesNotThrow(() ->
                clientMethod.apply(restClient)); (1)

        assertEquals(ENDPOINT_VERSION, response.getEndpointVersion()); (4)
        assertEquals(USE_PROXY, response.getUseProxy());               (4)
    }
}| 1 | When performing a request to different URL Paths, the result is the same. |
| 2 | The Endpoint-Version name corresponds to the endpointVersion field of the request model.(This correspondence is formed basing on the default strategy use, which is defined by the @HeaderMappingStrategy annotation.) |
| 3 | The UseProxy name corresponds to the useProxy field of the request model, since this name is specified in the @Header annotation. |
| 4 | After executing the request in the resulting HTTP response, the Endpoint-Version and UseProxy headers are equal to v1 and true respectively.
(The handler returns the same header values it received from an HTTP request.) |
|
The project source code used in the current subsection is available at the following link: |
|
When compiling, the RxMicro framework searches for When changing the |
6.4.2. Supported Data Types
The RxMicro framework supports the following Java types, which can be HTTP request model headers:
-
? extends Enum<?>; -
java.lang.Boolean; -
java.lang.Byte; -
java.lang.Short; -
java.lang.Integer; -
java.lang.Long; -
java.math.BigInteger; -
java.lang.Float; -
java.lang.Double; -
java.math.BigDecimal; -
java.lang.Character; -
java.lang.String; -
java.time.Instant;
|
For floating point numbers, it is suggested to use the Using the |
and also the java.util.List<T>, java.util.Set<T> and the java.util.Map<String, T> type is parameterized by any of the above mentioned primitive types.
|
If the |
6.4.3. Static HTTP Headers
For static header installation, the RxMicro framework provides the
@AddHeader and
@SetHeader annotations:
@RestClient
(1)
@SetHeader(name = "Mode", value = "Demo")
public interface StaticHeadersRestClient {

    @GET("/get1")
    CompletableFuture<Void> get1();

    @GET("/get2")
    (2)
    @SetHeader(name = "Debug", value = "true")
    CompletableFuture<Void> get2();
}| 1 | If the HTTP header is set for the REST client, it is added to the HTTP requests for each handler. |
| 2 | If the HTTP header is set for the handler, it is added to the HTTP requests only for that handler. |
In terms of the HTTP protocol, static headers do not differ from any others:
@InitMocks
@RxMicroComponentTest(StaticHeadersRestClient.class)
final class StaticHeadersRestClientTest {

    private StaticHeadersRestClient restClient;

    @Mock(answer = RETURNS_DEEP_STUBS)
    @Alternative
    private HttpClientFactory httpClientFactory;

    private void prepareParentHeaderOnly() {
        prepareHttpClientMock(
                httpClientFactory,
                new HttpRequestMock.Builder()
                        .setMethod(GET)
                        .setPath("/get1")
                        .setHeaders(HttpHeaders.of(
                                "Mode", "Demo"
                        ))
                        .build(),
                true
        );
    }

    @Test
    @BeforeThisTest(method = "prepareParentHeaderOnly")
    void Should_use_parent_header_only() {
        assertDoesNotThrow(() -> restClient.get1().join());
    }

    private void prepareParentAndChildHeaders() {
        prepareHttpClientMock(
                httpClientFactory,
                new HttpRequestMock.Builder()
                        .setMethod(GET)
                        .setPath("/get2")
                        .setHeaders(HttpHeaders.of(
                                "Mode", "Demo",
                                "Debug", "true"
                        ))
                        .build(),
                true
        );
    }

    @Test
    @BeforeThisTest(method = "prepareParentAndChildHeaders")
    void Should_use_parent_and_child_headers() {
        assertDoesNotThrow(() -> restClient.get2().join());
    }
}|
In order to understand the differences between the |
|
The project source code used in the current subsection is available at the following link: |
|
When compiling, the RxMicro framework searches for When changing the |
6.4.4. Repeating HTTP Headers
If the HTTP header of an HTTP request is a list of values, the list elements are transferred by default via the HTTP protocol as a string separated by the | symbol.
If You want the HTTP header to be repeated for each value, You need to use the
@RepeatHeader annotation:
@RestClient
public interface RepeatingHeadersRestClient {

    @PUT("/")
    @HeaderMappingStrategy
    CompletableFuture<Void> put(@Header List<Status> singleHeader,
                                @Header @RepeatHeader List<Status> repeatingHeader);
}|
The use of the For response models it makes no sense, because the RxMicro framework converts any of the supported formats into a list of values. |
As a result of converting the Java model to HTTP response, the result will be as follows:
@InitMocks
@RxMicroComponentTest(RepeatingHeadersRestClient.class)
final class RepeatingHeadersRestClientTest {

    private RepeatingHeadersRestClient restClient;

    @Mock(answer = RETURNS_DEEP_STUBS)
    @Alternative
    private HttpClientFactory httpClientFactory;

    private void prepare() {
        prepareHttpClientMock(
                httpClientFactory,
                new HttpRequestMock.Builder()
                        .setMethod(PUT)
                        .setPath("/")
                        .setHeaders(HttpHeaders.of(
                                "Single-Header", "created|approved|rejected", (1)
                                "Repeating-Header", "created",
                                "Repeating-Header", "approved",               (2)
                                "Repeating-Header", "rejected"
                        ))
                        .build(),
                true
        );
    }

    @Test
    @BeforeThisTest(method = "prepare")
    void Should_support_repeating_headers() {
        final List<Status> headers = List.of(created, approved, rejected);
        assertDoesNotThrow(() -> restClient.put(headers, headers).join());
    }
}| 1 | By default, HTTP header list elements are transferred via the HTTP protocol as a string separated by the | symbol. |
| 2 | If the field is annotated by the @RepeatHeader annotation, then the header is repeated for each element of the list. |
|
The project source code used in the current subsection is available at the following link: |
|
When compiling, the RxMicro framework searches for When changing the |
6.5. HTTP Parameters Handling
6.5.1. Basic Rules
The RxMicro framework supports HTTP parameters in request and response models:
(1)
@ParameterMappingStrategy
public final class Request {

    (2)
    String endpointVersion;

    (3)
    @Parameter("use-Proxy")
    Boolean useProxy;

    public String getEndpointVersion() {
        return endpointVersion;
    }

    public Boolean getUseProxy() {
        return useProxy;
    }
}
(1)
@ParameterMappingStrategy
public final class Response {
(2)
final String endpointVersion;
(3)
@Parameter("use-Proxy")
final Boolean useProxy;
public Response(final Request request) {
this.endpointVersion = request.getEndpointVersion();
this.useProxy = request.getUseProxy();
}
public Response(final String endpointVersion,
final Boolean useProxy) {
this.endpointVersion = endpointVersion;
this.useProxy = useProxy;
}
}| 1 | The @ParameterMappingStrategy
annotation allows setting common conversion rules for all parameter names from HTTP to Java format and vice versa in the current model class.
(By default, the
LOWERCASE_WITH_UNDERSCORED strategy is used.
The field name is used as the basic name, and then, following the rules of the specified strategy, the HTTP parameter name is generated.) |
| 2 | In order to declare a model field as the HTTP parameter field, it is necessary to use the
@Parameter annotation.
(Unlike the @Header annotation, the @Parameter annotation is optional.
Thus, if the model field is not annotated by any annotation, then by default it is assumed that there is the @Parameter annotation above the model field.) |
| 3 | Using the @Parameter
annotation, it is possible to specify the HTTP parameter name, which does not correspond to the used strategy declared by the
@ParameterMappingStrategy annotation. |
The RxMicro framework uses the following algorithm to define the HTTP parameter name for the specified model field:
-
If the field is annotated by the
@Parameterannotation with an explicit indication of the HTTP parameter name, the specified name is used; -
If no HTTP parameter name is specified in the
@Parameterannotation, the RxMicro framework checks for the@ParameterMappingStrategyannotation above the model class; -
If the model class is annotated by the
@ParameterMappingStrategyannotation, then the specified naming strategy is used. (The field name is used as the basic name, and then, following the rules of the specified strategy, the HTTP parameter name is generated.) -
If the
@ParameterMappingStrategyannotation is missing, the model class field name is used as the HTTP parameter name.
|
Unlike the Thus, if the model field is not annotated by any annotation, then by default it is assumed that there is the |
After creating model classes, it is necessary to create an HTTP request handler that uses the following models:
@RestClient
public interface SimpleUsageRestClient {

    @GET("/get1")
    CompletableFuture<Response> get1(final Request request); (1)

    (2)
    @GET("/get2")
    (3)
    @ParameterMappingStrategy
    CompletableFuture<Response> get2(final String endpointVersion,        (4)
                                     final @Parameter("use-Proxy") Boolean useProxy); (5)
}| 1 | If a separate model class has been created for an HTTP request, then this class must be passed by the method parameter that handles the HTTP request. |
| 2 | Besides supporting HTTP request model classes, the RxMicro framework supports request handlers that accept HTTP request parameters as method parameters. |
| 3 | To define a common naming strategy for all HTTP parameters which are passed as method parameters, the request handler must be annotated by the @ParameterMappingStrategy annotation. |
| 4 | To declare a method parameter as an HTTP parameter field, You do not need to use any additional annotations. |
| 5 | Using the @Parameter annotation, it is possible to specify an HTTP parameter name that does not correspond to the strategy used, declared by the @ParameterMappingStrategy annotation. |
|
Note that the RxMicro framework does not distinguish whether HTTP request parameters will be transferred to the handler using the start line or HTTP body! |
|
The RxMicro framework recommends for request handlers that depend on 3 or more HTTP parameters to create separate classes of request model. Upon implementation of HTTP parameters directly into the handler, the code becomes hard to read! |
Despite the different approaches to HTTP parameter handling support, as to the message generated by the HTTP protocol, the two above-mentioned handlers are absolutely equal:
@InitMocks
@RxMicroComponentTest(SimpleUsageRestClient.class)
final class SimpleUsageRestClientTest {

    private static final String ENDPOINT_VERSION = "v1";

    private static final Boolean USE_PROXY = true;

    private static final QueryParams QUERY_PARAMETERS = QueryParams.of(
            "endpoint_version", ENDPOINT_VERSION,
            "use-Proxy", USE_PROXY
    );

    private static final Object BODY = jsonObject(
            "endpoint_version", ENDPOINT_VERSION,
            "use-Proxy", USE_PROXY
    );

    private SimpleUsageRestClient restClient;

    @Mock(answer = RETURNS_DEEP_STUBS)
    @Alternative
    private HttpClientFactory httpClientFactory;

    private void prepare1() {
        prepareHttpClientMock(
                httpClientFactory,
                new HttpRequestMock.Builder()
                        .setMethod(HttpMethod.GET)
                        .setPath("/get1")
                        .setQueryParameters(QUERY_PARAMETERS)
                        .build(),
                BODY,
                true
        );
    }

    @Test
    @BeforeThisTest(method = "prepare1")
    void Should_use_handler_with_request_class() {
        final Response response =
                assertDoesNotThrow(() ->
                        restClient.get1(new Request(ENDPOINT_VERSION, USE_PROXY)).join());

        assertEquals(ENDPOINT_VERSION, response.getEndpointVersion());
        assertEquals(USE_PROXY, response.getUseProxy());
    }

    private void prepare2() {
        prepareHttpClientMock(
                httpClientFactory,
                new HttpRequestMock.Builder()
                        .setMethod(HttpMethod.GET)
                        .setPath("/get2")
                        .setQueryParameters(QUERY_PARAMETERS)
                        .build(),
                BODY,
                true
        );
    }

    @Test
    @BeforeThisTest(method = "prepare2")
    void Should_use_handler_with_request_params() {
        final Response response =
                assertDoesNotThrow(() ->
                        restClient.get2(ENDPOINT_VERSION, USE_PROXY).join());

        assertEquals(ENDPOINT_VERSION, response.getEndpointVersion());
        assertEquals(USE_PROXY, response.getUseProxy());
    }
}|
The project source code used in the current subsection is available at the following link: |
|
When compiling, the RxMicro framework searches for When changing the |
6.5.2. Supported Data Types
The RxMicro framework supports the following Java types, which can be HTTP request model parameters:
-
? extends Enum<?>; -
java.lang.Boolean; -
java.lang.Byte; -
java.lang.Short; -
java.lang.Integer; -
java.lang.Long; -
java.math.BigInteger; -
java.lang.Float; -
java.lang.Double; -
java.math.BigDecimal; -
java.lang.Character; -
java.lang.String; -
java.time.Instant; -
? extends Object; -
java.util.List<? extends Object>; -
java.util.Set<? extends Object>; -
java.util.Map<java.lang.String, ? extends Object>;
|
For floating point numbers, it is suggested to use the Using the |
and also the java.util.List<T>, java.util.Set<T> and the java.util.Map<String, T> type is parameterized by any of the above mentioned primitive types.
|
If the |
6.5.3. Complex Model Support
Unlike HTTP headers, HTTP parameters can be transferred in the request body.
Therefore, besides primitives the RxMicro framework also supports nested JSON objects and arrays.
|
Therefore, the list of supported types includes the following types:
|
Nested Model Example:
@ParameterMappingStrategy
public final class NestedModel {

    String stringParameter;

    BigDecimal bigDecimalParameter;

    Instant instantParameter;

    public NestedModel(final String stringParameter,
                       final BigDecimal bigDecimalParameter,
                       final Instant instantParameter) {
        this.stringParameter = stringParameter;
        this.bigDecimalParameter = bigDecimalParameter;
        this.instantParameter = instantParameter;
    }

    public NestedModel() {
    }

    @Override
    public int hashCode() {
        return Objects.hash(stringParameter, bigDecimalParameter, instantParameter);
    }

    @Override
    public boolean equals(final Object o) {
        if (this == o) return true;
        if (o == null || getClass() != o.getClass()) return false;
        final NestedModel that = (NestedModel) o;
        return stringParameter.equals(that.stringParameter) &&
                bigDecimalParameter.equals(that.bigDecimalParameter) &&
                instantParameter.equals(that.instantParameter);
    }
}
As well as examples of more complex Java models that use a nested model:
@ParameterMappingStrategy
public final class ComplexRequest {

    final Integer integerParameter; (1)

    final Status enumParameter; (1)

    final List<Status> enumsParameter; (2)

    final NestedModel nestedModelParameter; (3)

    final List<NestedModel> nestedModelsParameter; (4)

    public ComplexRequest(final Integer integerParameter,
                          final Status enumParameter,
                          final List<Status> enumsParameter,
                          final NestedModel nestedModelParameter,
                          final List<NestedModel> nestedModelsParameter) {
        this.integerParameter = integerParameter;
        this.enumParameter = enumParameter;
        this.enumsParameter = enumsParameter;
        this.nestedModelParameter = nestedModelParameter;
        this.nestedModelsParameter = nestedModelsParameter;
    }
}
@ParameterMappingStrategy
public final class ComplexResponse {
Integer integerParameter; (1)
Status enumParameter; (1)
List<Status> enumsParameter; (2)
NestedModel nestedModelParameter; (3)
List<NestedModel> nestedModelsParameter; (4)
public Integer getIntegerParameter() {
return integerParameter;
}
public Status getEnumParameter() {
return enumParameter;
}
public List<Status> getEnumsParameter() {
return enumsParameter;
}
public NestedModel getNestedModelParameter() {
return nestedModelParameter;
}
public List<NestedModel> getNestedModelsParameter() {
return nestedModelsParameter;
}
}| 1 | Primitive JSON type field. |
| 2 | Primitive JSON array type. |
| 3 | Nested JSON object. |
| 4 | JSON array of JSON nested objects. |
After creating model classes, it is necessary to create a request handler that uses the following models:
@RestClient
public interface ComplexModelRestClient {
@POST("/")
CompletableFuture<ComplexResponse> post(ComplexRequest request);
}Since the request is transferred in an HTTP body, the sent and received JSON objects must be the same:
@InitMocks
@RxMicroComponentTest(ComplexModelRestClient.class)
final class ComplexModelRestClientTest {
private final Integer integerParameter = 1;
private final Status enumParameter = created;
private final List<Status> enumsParameter = List.of(created, approved);
private final NestedModel nestedModelParameter =
new NestedModel("test", new BigDecimal("3.14"), Instant.now());
private final List<NestedModel> nestedModelsParameter = List.of(
new NestedModel("test1", new BigDecimal("1.1"), Instant.now()),
new NestedModel("test2", new BigDecimal("1.2"), Instant.now())
);
private ComplexModelRestClient restClient;
@Mock(answer = RETURNS_DEEP_STUBS)
@Alternative
private HttpClientFactory httpClientFactory;
void prepare() {
prepareHttpClientMock(
httpClientFactory,
new HttpRequestMock.Builder()
.setMethod(POST)
.setPath("/")
.setAnyBody()
.build(),
new HttpResponseMock.Builder()
.setReturnRequestBody()
.build(),
true
);
}
@Test
@BeforeThisTest(method = "prepare")
void Should_support_complex_requests_and_responses() {
final ComplexResponse response = assertDoesNotThrow(() ->
restClient.post(new ComplexRequest(
integerParameter,
enumParameter,
enumsParameter,
nestedModelParameter,
nestedModelsParameter
)).join());
assertEquals(integerParameter, response.getIntegerParameter());
assertEquals(enumParameter, response.getEnumParameter());
assertEquals(enumsParameter, response.getEnumsParameter());
assertEquals(nestedModelParameter, response.getNestedModelParameter());
assertEquals(nestedModelsParameter, response.getNestedModelsParameter());
}
}|
The project source code used in the current subsection is available at the following link: |
|
When compiling, the RxMicro framework searches for When changing the |
6.5.4. Static Query Parameters
For setting static query parameters, the RxMicro framework provides the
@AddQueryParameter and
@SetQueryParameter annotations:
@RestClient
(1)
@SetQueryParameter(name = "mode", value = "demo")
public interface StaticQueryParametersRestClient {
@GET("/get1")
CompletableFuture<Void> get1();
@GET("/get2")
(2)
@SetQueryParameter(name = "debug", value = "true")
CompletableFuture<Void> get2();
}| 1 | If the static query parameter is set for the REST client, it is added to the HTTP requests for each handler. |
| 2 | If the static query parameter is set for the handler, it is added to the HTTP requests only for that handler. |
In terms of the HTTP protocol, static query parameters do not differ from any standard parameter:
@InitMocks
@RxMicroComponentTest(StaticQueryParametersRestClient.class)
final class StaticQueryParametersRestClientTest {
private StaticQueryParametersRestClient restClient;
@Mock(answer = RETURNS_DEEP_STUBS)
@Alternative
private HttpClientFactory httpClientFactory;
private void prepareParentParamOnly() {
prepareHttpClientMock(
httpClientFactory,
new HttpRequestMock.Builder()
.setMethod(GET)
.setPath("/get1")
.setQueryParameters(QueryParams.of(
"mode", "demo"
))
.build(),
true
);
}
@Test
@BeforeThisTest(method = "prepareParentParamOnly")
void Should_use_parent_param_only() {
assertDoesNotThrow(() -> restClient.get1().join());
}
private void prepareParentAndChildParams() {
prepareHttpClientMock(
httpClientFactory,
new HttpRequestMock.Builder()
.setMethod(GET)
.setPath("/get2")
.setQueryParameters(QueryParams.of(
"debug", true,
"mode", "demo"
))
.build(),
true
);
}
@Test
@BeforeThisTest(method = "prepareParentAndChildParams")
void Should_use_parent_and_child_params() {
assertDoesNotThrow(() -> restClient.get2().join());
}
}|
In order to understand the differences between the |
|
The project source code used in the current subsection is available at the following link: |
|
When compiling, the RxMicro framework searches for When changing the |
6.5.5. Repeating Query Parameters
If the static query parameter of an HTTP request is a list of values, the list elements are transferred by default via the HTTP protocol as a string separated by the | symbol.
If You want the static query parameter to be repeated for each value, You need to use the
@RepeatQueryParameter annotation:
@RestClient
public interface RepeatingQueryParamsRestClient {
@PUT(value = "/", httpBody = false)
@ParameterMappingStrategy
CompletableFuture<Void> put(List<Status> singleHeader,
@RepeatQueryParameter List<Status> repeatingHeader);
}As a result of converting the Java model to HTTP response, the result will be as follows:
@InitMocks
@RxMicroComponentTest(RepeatingQueryParamsRestClient.class)
final class RepeatingQueryParamsRestClientTest {
private RepeatingQueryParamsRestClient restClient;
@Mock(answer = RETURNS_DEEP_STUBS)
@Alternative
private HttpClientFactory httpClientFactory;
private void prepare() {
prepareHttpClientMock(
httpClientFactory,
new HttpRequestMock.Builder()
.setMethod(PUT)
.setPath("/")
.setQueryParameters(QueryParams.of(
"single_header", "created|approved|rejected", (1)
"repeating_header", "created",
"repeating_header", "approved", (2)
"repeating_header", "rejected"
))
.build(),
true
);
}
@Test
@BeforeThisTest(method = "prepare")
void Should_support_repeating_headers() {
final List<Status> headers = List.of(created, approved, rejected);
assertDoesNotThrow(() -> restClient.put(headers, headers).join());
}
}| 1 | By default, static query parameter list elements are transferred via the HTTP protocol as a string separated by the | symbol. |
| 2 | If the field is annotated by the @RepeatQueryParameter annotation, then the static query parameter is repeated for each element of the list. |
|
The project source code used in the current subsection is available at the following link: |
|
When compiling, the RxMicro framework searches for When changing the |
6.6. The path variables Support
6.6.1. Basic Rules
The RxMicro framework supports path variables in request models:
public final class Request {
(1)
@PathVariable
String category;
(2)
@PathVariable("class")
String type;
@PathVariable
String subType;
public String getCategory() {
return category;
}
public String getType() {
return type;
}
public String getSubType() {
return subType;
}
}| 1 | In order to declare a model field as the path variable, it is necessary to use the
@PathVariable annotation. |
| 2 | Using the @PathVariable annotation, it is possible to specify the path variable name.(If no name is specified, the model field name is used as the path variable name.) |
|
Unlike HTTP headers and parameters that are available also on the client side, So for simplicity it is recommended to always use the model field name as the |
After creating model classes, it is necessary to create an HTTP request handler that uses the following model:
@RestClient
public interface RESTClient {
(1)
@GET("/${category}/${class}-${subType}")
CompletableFuture<Void> consume(final Request request);
(1)
@GET("/${category}/${class}-${subType}")
CompletableFuture<Void> consume(@PathVariable String category, (2)
@PathVariable("class") String type, (3)
@PathVariable String subType);
}| 1 | When using path variables in request models, be sure to use all path variables in the URL Path.
(Based on the analysis of the URL Path, and considering all path variables, the RxMicro framework generates the final URL to which the HTTP request will be sent.) |
| 2 | In order to declare a method parameter as path variable, You must use the @PathVariable annotation. |
| 3 | Using the @PathVariable annotation it is possible to specify the path variable name, which does not match the name of the method parameter. |
|
The RxMicro framework recommends for request handlers that depend on 3 or more
Upon implementation of
|
Despite the different approaches to path variables handling support, in terms of the final URL the two above-mentioned handlers are absolutely equal:
@InitMocks
@RxMicroComponentTest(RESTClient.class)
final class RESTClientTest {
private RESTClient restClient;
@Mock(answer = RETURNS_DEEP_STUBS)
@Alternative
private HttpClientFactory httpClientFactory;
static Stream<Consumer<RESTClient>> clientMethodsProvider() {
return Stream.of(
client -> client.consume(new Request("CATEGORY", "TYPE", "SUB-TYPE")).join(),
client -> client.consume("CATEGORY", "TYPE", "SUB-TYPE").join()
);
}
private void prepare() {
prepareHttpClientMock(
httpClientFactory,
new HttpRequestMock.Builder()
.setMethod(HttpMethod.GET)
.setPath("/CATEGORY/TYPE-SUB-TYPE") (1)
.build(),
true
);
}
@ParameterizedTest
@MethodSource("clientMethodsProvider")
@BeforeThisTest(method = "prepare")
void Should_return_message_Hello_World(final Consumer<RESTClient> clientMethod) {
assertDoesNotThrow(() -> clientMethod.accept(restClient));
}
}| 1 | As a result of the HTTP request handler execution, the RxMicro framework generates the same URL: /CATEGORY/TYPE-SUB-TYPE |
|
The project source code used in the current subsection is available at the following link: |
|
When compiling, the RxMicro framework searches for When changing the |
6.6.2. Supported Data Types
The RxMicro framework supports the following Java types, which can be path variables of the request model:
-
? extends Enum<?>; -
java.lang.Boolean; -
java.lang.Byte; -
java.lang.Short; -
java.lang.Integer; -
java.lang.Long; -
java.math.BigInteger; -
java.lang.Float; -
java.lang.Double; -
java.math.BigDecimal; -
java.lang.Character; -
java.lang.String; -
java.time.Instant;
|
For floating point numbers, it is suggested to use the Using the |
6.7. Support of Internal Data Types
6.7.1. Basic Rules
The RxMicro framework works with internal data. Due to this, the developer can extract additional information about the HTTP response.
To work with internal data, it is necessary to create a response model:
public final class Response {
(1)
@ResponseStatusCode
Integer status;
(2)
HttpVersion version;
(3)
HttpHeaders headers;
(4)
@ResponseBody
byte[] body;
public Integer getStatus() {
return status;
}
public HttpVersion getVersion() {
return version;
}
public HttpHeaders getHeaders() {
return headers;
}
public byte[] getBody() {
return body;
}
}| 1 | To get the HTTP status code, it is necessary to use the
@ResponseStatusCode annotation. |
| 2 | To get the HTTP protocol version, it is necessary to use the
HttpVersion type.(Currently only 1.0 and 1.1 HTTP versions are supported.) |
| 3 | To get all HTTP headers, it is necessary to use the
HttpHeaders type. |
| 4 | To get the response body content as a byte array, it is necessary to use the
@ResponseBody annotation. |
After creating model classes, it is necessary to create a REST client method that uses this model:
@RestClient
public interface RESTClient {
@GET("/")
CompletableFuture<Response> get();
}After creating the REST client, let’s check that everything works:
@InitMocks
@RxMicroComponentTest(RESTClient.class)
final class RESTClientTest {
private RESTClient restClient;
@Mock(answer = RETURNS_DEEP_STUBS)
@Alternative
private HttpClientFactory httpClientFactory;
@Mock
private HttpHeaders headers;
private void prepare() {
prepareHttpClientMock(
httpClientFactory,
new HttpRequestMock.Builder()
.setMethod(GET)
.setPath("/")
.build(),
new HttpResponseMock.Builder()
.setStatus(201)
.setVersion(HTTP_1_0)
.setHeaders(headers)
.setBody("<BODY>")
.build(),
true
);
}
@Test
@BeforeThisTest(method = "prepare")
void Should_support_internals() {
final Response response = assertDoesNotThrow(() -> restClient.get().join());
assertEquals(201, response.getStatus());
assertEquals(HTTP_1_0, response.getVersion());
assertSame(headers, response.getHeaders());
assertArrayEquals("<BODY>".getBytes(UTF_8), response.getBody());
}
}|
The project source code used in the current subsection is available at the following link: |
|
When compiling, the RxMicro framework searches for When changing the |
6.7.2. Supported Internal Data Types
| Java type | RxMicro Annotation | Is the annotation required? | Description |
|---|---|---|---|
None |
- |
HTTP protocol version |
|
None |
- |
HTTP header model |
|
Yes |
HTTP response status code |
||
|
Yes |
HTTP response body content |
|
Currently only |
6.8. Versioning of REST Clients
The RxMicro framework supports versioning of REST Clients using two strategies:
-
Versioning based on HTTP header analysis with the
Api-Versionname. -
Versioning based on URL Path fragment analysis.
6.8.1. Versioning Based on HTTP Header Analysis
The RxMicro framework allows creating identical REST clients that differ only in version:
@RestClient
@Version(value = "v1", strategy = Version.Strategy.HEADER) (1)
public interface OldRestClient {
@PATCH("/patch")
CompletableFuture<Void> update();
}| 1 | REST client of the old v1 version, using the
Version.Strategy.HEADER strategy; |
@RestClient
@Version(value = "v2", strategy = Version.Strategy.HEADER) (1)
public interface NewRestClient {
@PATCH("/patch")
CompletableFuture<Void> update();
}| 1 | REST client of the new v2 version, using the
Version.Strategy.HEADER strategy; |
The correctness of HTTP request generation for these REST clients can be checked with the following tests:
@InitMocks
@RxMicroComponentTest(OldRestClient.class)
final class OldRestClientTest {
private OldRestClient restClient;
@Mock(answer = RETURNS_DEEP_STUBS)
@Alternative
private HttpClientFactory httpClientFactory;
private void prepare() {
prepareHttpClientMock(
httpClientFactory,
new HttpRequestMock.Builder()
.setMethod(HttpMethod.PATCH)
.setPath("/patch")
.setHeaders(HttpHeaders.of(
API_VERSION, "v1"
))
.build(),
true
);
}
@Test
@BeforeThisTest(method = "prepare")
void Should_add_version_url_path() {
assertDoesNotThrow(() -> restClient.update().join());
}
}@InitMocks
@RxMicroComponentTest(NewRestClient.class)
final class NewRestClientTest {
private NewRestClient restClient;
@Mock(answer = RETURNS_DEEP_STUBS)
@Alternative
private HttpClientFactory httpClientFactory;
private void prepare() {
prepareHttpClientMock(
httpClientFactory,
new HttpRequestMock.Builder()
.setMethod(HttpMethod.PATCH)
.setPath("/patch")
.setHeaders(HttpHeaders.of(
API_VERSION, "v2"
))
.build(),
true
);
}
@Test
@BeforeThisTest(method = "prepare")
void Should_add_version_url_path() {
assertDoesNotThrow(() -> restClient.update().join());
}
}|
The project source code used in the current subsection is available at the following link: |
|
When compiling, the RxMicro framework searches for When changing the |
6.8.2. Versioning Based on URL Path Fragment Analysis
The RxMicro framework allows creating identical REST clients that differ only in version:
@RestClient
@Version(value = "v1", strategy = Version.Strategy.URL_PATH) (1)
public interface OldRestClient {
@PATCH("/patch")
CompletableFuture<Void> update();
}| 1 | REST client of the old v1 version, using the
Version.Strategy.URL_PATH strategy; |
@RestClient
@Version(value = "v2", strategy = Version.Strategy.URL_PATH) (1)
public interface NewRestClient {
@PATCH("/patch")
CompletableFuture<Void> update();
}| 1 | REST client of the new v2 version, using the
Version.Strategy.URL_PATH strategy; |
The correctness of HTTP request generation for these REST clients can be checked with the following tests:
@InitMocks
@RxMicroComponentTest(OldRestClient.class)
final class OldRestClientTest {
private OldRestClient restClient;
@Mock(answer = RETURNS_DEEP_STUBS)
@Alternative
private HttpClientFactory httpClientFactory;
private void prepare() {
prepareHttpClientMock(
httpClientFactory,
new HttpRequestMock.Builder()
.setMethod(HttpMethod.PATCH)
.setPath("/v1/patch")
.build(),
true
);
}
@Test
@BeforeThisTest(method = "prepare")
void Should_add_version_url_path() {
assertDoesNotThrow(() -> restClient.update().join());
}
}@InitMocks
@RxMicroComponentTest(NewRestClient.class)
final class NewRestClientTest {
private NewRestClient restClient;
@Mock(answer = RETURNS_DEEP_STUBS)
@Alternative
private HttpClientFactory httpClientFactory;
private void prepare() {
prepareHttpClientMock(
httpClientFactory,
new HttpRequestMock.Builder()
.setMethod(HttpMethod.PATCH)
.setPath("/v2/patch")
.build(),
true
);
}
@Test
@BeforeThisTest(method = "prepare")
void Should_add_version_url_path() {
assertDoesNotThrow(() -> restClient.update().join());
}
}|
The project source code used in the current subsection is available at the following link: |
|
When compiling, the RxMicro framework searches for When changing the |
6.9. Base URL Path for All Handlers
To configure a base URL Path for all methods sending an HTTP request, the RxMicro framework provides the
@BaseUrlPath annotation:
@RestClient
@BaseUrlPath("base-url-path")
public interface RESTClient {
@GET("/path")
CompletableFuture<Void> path();
}@InitMocks
@RxMicroComponentTest(RESTClient.class)
final class RESTClientTest {
private RESTClient restClient;
@Mock(answer = RETURNS_DEEP_STUBS)
@Alternative
private HttpClientFactory httpClientFactory;
private void prepare() {
prepareHttpClientMock(
httpClientFactory,
new HttpRequestMock.Builder()
.setMethod(HttpMethod.GET)
.setPath("/base-url-path/path")
.build(),
true
);
}
@Test
@BeforeThisTest(method = "prepare")
void Should_support_base_url() {
assertDoesNotThrow(() -> restClient.path().join());
}
}|
The project source code used in the current subsection is available at the following link: |
|
When compiling, the RxMicro framework searches for When changing the |
6.10. Expressions
The RxMicro framework supports expressions for REST clients.
Expressions can be useful to send configuration parameters to the server.
To use expressions You need to create a configuration class:
public final class CustomRestClientConfig extends RestClientConfig {
private boolean useProxy = true;
private Mode mode = Mode.PRODUCTION;
public boolean isUseProxy() {
return useProxy;
}
public CustomRestClientConfig setUseProxy(final boolean useProxy) {
this.useProxy = useProxy;
return this;
}
public Mode getMode() {
return mode;
}
public CustomRestClientConfig setMode(final Mode mode) {
this.mode = mode;
return this;
}
@Override
public CustomRestClientConfig setSchema(final ProtocolSchema schema) {
return (CustomRestClientConfig) super.setSchema(schema);
}
@Override
public CustomRestClientConfig setHost(final String host) {
return (CustomRestClientConfig) super.setHost(host);
}
@Override
public CustomRestClientConfig setPort(final int port) {
return (CustomRestClientConfig) super.setPort(port);
}
public enum Mode {
PRODUCTION,
TEST
}
}, which must meet the following requirements:
-
The class must be public.
-
The class must contain a public constructor without parameters.
-
The class must extend the
RestClientConfigclass. -
To set property values, the class must contain
setters.
(Only those fields, that will containsetters, can be initialized!)
To attach this configuration class to a REST client, You must specify it in the
@RestClient annotation parameter:
@RestClient(
configClass = CustomRestClientConfig.class, (1)
configNameSpace = "custom" (2)
)
@AddHeader(name = "Use-Proxy", value = "${useProxy}") (3)
public interface RESTClient {
@PUT("/")
@AddHeader(name = "Debug", value = "Use-Proxy=${useProxy}, Mode=${mode}") (3)
@AddHeader(name = "Endpoint", value = "Schema=${schema}, Host=${host}, Port=${port}") (3)
CompletableFuture<Void> put();
}| 1 | Attaching the configuration class to a REST client. |
| 2 | The name space specification for this configuration file.(For more information on name space, refer to the core.html section) |
| 3 | After attaching the configuration class, its properties can be used in expressions. |
|
So dont’t forget to add the following |
The functionality of expressions can be demonstrated through the test:
@InitMocks
@RxMicroComponentTest(RESTClient.class)
final class RESTClientTest {
@WithConfig("custom")
private static final CustomRestClientConfig config =
new CustomRestClientConfig()
.setHost("rxmicro.io")
.setPort(8443)
.setSchema(ProtocolSchema.HTTPS)
.setUseProxy(false)
.setMode(CustomRestClientConfig.Mode.TEST);
private RESTClient restClient;
@Mock(answer = RETURNS_DEEP_STUBS)
@Alternative
private HttpClientFactory httpClientFactory;
private void prepare() {
prepareHttpClientMock(
httpClientFactory,
new HttpRequestMock.Builder()
.setMethod(HttpMethod.PUT)
.setPath("/")
.setHeaders(HttpHeaders.of(
"Use-Proxy", "false",
"Debug", "Use-Proxy=false, Mode=TEST",
"Endpoint", "Schema=HTTPS, Host=rxmicro.io, Port=8443"
))
.build(),
true
);
}
@Test
@BeforeThisTest(method = "prepare")
void Should_support_expressions() {
assertDoesNotThrow(() -> restClient.put().join());
}
}|
The project source code used in the current subsection is available at the following link: |
|
When compiling, the RxMicro framework searches for When changing the |
6.11. Request ID
The Request Id feature described at Monitoring section.
6.12. Partial Implementation
If the REST client generated by the RxMicro Annotation Processor contains errors, incorrect or non-optimized logic, the developer can use the Partial Implementation feature.
This feature allows You to implement HTTP request handlers for the REST client on Your own, instead of generating them by the RxMicro framework.
To activate this feature, You need to use the
@PartialImplementation
annotation, and specify an abstract class that contains a partial implementation of HTTP request handler(s) for REST client:
@RestClient
(1)
@PartialImplementation(AbstractRESTClient.class)
public interface RESTClient {
@GET("/")
CompletableFuture<Void> generatedMethod();
CompletableFuture<Void> userDefinedMethod();
}| 1 | Using the
@PartialImplementation
annotation, the AbstractRESTClient class is specified. |
An AbstractRESTClient contains the following content:
abstract class AbstractRESTClient extends AbstractRestClient implements RESTClient {
@Override
public final CompletableFuture<Void> userDefinedMethod() {
return CompletableFuture.completedFuture(null);
}
}An abstract class that contains a partial implementation must meet the following requirements:
-
The class must be an
abstractone. -
The class must extend the
AbstractRestClientone. -
The class must implement the REST client interface.
-
The class must contain an implementation of all methods that are not generated automatically.
In terms of infrastructure, the HTTP request handlers generated and defined by the developer for REST client do not differ:
@InitMocks
@RxMicroComponentTest(RESTClient.class)
final class RESTClientTest {
private RESTClient restClient;
@Mock(answer = RETURNS_DEEP_STUBS)
@Alternative
private HttpClientFactory httpClientFactory;
private void prepareGeneratedMethod() {
prepareHttpClientMock(
httpClientFactory,
new HttpRequestMock.Builder()
.setMethod(GET)
.setPath("/")
.build(),
true
);
}
@Test
@BeforeThisTest(method = "prepareGeneratedMethod")
void Should_invoke_generated_method() {
assertDoesNotThrow(() -> restClient.generatedMethod().join());
}
private void prepareUserDefinedMethod() {
prepareHttpClientMock(
httpClientFactory,
new HttpRequestMock.Builder()
.setAnyRequest()
.build(),
true
);
}
@Test
@BeforeThisTest(method = "prepareUserDefinedMethod")
void Should_invoke_user_defined_method() {
assertDoesNotThrow(() -> restClient.userDefinedMethod().join());
final HttpClient httpClient = getPreparedHttpClientMock();
verify(httpClient, never()).sendAsync(anyString(), anyString(), any());
verify(httpClient, never()).sendAsync(anyString(), anyString(), any(), any());
}
}|
The project source code used in the current subsection is available at the following link: |
|
When compiling, the RxMicro framework searches for When changing the |
6.13. Configuring the Code Generation Process
The RxMicro framework provides an option to configure the code generation process for REST client.
For this purpose, it is necessary to use the
@RestClientGeneratorConfig
annotation, that annotates the module-info.java module descriptor:
import io.rxmicro.rest.client.RestClientGeneratorConfig;
import io.rxmicro.rest.model.ClientExchangeFormatModule;
import io.rxmicro.rest.model.GenerateOption;
@RestClientGeneratorConfig(
exchangeFormat = ClientExchangeFormatModule.AUTO_DETECT, (1)
generateRequestValidators = GenerateOption.DISABLED, (2)
generateResponseValidators = GenerateOption.DISABLED, (3)
requestValidationMode =
RestClientGeneratorConfig.RequestValidationMode.RETURN_ERROR_SIGNAL (4)
)
module rest.client.generator {
requires rxmicro.rest.client;
}| 1 | The exchangeFormat parameter allows You to specify a format for message exchange with a server.(By default, it is used the message exchange format which added to the module-info.java descriptor.
If several modules supporting the message exchange format are added to the module-info.java descriptor, then using the exchangeFormat, You need to specify which module should be used for REST clients.) |
| 2 | The generateRequestValidators parameter allows enabling/disabling the option of generating HTTP request validators for all REST client methods in the project.(The DISABLED value means that validators won’t be generated by the RxMicro Annotation Processor.) |
| 3 | The generateResponseValidators parameter allows enabling/disabling the option of generating HTTP response validators for all REST client methods in the project.(The AUTO_DETECT value means that validators will be generated only if the developer adds the rxmicro.validation module to the module-info.java descriptor.) |
| 4 | The requestValidationMode parameter specifies how the HTTP request parameters should be checked. |
If the requestValidationMode parameter is equal to the RETURN_ERROR_SIGNAL, then error handling should be performed in reactive style:
restClient.put("not_valid_email")
.exceptionally(throwable -> {
// do something with ValidationException
return null;
});If the requestValidationMode parameter is equal to the THROW_EXCEPTION, then it is necessary to catch the exception
try {
restClient.put("not_valid_email");
} catch (final ValidationException e) {
// do something with ValidationException
}|
The RxMicro team strong recommends using the (HTTP request validation can be useful for identifying errors in business task implementation algorithms. For example, instead of returning an incorrect request model to a server, the REST client will throw an error. This approach increases the speed of error search and debugging of the source code that performs the business task.) FYI: By default the request validators are generated but not invoked!
To activate the validation of requests it is necessary to set
or
or using any other supported config types Thus the RxMicro team recommends the following approach:
|
7. Validation
The RxMicro framework supports validation of HTTP requests and responses.
All classes and annotations required for data validation are available in the
rxmicro.validation module.
7.1. Preparatory Steps
To activate the validation module in a microservices project, the following steps must be taken:
-
Add the required dependencies to
pom.xml. -
Add the
rxmicro.validationmodule tomodule-info.java.
7.1.1. Adding the Required Dependencies:
To activate the validation module in a microservices project, it is necessary to add the rxmicro-validation library:
<dependencies>
<dependency>
<groupId>io.rxmicro</groupId>
<artifactId>rxmicro-validation</artifactId>
<version>${rxmicro.version}</version>
</dependency>
</dependencies>7.1.2. Adding the rxmicro.validation Module to module-info.java
module example {
requires rxmicro.validation; (1)
}| 1 | Adding the request and response validation module. |
7.2. Built-in Constraints.
The RxMicro framework supports the following built-in constraints, that are available at the
io.rxmicro.validation.constraint package:
| Annotation | Supported Type | Description |
|---|---|---|
The annotated element may be optional, i.e. |
||
The annotated element must be |
||
The annotated element must be |
||
The annotated element must be a valid country code: |
||
The annotated element must be a string value with digit characters only. |
||
The annotated element must be a well-formed email address. |
||
The annotated element value must end with the provided suffix. |
||
The annotated element must be an element of the predefined enumeration. This validation rule is useful when a Java |
||
The annotated element must be an instant in the future. |
||
The annotated element must be an instant in the present or in the future. |
||
The annotated element must be a valid host name. |
||
The annotated element must be a valid IP address: |
||
The annotated element must be a valid latitude coordinate. |
||
The annotated element must be a string with latin alphabet letters only. |
||
The annotated element must have the expected string length. |
||
The annotated element must be a valid longitude coordinate. |
||
The annotated element must a lowercase string. |
||
The annotated element must be a double whose value must be lower to the specified maximum. |
||
The annotated element must be a |
||
The annotated element must have a string length whose value must be lower or equal to the specified maximum. |
||
The annotated element must be a number whose value must be lower or equal to the specified maximum. |
||
The annotated element must have a list size whose value must be lower or equal to the specified maximum. |
||
The annotated element must be a double whose value must be higher or equal to the specified minimum. |
||
The annotated element must be a |
||
The annotated element must have a string length whose value must be higher or equal to the specified minimum. |
||
The annotated element must be a number whose value must be higher or equal to the specified minimum. |
||
The annotated element must have a list size whose value must be higher or equal to the specified minimum. |
||
|
The annotated element may be optional, i.e. |
|
The annotated array element may be optional, i.e. |
||
The annotated element must be a decimal within accepted range (scale and precision). |
||
The annotated element must be an instant in the past. |
||
The annotated element must be an instant in the past or in the present. |
||
The annotated (See |
||
The annotated element must be a valid phone number. |
||
The annotated element must have the expected list size. |
||
The annotated element must be a valid |
||
The annotated element value must start with the provided prefix. |
||
The annotated element must be an enumeration with predefined sub sequence. |
||
The annotated element must be a valid |
||
The annotated element must be an instant with truncated time value. |
||
The annotated element must contain unique items. |
||
The annotated element must an uppercase string. |
||
The annotated element must be a valid |
||
The annotated element must be a valid URL encoded value. |
||
The annotated element must be a valid |
||
The annotated element must be a valid |
|
The RxMicro framework analyzes built-in constraints when drawing up the project documentation. Therefore, a properly selected annotation, in addition to its main purpose, makes it possible to automatically generate more accurate project documentation! |
7.3. HTTP Requests Server Validation
After activation of the rxmicro.validation module in the module-info.java descriptor
module examples.validation.server.basic {
requires rxmicro.rest.server.netty;
requires rxmicro.rest.server.exchange.json;
requires rxmicro.validation; (1)
}| 1 | rxmicro.validation is a module for request and response validation. |
the developer can use built-in constraints to validate HTTP request parameters:
final class MicroService {
@PUT(value = "/", httpBody = false)
void consume(final @Email String email) { (1)
System.out.println("Email: " + email);
}
}| 1 | The email parameter is annotated by the @Email annotation. |
Due to this annotation the RxMicro Annotation Processor will automatically generate a validator for email HTTP parameter:
@RxMicroRestBasedMicroServiceTest(MicroService.class)
final class MicroServiceTest {
private BlockingHttpClient blockingHttpClient;
private SystemOut systemOut;
@ParameterizedTest
@CsvSource({
"/, Parameter \"email\" is required!", (1)
"/?email=, Parameter \"email\" is required!",
"/?email=rxmicro, Invalid parameter \"email\": Expected a valid email format!",
"/?email=rxmicro.io, Invalid parameter \"email\": Expected a valid email format!",
"/?email=@rxmicro.io, Invalid parameter \"email\": Expected a valid email format!",
"/?email=rxmicro.io@, Invalid parameter \"email\": Expected a valid email format!",
"/?email=@.rxmicro.io, Invalid parameter \"email\": Expected a valid email format!",
"/?email=rxmicro.io@., Invalid parameter \"email\": Expected a valid domain name!"
})
void Should_return_invalid_request_status(final String path,
final String expectedErrorMessage) {
final ClientHttpResponse response = blockingHttpClient.put(path);
assertEquals(jsonErrorObject(expectedErrorMessage), response.getBody()); (2)
assertEquals(400, response.getStatusCode()); (2)
assertTrue(systemOut.isEmpty(), "System.out is not empty: " + systemOut.asString()); (3)
}
@Test
void Should_handle_request() {
final ClientHttpResponse response = blockingHttpClient.put("/?email=welcome@rxmicro.io");
assertEquals("Email: welcome@rxmicro.io", systemOut.asString()); (4)
assertEquals(200, response.getStatusCode()); (4)
}
}| 1 | When activating the rxmicro.validation module, all query parameters are automatically considered as required.(Therefore the RxMicro Annotation Processor automatically adds a required validator for each parameter.
If the parameter should be optional, the model field should be annotated with the
@Nullable annotation.) |
| 2 | If request parameters are invalid, HTTP server automatically returns a status code 400 and JSON object of standard structure with detailed error description. |
| 3 | If an HTTP request validation error occurs, the request handler isn’t invoked from the REST controller. |
| 4 | If the request parameters are valid, control is transferred to the request handler from the REST controller. |
|
The project source code used in the current subsection is available at the following link: |
|
When compiling, the RxMicro framework searches for When changing the |
7.4. HTTP Responses Server Validation
In addition to validating HTTP requests, the RxMicro framework also provides the option to validate HTTP responses.
(HTTP response validation can be useful for identifying errors in business task implementation algorithms. For example, instead of returning an incorrect response model to a client, the microservice will throw an error. This approach increases the speed of error search and debugging of the source code that performs the business task.)
|
If current implementation of the business task doesn’t contain any errors, then HTTP response validation will consume computing resources senselessly. In this case, HTTP response validation must be disabled! By default the response validators are generated but not invoked! To activate the validation of responses it is necessary to set
or
or using any other supported config types |
The HTTP response model class can contain any built-in or custom constraint annotations:
public final class Response {
final String message; (1)
public Response(final String message) {
this.message = message;
}
}| 1 | In this example, the message field doesn’t explicitly contain any constraint annotations.
But since to the module-info.java descriptor was added the rxmicro.validation module, then all model fields not marked with the
@Nullable annotation are automatically required.
(In other words, such fields are implicitly marked by a virtual constraint annotation @Required.) |
To emulate an incorrect business value, null value is passed in the request handler to the message field:
final class MicroService {
@GET("/")
CompletableFuture<Response> get() {
return CompletableFuture.completedFuture(new Response(null));
}
}In case of invalid HTTP response, the RxMicro framework returns HTTP response with a status 500 and standard error model:
@RxMicroRestBasedMicroServiceTest(MicroService.class)
final class MicroServiceTest {
private BlockingHttpClient blockingHttpClient;
@Test
void Should_produce_internal_error() {
final ClientHttpResponse response = blockingHttpClient.get("/");
assertEquals(
jsonErrorObject("Response is invalid: Parameter \"message\" is required!"),
response.getBody()
);
assertEquals(500, response.getStatusCode());
}
}|
The project source code used in the current subsection is available at the following link: |
|
When compiling, the RxMicro framework searches for When changing the |
7.5. HTTP Responses Client Validation
After activation of the rxmicro.validation module in the module-info.java descriptor
module examples.validation.client.basic {
requires rxmicro.rest.client;
requires rxmicro.rest.client.exchange.json;
requires rxmicro.validation; (1)
}| 1 | rxmicro.validation is a module for request and response validation. |
the developer can use built-in constraints to validate HTTP request parameters:
public final class Response {
(1)
@Email
String email;
public String getEmail() {
return email;
}
}| 1 | The email parameter is annotated by the @Email annotation. |
After setting up the model class, this model must be used in the REST client:
@RestClient
public interface RESTClient {
@GET("/")
CompletableFuture<Response> get();
}When converting the content of an HTTP response to the Response class object, the validator will be invoked automatically:
@InitMocks
@RxMicroComponentTest(RESTClient.class)
final class RESTClientTest {
private static final HttpRequestMock HTTP_REQUEST_MOCK = new HttpRequestMock.Builder()
.setMethod(HttpMethod.GET)
.setPath("/")
.build();
private RESTClient restClient;
@Alternative
@Mock
private HttpClientFactory httpClientFactory;
private void prepareValidResponse() {
prepareHttpClientMock(
httpClientFactory,
HTTP_REQUEST_MOCK,
jsonObject("email", "welcome@rxmicro.io") (1)
);
}
@Test
@BeforeThisTest(method = "prepareValidResponse")
void Should_return_received_email() {
final Response response = restClient.get().join();
assertEquals("welcome@rxmicro.io", response.getEmail()); (1)
}
private void prepareInvalidResponse() {
prepareHttpClientMock(
httpClientFactory,
HTTP_REQUEST_MOCK,
jsonObject("email", "rxmicro.io") (2)
);
}
@Test
@BeforeThisTest(method = "prepareInvalidResponse")
void Should_throw_UnexpectedResponseException() {
final Throwable throwable =
(4)
getRealThrowable(assertThrows(RuntimeException.class, () -> restClient.get().join())); (2)
assertEquals(UnexpectedResponseException.class, throwable.getClass()); (3)
assertEquals(
"Response is invalid: " +
"Invalid parameter \"email\": Expected a valid email format!", (3)
throwable.getMessage()
);
}
}| 1 | If the REST client receives a valid HTTP response, no errors will occur. |
| 2 | If the email field is incorrect in the HTTP response, the REST client will return an error signal. |
| 3 | If the HTTP response is incorrect, the UnexpectedResponseException class exception is returned with a detailed text message. |
| 4 | Since CompletableFuture when receiving an error signal ALWAYS returns the CompletionException class exception, to get the original exception class, which was thrown during the lazy evaluation, it is necessary to use the
Exceptions.getRealThrowable(Throwable) utility method! |
|
Check out the following example to find out the features of the RxMicro framework for HTTP request validation in REST clients: |
|
The project source code used in the current subsection is available at the following link: |
|
When compiling, the RxMicro framework searches for When changing the |
7.6. HTTP Requests Client Validation
In addition to validating HTTP responses, the RxMicro framework also provides the option to validate HTTP requests.
(HTTP request validation can be useful for identifying errors in business task implementation algorithms. For example, instead of returning an incorrect request model to a server, the REST client will throw an error. This approach increases the speed of error search and debugging of the source code that performs the business task.)
|
If current implementation of the business task doesn’t contain any errors, then HTTP request validation will consume computing resources senselessly. In this case, HTTP request validation must be disabled! By default the request validators are generated but not invoked!
To activate the validation of requests it is necessary to set
or
or using any other supported config types |
7.7. Creating Custom Constraints
If built-in constraints are not enough, the developer can create custom constraint. To do so, the following steps must be taken:
-
Create a constraint annotation.
-
Implement a validator.
A validation annotation is an annotation that meets the following requirements:
(1)
@Retention(CLASS)
(2)
@Target({FIELD, METHOD, PARAMETER})
(3)
@ConstraintRule(
supportedTypes = {
BigDecimal.class (4)
},
validatorClass = {
ExpectedZeroConstraintValidator.class (5)
}
)
public @interface ExpectedZero {
boolean off() default false; (6)
}| 1 | The annotation is only available at the compilation level. |
| 2 | This annotation allows validating class fields, class methods (setters and getters) and method parameters. |
| 3 | The
@ConstraintRule annotation is used to indicate: |
| 4 | data type; |
| 5 | validator class. |
| 6 | Each constraint annotation requires a required boolean off() default false; parameter, that allows You to disable the validator.(This feature is useful for model inheritance when a parameter from a child class should not be validated and a parameter from a parent class should be validated!) |
Validator is a class that meets the following requirements:
public final class ExpectedZeroConstraintValidator
implements ConstraintValidator<BigDecimal> { (1)
@Override
public void validateNonNull(final BigDecimal value,
final HttpModelType httpModelType,
final String modelName) throws ValidationException {
if (value.compareTo(BigDecimal.ZERO) != 0) { (2)
throw new ValidationException(
"Invalid ? \"?\": Expected a zero value!",
httpModelType, modelName
);
}
}
}| 1 | The validator class must implement the
ConstraintValidator interface parameterized by the data type.(If constraint annotation can be applied to different data types, a separate validator class must be created for each data type.) |
| 2 | If the parameter is incorrect, the
ValidationException exception with a clear error message must be thrown. |
Using a custom validator is no different from using a predefined validator:
final class MicroService {
@PATCH("/")
void consume(final @ExpectedZero BigDecimal value) {
System.out.println(value);
}
}@ParameterizedTest
@CsvSource({
"/, Parameter \"value\" is required!",
"/?value=, Parameter \"value\" is required!",
"/?value=1.23, Invalid parameter \"value\": Expected a zero value!",
"/?value=-3.45, Invalid parameter \"value\": Expected a zero value!"
})
void Should_return_invalid_request_status(final String path,
final String expectedErrorMessage) {
final ClientHttpResponse response = blockingHttpClient.patch(path);
assertEquals(jsonErrorObject(expectedErrorMessage), response.getBody());
assertEquals(400, response.getStatusCode());
assertEquals("", systemOut.asString());
}
@ParameterizedTest
@ValueSource(strings = {"0", "0.0", "0.000", "-0.0"})
void Should_handle_request(final String value) {
final ClientHttpResponse response = blockingHttpClient.patch("/?value=" + value);
assertEquals(new BigDecimal(value).toString(), systemOut.asString());
assertEquals(200, response.getStatusCode());
}|
The project source code used in the current subsection is available at the following link: |
|
When compiling, the RxMicro framework searches for When changing the |
7.8. Disabling Validation
To disable the generation of validators, You must perform one of the following steps:
-
Delete the
rxmicro.validationmodule from themodule-info.javadescriptor. -
Use
GenerateOption.DISABLEDoptions to disable specific categories of validators. -
Use the
@DisableValidationannotation to disable validators of a selected group of classes in the project.
7.8.1. Removing the rxmicro.validation Module
The easiest and fastest way to disable the generation of validators for all classes in the current module is to remove the rxmicro.validation module from the module-info.java descriptor.
|
After deleting the |
7.8.2. Using GenerateOption.DISABLED Option
To disable the generation of validators by category, it is necessary to use annotations:
-
@RestServerGeneratorConfig(to set up the REST controllers). -
@RestClientGeneratorConfig(to set up the REST clients).
@RestServerGeneratorConfig(
generateRequestValidators = GenerateOption.DISABLED, (1)
generateResponseValidators = GenerateOption.DISABLED (2)
)
@RestClientGeneratorConfig(
generateRequestValidators = GenerateOption.DISABLED, (3)
generateResponseValidators = GenerateOption.DISABLED (4)
)
module examples.validation {
requires rxmicro.rest.server;
requires rxmicro.rest.client;
requires rxmicro.validation;
}| 1 | Validators for all models of HTTP requests in the current project won’t be generated. |
| 2 | Validators for all models of HTTP responses in the current project won’t be generated. |
| 3 | Validators for all models of HTTP requests in the current project won’t be generated. |
| 4 | Validators for all models of HTTP responses in the current project won’t be generated. |
|
Upon activation of the All other categories of validators must be manually activated using the |
|
After changing the settings using the |
7.8.3. Using @DisableValidation Annotation
The @DisableValidation
annotation provides an opportunity to disable the generation of validators for the selected group of classes in the project:
-
If a model class is annotated by this annotation, then only for this model class the validator won’t be generated.
-
If this annotation annotates the
package-info.javaclass, then for all classes from the specified package and all its subpackages no validators will be generated. -
If this annotation annotates the
module-info.javadescriptor, then for all classes in the current module no validators will be generated.
(This behavior is similar to the removal of therxmicro.validationmodule from themodule-info.javadescriptor.)
|
After adding the |
8. REST-based Microservice Documentation
REST-based microservice documentation describes rules of interaction with REST-based microservices for fast and easy integration with them.
Currently, the RxMicro framework only supports specialized documentation format based on the AsciiDoc format.
8.1. Basic Usage
Default settings allow You to generate REST-based microservice documentation using minimal configurations.
(This advantage is achieved through close integration with other RxMicro modules.)
8.1.1. Min Settings
To generate REST-based microservice documentation during the compilation of the microservice project, the following two steps must be done:
-
Add the
rxmicro-documentation-asciidoctordependency topom.xmlof the microservice project:
<dependency>
<groupId>io.rxmicro</groupId>
<artifactId>rxmicro-documentation-asciidoctor</artifactId>
<version>${rxmicro.version}</version>
</dependency>-
Add the
rxmicro.documentation.asciidoctormodule to themodule-info.javadescriptor of the microservice project:
module examples.documentation.asciidoctor.quick.start {
requires rxmicro.rest.server.netty;
requires rxmicro.rest.server.exchange.json;
requires static rxmicro.documentation.asciidoctor; (1)
}| 1 | The rxmicro.documentation.asciidoctor must be added using the static modifier.(For more information on the benefits of the static modifier, refer to the Section 8.1.3, “Asciidoctor-dependency-plugin Settings”.) |
After performing these steps during compiling the microservice project, the RxMicro Annotation Processor will generate the ExamplesDocumentationAsciidoctorQuickStartDocumentation.adoc file.
The generated file will contain REST-based microservice documentation in the AsciiDoc format, and by default will be located in the ./src/main/asciidoc folder.
|
In terms of the version control system, the
Using the
|
8.1.2. Asciidoctor-maven-plugin Settings
The asciidoctor-maven-plugin plugin allows You to convert documentation from the AsciiDoc format to
HTML, PDF and other formats.
<plugin>
<groupId>org.asciidoctor</groupId>
<artifactId>asciidoctor-maven-plugin</artifactId> (1)
<version>${asciidoctor-maven-plugin.version}</version>
<executions>
<execution>
<id>output-html5</id>
<phase>package</phase> (2)
<goals>
<goal>process-asciidoc</goal>
</goals>
<configuration>
<backend>html5</backend> (3)
<sourceHighlighter>highlight.js</sourceHighlighter> (4)
<preserveDirectories>true</preserveDirectories>
<relativeBaseDir>true</relativeBaseDir>
<attributes> (5)
<icons>font</icons>
<pagenums/>
<toclevels>3</toclevels>
</attributes>
</configuration>
</execution>
</executions>
</plugin>| 1 | The latest stable version of the asciidoctor-maven-plugin. |
| 2 | The asciidoctor-maven-plugin must convert REST-based microservice documentation at the package phase. |
| 3 | Using the backend directive, You can specify in which format the AsciiDoc document should be converted. |
| 4 | If the AsciiDoc document contains examples of source code in a programming language, You need to add the js library for highlighting the syntax of that language. |
| 5 | Using the attributes directive, it is possible to override the attributes of the AsciiDoc document. |
|
For more information about the |
8.1.3. Asciidoctor-dependency-plugin Settings
REST-based microservice documentation is generated during the compilation process, therefore the libraries used to configure the REST-based microservice documentation generation process are not required in runtime.
Therefore, the maven-dependency-plugin should not copy artifacts related to the generation of REST-based microservice documentation to the lib folder:
<plugin>
<artifactId>maven-dependency-plugin</artifactId>
<version>${maven-dependency-plugin.version}</version>
<executions>
<execution>
<id>copy-dependencies</id>
<phase>package</phase>
<goals>
<goal>copy-dependencies</goal>
</goals>
<configuration>
<outputDirectory>${project.build.directory}/lib</outputDirectory>
<includeScope>compile</includeScope>
<excludeArtifactIds> (1)
rxmicro-documentation,
rxmicro-documentation-asciidoctor
</excludeArtifactIds>
</configuration>
</execution>
</executions>
</plugin>| 1 | The rxmicro-documentation and rxmicro-documentation-asciidoctor artifacts are required only during the compilation process. |
|
In order that in Without this modifier the following error will occur when starting the microservice: |
When compiling a project, the RxMicro framework will generate the following project documentation according to the settings of the rxmicro.documentation.asciidoctor module defined in this section:
|
The project source code used in the current subsection is available at the following link: |
|
When compiling, the RxMicro framework searches for When changing the |
8.2. RxMicro Annotations
The RxMicro framework supports the following RxMicro Annotations:
| Annotation | Description |
|---|---|
Denotes the author of the generated REST-based microservice documentation. (Allows You to override the author specified in the |
|
Denotes the basic endpoint in the generated REST-based microservice documentation. (Allows You to override the basic endpoint specified in the |
|
Denotes the description of the generated REST-based microservice documentation. (Allows You to override the description specified in the In addition to the description of all REST-based microservice documentation, this annotation also allows You to specify a description of separate elements: sections, model fields, etc. |
|
A composite annotation that specifies the settings for generating a whole document. |
|
Denotes the version of REST-based microservice in the generated REST-based microservice documentation. (Allows You to override the version of REST-based microservice specified in the |
|
Denotes the model field value used as an example in the generated REST-based microservice documentation. |
|
Denotes the AsciiDoc fragment to be imported into the generated REST-based microservice documentation. In addition to the description of all REST-based microservice documentation, this annotation also allows You to specify the AsciiDoc fragment for separate elements: sections, model fields, etc. |
|
A composite annotation that specifies the settings for generating the |
|
Denotes the license of REST-based microservice in the generated REST-based microservice documentation. (Allows You to override the license of REST-based microservice specified in the |
|
Denotes the exception class to be analyzed by the |
|
A composite annotation that specifies the settings for generating the |
|
A composite annotation that specifies the settings for generating the |
|
Contains metadata about the unsuccessful HTTP response of REST-based microservice. |
|
Denotes the name of the generated REST-based microservice documentation. (Allows You to override the name of the generated REST-based microservice documentation specified in the |
|
Allows You to specify AsciiDoc attributes for the generated REST-based microservice documentation. |
8.3. @Example and @Description Usage
Using the
@Example
annotation, the developer can specify the data that is as close to the real data as possible, which will be used to build examples of usage in REST-based microservice documentation.
Using the
@Description
annotation, the developer can specify the detailed description of separate model fields to be used in building REST-based microservice documentation.
public final class Echo {
@Example("EchoExample")
@Description("EchoDescription")
String echo;
}final class MicroService {
@GET("/")
@POST("/")
@POST(value = "/", httpBody = false)
CompletableFuture<Echo> echo(final Echo echo) {
return completedFuture(echo);
}
}When compiling a project, the RxMicro framework will generate the following project documentation according to the settings of the rxmicro.documentation.asciidoctor module defined in this section:
|
The project source code used in the current subsection is available at the following link: |
|
When compiling, the RxMicro framework searches for When changing the |
8.4. Sections Customization
Using the following composite annotations:
the developer can regroup standard sections of REST-based microservice documentation, as well as add his own fragments as sections.
@DocumentationDefinition(
withGeneratedDate = false,
introduction = @IntroductionDefinition(
sectionOrder = {
IntroductionDefinition.Section.LICENSES,
IntroductionDefinition.Section.SPECIFICATION,
IntroductionDefinition.Section.CUSTOM_SECTION
},
customSection = {
"${PROJECT-DIR}/src/main/asciidoc/_fragment/" +
"custom-introduction-content.asciidoc"
},
includeMode = IncludeMode.INLINE_CONTENT
),
resourceGroup = @ResourceGroupDefinition(
sectionOrder = {
ResourceGroupDefinition.Section.CUSTOM_SECTION
},
customSection = {
"${PROJECT-DIR}/src/main/asciidoc/_fragment/" +
"custom-resource-group-content.asciidoc"
},
includeMode = IncludeMode.INLINE_CONTENT
),
resource = @ResourceDefinition(
withInternalErrorResponse = false,
withJsonSchema = false,
withRequestIdResponseHeader = false,
withQueryParametersDescriptionTable = false,
withBodyParametersDescriptionTable = false
)
)
module examples.documentation.asciidoctor.custom.sections {
requires rxmicro.rest.server.netty;
requires rxmicro.rest.server.exchange.json;
requires static rxmicro.documentation.asciidoctor;
}|
Besides generating the final For more information on this feature, check out the following example: |
When compiling a project, the RxMicro framework will generate the following project documentation according to the settings of the rxmicro.documentation.asciidoctor module defined in this section:
|
The project source code used in the current subsection is available at the following link: |
|
When compiling, the RxMicro framework searches for When changing the |
8.5. Integration with rxmicro.validation Module
The rxmicro.documentation.asciidoctor module is integrated with the rxmicro.validation module.
Thanks to this integration, when building the REST-based microservice documentation, the RxMicro framework analyzes all available built-in constraints for automatic generation of model fields description.
@DocumentationDefinition(
introduction = @IntroductionDefinition(sectionOrder = {}),
withGeneratedDate = false
)
module examples.documentation.asciidoctor.validation {
requires rxmicro.rest.server.netty;
requires rxmicro.rest.server.exchange.json;
requires rxmicro.validation;
requires static rxmicro.documentation.asciidoctor;
}final class MicroService {
@PUT("/")
void consume(final @Phone String phone) { (1)
// do something
}
}| 1 | The phone parameter must be validated via built-in constraint for phones. |
Thus, when building the REST-based microservice documentation, the RxMicro framework will automatically generate a description for the phone parameter:
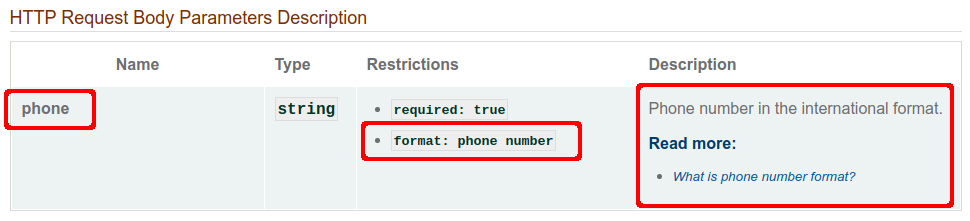
phone field description, formed based on built-in constraints analysisWhen compiling a project, the RxMicro framework will generate the following project documentation according to the settings of the rxmicro.documentation.asciidoctor module defined in this section:
|
The project source code used in the current subsection is available at the following link: |
|
When compiling, the RxMicro framework searches for When changing the |
8.6. REST-based Microservice Metadata Configuration
To obtain metadata while building REST-based microservice documentation, the RxMicro framework can use:
-
The
pom.xmlfile; -
The
rxmicro.documentationmodule annotations.
The REST-based microservice metadata is:
-
the REST-based microservice name;
-
the REST-based microservice description;
-
the REST-based microservice version;
-
the list of licenses that cover the REST-based microservice;
-
the list of REST-based microservice developers;
-
the REST-based microservice basic endpoint.
8.6.1. Using pom.xml
To specify the metadata needed to generate the REST-based microservice documentation, You can use the pom.xml file
<project>
<name>Metadata Pom Xml</name>
<description>*Project* _Description_</description>
<developers>
<developer>
<name>Richard Hendricks</name>
<email>richard.hendricks@piedpiper.com</email>
</developer>
<developer>
<name>Bertram Gilfoyle</name>
<email>bertram.gilfoyle@piedpiper.com</email>
</developer>
<developer>
<name>Dinesh Chugtai</name>
<email>dinesh.chugtai@piedpiper.com</email>
</developer>
</developers>
<url>https://api.rxmicro.io</url>
<licenses>
<license>
<name>Apache License 2.0</name>
<url>https://github.com/rxmicro/rxmicro/blob/master/LICENSE</url>
</license>
</licenses>
</project>When compiling a project, the RxMicro framework will generate the following project documentation according to the settings of the rxmicro.documentation.asciidoctor module defined in this section:
|
The project source code used in the current subsection is available at the following link: |
|
When compiling, the RxMicro framework searches for When changing the |
8.6.2. Using Annotations
To specify the metadata needed to generate the REST-based microservice documentation, You can use the rxmicro.documentation module annotations.
@Title("Metadata Annotations")
@Description("*Project* _Description_")
@DocumentationVersion("0.0.1")
@Author(
name = "Richard Hendricks",
email = "richard.hendricks@piedpiper.com"
)
@Author(
name = "Bertram Gilfoyle",
email = "bertram.gilfoyle@piedpiper.com"
)
@Author(
name = "Dinesh Chugtai",
email = "dinesh.chugtai@piedpiper.com"
)
@BaseEndpoint("https://api.rxmicro.io")
@License(
name = "Apache License 2.0",
url = "https://github.com/rxmicro/rxmicro/blob/master/LICENSE"
)
@DocumentationDefinition(
introduction = @IntroductionDefinition(
sectionOrder = {
IntroductionDefinition.Section.BASE_ENDPOINT,
IntroductionDefinition.Section.LICENSES
}
),
resource = @ResourceDefinition(
withInternalErrorResponse = false
),
withGeneratedDate = false
)
module examples.documentation.asciidoctor.metadata.annotations {
requires rxmicro.rest.server.netty;
requires rxmicro.rest.server.exchange.json;
requires static rxmicro.documentation.asciidoctor;
}When compiling a project, the RxMicro framework will generate the following project documentation according to the settings of the rxmicro.documentation.asciidoctor module defined in this section:
|
The project source code used in the current subsection is available at the following link: |
|
When compiling, the RxMicro framework searches for When changing the |
8.7. Error Documentation
To describe unsuccessful HTTP responses, the rxmicro.documentation module provides two annotations:
Unresolved directive in _fragment/_project-documentation/errors.adoc - include::../../../../../../examples/group-documentation-asciidoctor/documentation-asciidoctor-errors/src/main/java/io/rxmicro/examples/documentation/asciidoctor/errors/ProxyMicroService.java[tags=content]| 1 | The @SimpleErrorResponse annotation allows You to explicitly specify the HTTP response description. |
| 2 | The status parameter describes the HTTP status code. |
| 3 | The description parameter describes the text description. |
| 4 | The exampleErrorMessage parameter denotes the value used as an example in the generated REST-based microservice documentation. |
| 5 | The @ModelExceptionErrorResponse annotation allows You to specify the exception class of the standard |
| 6 | or custom type. |
When using the custom exception type, this class contains all necessary parameters for building REST-based microservice documentation:
Unresolved directive in _fragment/_project-documentation/errors.adoc - include::../../../../../../examples/group-documentation-asciidoctor/documentation-asciidoctor-errors/src/main/java/io/rxmicro/examples/documentation/asciidoctor/errors/model/NotAcceptableException.java[tags=content]| 1 | The required STATUS_CODE static field describes the HTTP status code. |
| 2 | The @Description annotation describes the text description. |
| 3 | The @Example annotation describes the value used as an example in the generated REST-based microservice documentation. |
The custom exception class can contain not string parameter(s). For such classes the RxMicro framework returns custom JSON model instead of standard one.
Unresolved directive in _fragment/_project-documentation/errors.adoc - include::../../../../../../examples/group-documentation-asciidoctor/documentation-asciidoctor-errors/src/main/java/io/rxmicro/examples/documentation/asciidoctor/errors/model/CustomErrorModelException.java[tags=content]| 1 | The @Description annotation describes the text description. |
| 2 | The required STATUS_CODE static field describes the HTTP status code. |
| 3 | The custom field can contain @Example and
@Description annotations. |
| 4 | The custom field(s) must be initialized via constructor. |
| 5 | For custom exception classes with custom field(s) the RxMicro Annotation Processor does not generate Writer, so You must override the getResponseData method manually! |
| 6 | Overridden method must return values from all declared fields at custom exception class. |
|
If |
When compiling a project, the RxMicro framework will generate the following project documentation according to the settings of the rxmicro.documentation.asciidoctor module defined in this section:
|
The project source code used in the current subsection is available at the following link: |
|
When compiling, the RxMicro framework searches for When changing the |
9. Postgre SQL Data Repositories
The RxMicro framework supports creation of dynamic repositories for interaction with databases.
To interact with PostgreSQL DB, using the reactive R2DBC PostgreSQL driver, the RxMicro framework provides the rxmicro.data.sql.r2dbc.postgresql module.
9.1. Basic Usage
To use the rxmicro.data.sql.r2dbc.postgresql module in the project, the following two steps must be taken:
-
Inject the
rxmicro.data.sql.r2dbc.postgresqldependency to thepom.xmlfile:
<dependency>
<groupId>io.rxmicro</groupId>
<artifactId>rxmicro-data-sql-r2dbc-postgresql</artifactId>
<version>${rxmicro.version}</version>
</dependency>-
Add the
rxmicro.data.sql.r2dbc.postgresqlmodule to themodule-info.javadescriptor:
module examples.data.r2dbc.postgresql.basic {
requires rxmicro.data.sql.r2dbc.postgresql;
}|
By default, the reactive R2DBC PostgreSQL driver uses the Project Reactor library, so when adding the |
After adding the rxmicro.data.sql.r2dbc.postgresql module, You can create a data model class and dynamic repository:
@Table
(1)
@ColumnMappingStrategy
public final class Account {
@Column(length = Column.UNLIMITED_LENGTH)
String firstName;
@Column(length = Column.UNLIMITED_LENGTH)
String lastName;
public String getFirstName() {
return firstName;
}
public String getLastName() {
return lastName;
}
}| 1 | The @ColumnMappingStrategy
annotation sets the strategy of forming column names of the relational database table based on the analysis of the Java model class field names.(Thus, the firstName field corresponds to the first_name column, and the lastName field corresponds to the last_name column.) |
(1)
@PostgreSQLRepository
public interface DataRepository {
(2)
@Select("SELECT * FROM ${table} WHERE email = ?")
Mono<Account> findByEmail(String email);
}| 1 | In order for a standard interface to be recognized by the RxMicro framework as a dynamic repository for interaction with PostgreSQL DB, this interface should be annotated by @PostgreSQLRepository annotation. |
| 2 | The dynamic repository may contain methods that form a query to the PostgreSQL DB.(The query that used for a request for data uses the SQL and is specified in the annotation parameters.) |
Since the dynamic repository is a RxMicro component, for its testing You need to use the microservice component testing approach:
|
The common approach recommended for testing dynamic repositories, that interact with |
@Testcontainers
@RxMicroComponentTest(DataRepository.class)
final class DataRepositoryTest {
@Container
private final GenericContainer<?> postgresqlTestDb =
new GenericContainer<>("rxmicro/postgres-test-db")
.withExposedPorts(5432);
@WithConfig
private final PostgreSQLConfig config = new PostgreSQLConfig()
.setDatabase("rxmicro")
.setUser("rxmicro")
.setPassword("password");
private DataRepository dataRepository;
@BeforeEach
void beforeEach() {
config
.setHost(postgresqlTestDb.getHost())
.setPort(postgresqlTestDb.getFirstMappedPort());
}
@Test
void Should_find_account() {
final Account account = requireNonNull(
dataRepository.findByEmail("richard.hendricks@piedpiper.com").block()
);
assertEquals("Richard", account.getFirstName());
assertEquals("Hendricks", account.getLastName());
}
}|
The project source code used in the current subsection is available at the following link: |
|
When compiling, the RxMicro framework searches for When changing the |
9.2. RxMicro Annotations
The RxMicro framework supports the following RxMicro Annotations:
| Annotation | Description |
|---|---|
Sets mapping between the column name in the (By default, the RxMicro framework uses the Java model class field name as the column name in the Required The |
|
Sets the strategy of column name formation in the (If this annotation annotates the Java model class, then the set strategy will be used for all fields in this class.
For example, if You set the default |
|
Allows You to configure the repository generation process. |
|
Allows setting mapping between one method parameter marked with this annotation and several universal placeholders that are used in the query to |
|
Denotes a repository method that must execute a |
|
Denotes a string parameter of repository method, the value of that must be used as custom SELECT. |
|
Denotes a repository method that must execute a |
|
Denotes a repository method that must execute a |
|
Denotes a repository method that must execute a |
|
Enables validation for updated rows count during DML operation, like If current database has invalid state the |
|
Denotes a model field, the value of that ignored during |
|
Denotes a model field, the value of that ignored during |
|
Denotes a schema of a database table. |
|
Denotes a sequence that must be used to get the next unique value for model field. |
|
Denotes a table name for entity. |
|
Denotes a db type name for enum. |
|
Denotes a storage with the values of the predefined variables. |
|
Denotes that an interface is a dynamic generated PostgreSQL data repository. |
|
Denotes an abstract class that contains a partial implementation of the annotated by this annotation a PostgreSQL Data Repository interface. |
9.3. Repositories Testing
For successful functional testing of dynamic repositories, that interact with PostgreSQL DB, it is required:
-
Presence of a script that creates a test database.
-
Mechanism for preparing a database for testing: creating a database before starting the test and deleting a database after completing the test.
9.3.1. Test Database
A test database was created for testing the rxmicro.data.sql.r2dbc.postgresql module features, which are described in this section.
The test database contains three tables: account, product and order:
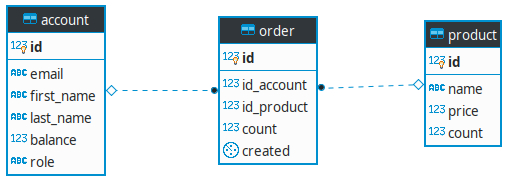
|
SQL scripts for creating a test database are available at the following link: |
The following classes of Java models correspond to the tables created in the test database:
@Table
@ColumnMappingStrategy
public final class Account {
@PrimaryKey
@SequenceGenerator
Long id;
@Column(length = Column.UNLIMITED_LENGTH)
@NotUpdatable
String email;
@Column(length = Column.UNLIMITED_LENGTH)
String firstName;
@Column(length = Column.UNLIMITED_LENGTH)
String lastName;
BigDecimal balance;
Role role;
}@Table
@ColumnMappingStrategy
public final class Order {
@PrimaryKey
Long id;
Long idAccount;
Integer idProduct;
Integer count;
@NotInsertable
Instant created;
}@Table
@ColumnMappingStrategy
public final class Product {
@PrimaryKey(autoGenerated = false)
Integer id;
@Column(length = Column.UNLIMITED_LENGTH)
String name;
BigDecimal price;
Integer count;
}public enum Role {
CEO,
Lead_Engineer,
Systems_Architect
}|
For ease of studying the The source code of the project used as a base for building this |
9.3.2. Test Templates
As a mechanism for preparing a database for testing (creating a database before starting the test and deleting a database after completing the test), it is most convenient to use docker.
To start docker containers in the functional test it is convenient to use the Testcontainers Java library:
(1)
@Testcontainers
(2)
@RxMicroComponentTest(DataRepository.class)
final class DataRepositoryTestTemplate1 {
(3)
@Container
private static final GenericContainer<?> POSTGRESQL_TEST_DB =
new GenericContainer<>("rxmicro/postgres-test-db")
.withExposedPorts(5432); (4)
(5)
@WithConfig
private static final PostgreSQLConfig CONFIG = new PostgreSQLConfig()
.setDatabase("rxmicro")
.setUser("rxmicro")
.setPassword("password"); (6)
@BeforeAll
static void beforeAll() {
POSTGRESQL_TEST_DB.start(); (7)
CONFIG
.setHost(POSTGRESQL_TEST_DB.getHost()) (8)
.setPort(POSTGRESQL_TEST_DB.getFirstMappedPort());
}
private DataRepository dataRepository; (9)
// ... test methods must be here
@AfterAll
static void afterAll() {
POSTGRESQL_TEST_DB.stop(); (10)
}
}| 1 | The @Testcontainers
annotation activates the start and stop of the docker containers to be used in this test. |
| 2 | Since the dynamic repository is a RxMicro component, for its testing You need to use the microservice component testing approach. |
| 3 | The @Container
annotation indicates the docker container that will be used in this test.
As an image on the basis of which it is necessary to create the docker container, the PostgreSQL DB ready-made image with the
rxmicro/postgres-test-db test database is used. |
| 4 | When starting the docker container, You need to open the standard port for PostgreSQL DB. |
| 5 | Using the @WithConfig
annotation, the configuration available only during the test is declared. |
| 6 | Setting up the configuration to interact with the test database. |
| 7 | Before running all tests, You must start the docker container. |
| 8 | After starting the docker container, You need to read the random IP address and port that will be used when connecting to the running docker container. |
| 9 | When testing microservice components, it is necessary to specify a reference to the component in which the RxMicro framework will inject the tested component. |
| 10 | After completing all the tests, You must stop the docker container. |
The main advantage of this template is the speed of testing.
Since the docker container is created once before starting all test methods, the total runtime of all test methods is reduced.
The main disadvantage of this template is that if any test method changes the PostgreSQL DB state, the following test method may end with an error.
Therefore, this functional test template should be used for queries to PostgreSQL DB that do not change the database state!
If You need to test methods that change the PostgreSQL DB state, You should use another template:
(1)
@Testcontainers
(2)
@RxMicroComponentTest(DataRepository.class)
final class DataRepositoryTestTemplate2 {
(3)
@Container
private final GenericContainer<?> postgresqlTestDb =
new GenericContainer<>("rxmicro/postgres-test-db")
.withExposedPorts(5432); (4)
(5)
@WithConfig
private final PostgreSQLConfig config = new PostgreSQLConfig()
.setDatabase("rxmicro")
.setUser("rxmicro")
.setPassword("password"); (6)
private DataRepository dataRepository; (7)
@BeforeEach
void beforeEach() {
config
.setHost(postgresqlTestDb.getHost()) (8)
.setPort(postgresqlTestDb.getFirstMappedPort());
}
// ... test methods must be here
}| 1 | The @Testcontainers
annotation activates the start and stop of the docker containers to be used in this test. |
| 2 | Since the dynamic repository is a RxMicro component, for its testing You need to use the microservice component testing approach |
| 3 | The @Container
annotation indicates the docker container that will be used in this test.
As an image on the basis of which it is necessary to create the docker container, the PostgreSQL DB ready-made image with the
rxmicro/postgres-test-db test database is used. |
| 4 | When starting the docker container, You need to open the standard port for PostgreSQL DB. |
| 5 | Using the @WithConfig
annotation, the configuration available only during the test is declared. |
| 6 | Setting up the configuration to interact with the test database. |
| 7 | When testing microservice components, it is necessary to specify a reference to the component in which the RxMicro framework will inject the tested component. |
| 8 | After starting the docker container, You need to read the random IP address and port that will be used when connecting to the running docker container. |
This template for each test method will create and drop the docker container, which may increase the total runtime of all test methods.
Therefore, select the most appropriate functional test template based on the requirements of the tested functionality!
|
The So You should start and stop the |
9.4. DataBase Models
The RxMicro framework supports the following database model types:
9.4.1. Primitives
A primitive is a supported Java type that can be mapped to database table column.
The rxmicro.data.sql.r2dbc.postgresql module supports the following primitive type:
-
? extends Enum<?>; -
java.lang.Boolean; -
java.lang.Byte; -
java.lang.Short; -
java.lang.Integer; -
java.lang.Long; -
java.math.BigInteger; -
java.lang.Float; -
java.lang.Double; -
java.math.BigDecimal; -
java.lang.Character; -
java.lang.String; -
java.time.Instant; -
java.time.LocalTime; -
java.time.LocalDate; -
java.time.LocalDateTime; -
java.time.OffsetDateTime; -
java.time.ZonedDateTime; -
java.net.InetAddress; -
java.util.UUID;
|
For floating point numbers, it is suggested to use the Using the |
9.4.2. Entities
An entity is a composition of primitives only.
For example:
@Table
@ColumnMappingStrategy
public final class Account {
@PrimaryKey
@SequenceGenerator
Long id;
@Column(length = Column.UNLIMITED_LENGTH)
@NotUpdatable
String email;
@Column(length = Column.UNLIMITED_LENGTH)
String firstName;
@Column(length = Column.UNLIMITED_LENGTH)
String lastName;
BigDecimal balance;
Role role;
}9.5. Universal Placeholder
The RxMicro framework recommends using the universal placeholder (?) as parameter value placeholder in the SQL queries:
@Select("SELECT * FROM ${table} WHERE email=?")
Mono<Account> findByEmail(String email);|
If this method invoked with the following parameter: the RxMicro framework will generate the following |
9.6. @RepeatParameter Annotation
The universal placeholder (?) is the simplest type of placeholders.
But unfortunately, it has one disadvantage: if a query parameter must be repeated, a developer must define a copy of this parameter:
@Select("SELECT * FROM ${table} WHERE firstName=? OR lastName=?")
Mono<Account> findByFirstOrLastNames(String name1, String name2);The @RepeatParameter annotation fixes this disadvantage.
The following code is an equivalent to the code with a copy of the name parameter:
@Select("SELECT * FROM ${table} WHERE firstName=? OR lastName=?")
Mono<Account> findByFirstOrLastNames(@RepeatParameter(2) String name);9.7. SQL Operations
9.7.1. @Select
The rxmicro.data.sql.r2dbc.postgresql module supports the SELECT SQL operation.
9.7.1.1. Returning Types Support
9.7.1.1.1. Reactive Types Support
PostgreSQL Data Repositories that generated by the RxMicro frameworks support the following return reactive types:
-
If expected an asynchronous
0-1result:
@PostgreSQLRepository
public interface SelectSingleDataRepository {
@Select("SELECT * FROM ${table} WHERE email = ?")
Mono<Account> findByEmail1(String email);
@Select("SELECT * FROM ${table} WHERE email = ?")
CompletableFuture<Account> findByEmail2(String email);
@Select("SELECT * FROM ${table} WHERE email = ?")
CompletionStage<Account> findByEmail3(String email);
@Select("SELECT * FROM ${table} WHERE email = ?")
CompletableFuture<Optional<Account>> findByEmail4(String email);
@Select("SELECT * FROM ${table} WHERE email = ?")
CompletionStage<Optional<Account>> findByEmail5(String email);
@Select("SELECT * FROM ${table} WHERE email = ?")
Single<Account> findByEmail6(String email);
@Select("SELECT * FROM ${table} WHERE email = ?")
Maybe<Account> findByEmail7(String email);
}-
If expected an asynchronous
0-nresult:
@PostgreSQLRepository
public interface SelectManyDataRepository {
@Select("SELECT * FROM ${table} ORDER BY id")
Mono<List<Account>> findAll1();
@Select("SELECT * FROM ${table} ORDER BY id")
Flux<Account> findAll2();
@Select("SELECT * FROM ${table} ORDER BY id")
CompletableFuture<List<Account>> findAll3();
@Select("SELECT * FROM ${table} ORDER BY id")
CompletionStage<List<Account>> findAll4();
@Select("SELECT * FROM ${table} ORDER BY id")
Single<List<Account>> findAll5();
@Select("SELECT * FROM ${table} ORDER BY id")
Flowable<Account> findAll6();
}|
The project source code used in the current subsection is available at the following link: |
|
When compiling, the RxMicro framework searches for When changing the |
9.7.1.1.2. Model Types Support
PostgreSQL Data Repositories that generated by the RxMicro frameworks support the following return model types:
-
If expected an asynchronous
0-1result:
@PostgreSQLRepository
@VariableValues({
"${table}", "account"
})
public interface SelectSingleDataRepository {
@Select("SELECT * FROM ${table} " +
"WHERE email='richard.hendricks@piedpiper.com'")
CompletableFuture<Account> findSingleAccount();
@Select("SELECT first_name, last_name FROM ${table} " +
"WHERE email='richard.hendricks@piedpiper.com'")
CompletableFuture<EntityFieldMap> findSingleEntityFieldMap();
@Select("SELECT first_name, last_name FROM ${table} " +
"WHERE email='richard.hendricks@piedpiper.com'")
CompletableFuture<EntityFieldList> findSingleEntityFieldList();
@Select("SELECT email FROM ${table} " +
"WHERE email='richard.hendricks@piedpiper.com'")
CompletableFuture<String> findSingleEmail();
@Select("SELECT role FROM ${table} " +
"WHERE email='richard.hendricks@piedpiper.com'")
CompletableFuture<Role> findSingleRole();
@Select("SELECT balance FROM ${table} " +
"WHERE email='richard.hendricks@piedpiper.com'")
CompletableFuture<BigDecimal> findSingleBalance();
}-
If expected an asynchronous
0-nresult:-
A list of entities;
-
A list of primitives.
-
@PostgreSQLRepository
public interface SelectManyDataRepository {
@Select("SELECT first_name, last_name FROM ${table} ORDER BY id")
CompletableFuture<List<Account>> findAllAccounts();
@Select(
value = "SELECT first_name, last_name FROM ${table} ORDER BY id",
entityClass = Account.class
)
CompletableFuture<List<EntityFieldMap>> findAllEntityFieldMapList();
@Select(
value = "SELECT first_name, last_name FROM ${table} ORDER BY id",
entityClass = Account.class
)
CompletableFuture<List<EntityFieldList>> findAllEntityFieldList();
@Select(
value = "SELECT email FROM ${table} ORDER BY id",
entityClass = Account.class
)
CompletableFuture<List<String>> findAllEmails();
@Select(
value = "SELECT DISTINCT role FROM ${table} ORDER BY role",
entityClass = Account.class
)
CompletableFuture<List<Role>> findAllRoles();
@Select(
value = "SELECT DISTINCT balance FROM ${table} ORDER BY balance",
entityClass = Account.class
)
CompletableFuture<List<BigDecimal>> findAllBalances();
}|
The project source code used in the current subsection is available at the following link: |
|
When compiling, the RxMicro framework searches for When changing the |
9.7.1.1.3. All Supported Return Types
|
For more information, we recommend that You familiarize yourself with the following examples: |
9.7.1.2. WHERE, ORDER BY and Other SELECT Operations
The rxmicro.data.sql.r2dbc.postgresql module supports all SQL nested operators that are supported by the SELECT operation:
-
WHEREoperator:
@PostgreSQLRepository
public interface SelectByFilterRepository {
@Select("SELECT * FROM ${table} WHERE role=?")
CompletableFuture<List<Account>> findByRole(Role role);
@Select("SELECT * FROM ${table} WHERE first_name=? OR first_name=? OR first_name=?")
CompletableFuture<List<Account>> findByFirstName(
String firstName1, String firstName2, String firstName3
);
@Select("SELECT * FROM ${table} WHERE balance BETWEEN ? AND ?")
CompletableFuture<List<Account>> findByBalance(BigDecimal minBalance, BigDecimal maxBalance);
@Select("SELECT * FROM ${table} WHERE first_name=? OR last_name=?")
CompletableFuture<List<Account>> findByFirstOrLastName(String name1, String name2);
@Select("SELECT * FROM ${table} WHERE first_name ILIKE ? OR last_name ILIKE ?")
CompletableFuture<List<Account>> findByFirstOrLastName(@RepeatParameter(2) String name);
}-
INoperator:
@PostgreSQLRepository
public interface SelectByFilterUsingINOperatorRepository {
@Select("SELECT * FROM ${table} WHERE role IN ('CEO'::role, 'Systems_Architect'::role)")
CompletableFuture<List<Account>> findByRole();
@Select("SELECT * FROM ${table} WHERE email NOT IN (SELECT email FROM blocked_accounts)")
CompletableFuture<List<Account>> findNotBlockedAccount();
@Select("SELECT * FROM ${table} WHERE email in ?")
CompletableFuture<Optional<Account>> findByEmail(String email);
@Select("SELECT * FROM ${table} WHERE email in ?")
CompletableFuture<List<Account>> findByEmail(List<String> emails);
@Select("SELECT * FROM ${table} WHERE role in (?)")
CompletableFuture<List<Account>> findByRole(Role role);
@Select("SELECT * FROM ${table} WHERE role in (?)")
CompletableFuture<List<Account>> findByRole(List<Role> roles);
@Select("SELECT * FROM ${table} WHERE balance in (?)")
CompletableFuture<List<Account>> findByBalance(BigDecimal balance);
@Select("SELECT * FROM ${table} WHERE balance in ?")
CompletableFuture<List<Account>> findByBalance(List<BigDecimal> balances);
}-
ORDER BYoperator:
@PostgreSQLRepository
public interface SelectOrderedDataRepository {
@Select("SELECT * FROM ${table} ORDER BY id")
CompletableFuture<List<Account>> findAllOrderedById();
@Select("SELECT * FROM ${table} ORDER BY ( id ? )")
CompletableFuture<List<Account>> findAllOrderedById(SortOrder sortOrder);
@Select("SELECT * FROM ${table} ORDER BY ? ?")
CompletableFuture<List<Account>> findAllOrderedBy(String columnName, SortOrder sortOrder);
@Select("SELECT * FROM ${table} ORDER BY (id ?, email ?) LIMIT 10")
CompletableFuture<List<Account>> findAllOrderedByIdAndEmail(
@RepeatParameter(2) SortOrder sortOrder
);
}-
LIMITand/orOFFSEToperator(s):
@PostgreSQLRepository
public interface SelectLimitedDataRepository {
@Select("SELECT * FROM ${table} ORDER BY id LIMIT 2")
CompletableFuture<List<Account>> findFirst2Accounts();
@Select("SELECT * FROM ${table} ORDER BY id LIMIT ?")
CompletableFuture<List<Account>> findAccounts(int limit);
@Select("SELECT * FROM ${table} ORDER BY id LIMIT ? OFFSET ?")
CompletableFuture<List<Account>> findAccounts(int limit, int offset);
@Select("SELECT * FROM ${table} ORDER BY id LIMIT ? OFFSET ?")
CompletableFuture<List<Account>> findAccounts(Pageable pageable);
}-
Composition of
WHERE,ORDER BY,LIMITandOFFSEToperators:
@PostgreSQLRepository
public interface SelectComplexDataRepository {
@Select("SELECT * FROM ${table} WHERE " +
"first_name ILIKE ? AND role IN (?) AND balance < ? " +
"ORDER BY (id ?, email ?) " +
"LIMIT ? " +
"OFFSET ?")
CompletableFuture<List<Account>> find01(
String firstNameTemplate,
List<Role> roles,
BigDecimal balance,
@RepeatParameter(2) SortOrder sortOrder,
int limit,
int offset
);
}-
etc.
|
The project source code used in the current subsection is available at the following link: |
|
When compiling, the RxMicro framework searches for When changing the |
9.7.1.3. Selected Projections
The rxmicro.data.sql.r2dbc.postgresql module supports projections from selected table(s).
To use projections, developer must specify required columns at SELECT query:
@PostgreSQLRepository
public interface SelectProjectionDataRepository {
@Select("SELECT * FROM ${table} " +
"WHERE email='richard.hendricks@piedpiper.com'")
CompletableFuture<Account> findAllColumns();
@Select("SELECT id, email, first_name, last_name, balance FROM ${table} " +
"WHERE email='richard.hendricks@piedpiper.com'")
CompletableFuture<Account> findAllColumnsExceptRole1();
@Select("SELECT id, email, last_name, first_name, balance FROM ${table} " +
"WHERE email='richard.hendricks@piedpiper.com'")
CompletableFuture<Account> findAllColumnsExceptRole2();
@Select("SELECT 1 as id, " +
"'richard.hendricks@piedpiper.com' as email, " +
"'Hendricks' as last_name, " +
"'Richard' as first_name, " +
"70000.00 as balance")
CompletableFuture<Account> findAllColumnsExceptRole3();
@Select("SELECT first_name, last_name FROM ${table} " +
"WHERE email='richard.hendricks@piedpiper.com'")
CompletableFuture<Account> findFirstAndLastName();
@Select("SELECT id, " +
"'***@***' as email, " +
"upper(last_name) as last_name, " +
"first_name, " +
"(20000 + 50000.00) as balance " +
"FROM ${table} " +
"WHERE email='richard.hendricks@piedpiper.com'")
CompletableFuture<Account> findModifiedColumns();
}For each nonstandard projection, the RxMicro framework generates a separate converter method.
For example for SelectProjectionDataRepository the RxMicro framework generates the following converter:
public final class $$AccountEntityFromDBConverter
extends EntityFromDBConverter<Row, RowMetadata, Account> {
(1)
public Account fromDB(final Row dbRow,
final RowMetadata metadata) {
final Account model = new Account();
model.id = dbRow.get(0, Long.class);
model.email = dbRow.get(1, String.class);
model.firstName = dbRow.get(2, String.class);
model.lastName = dbRow.get(3, String.class);
model.balance = dbRow.get(4, BigDecimal.class);
model.role = toEnum(Role.class, dbRow.get(5, String.class), "role");
return model;
}
public Account fromDBFirst_nameLast_name(final Row dbRow,
final RowMetadata metadata) {
final Account model = new Account();
model.firstName = dbRow.get(0, String.class);
model.lastName = dbRow.get(1, String.class);
return model;
}
public Account fromDBIdEmailFirst_nameLast_nameBalance(final Row dbRow,
final RowMetadata metadata) {
final Account model = new Account();
model.id = dbRow.get(0, Long.class);
model.email = dbRow.get(1, String.class);
model.firstName = dbRow.get(2, String.class);
model.lastName = dbRow.get(3, String.class);
model.balance = dbRow.get(4, BigDecimal.class);
return model;
}
public Account fromDBIdEmailLast_nameFirst_nameBalance(final Row dbRow,
final RowMetadata metadata) {
final Account model = new Account();
model.id = dbRow.get(0, Long.class);
model.email = dbRow.get(1, String.class);
model.lastName = dbRow.get(2, String.class);
model.firstName = dbRow.get(3, String.class);
model.balance = dbRow.get(4, BigDecimal.class);
return model;
}
}| 1 | It is standard converter example. (This converter is a standard one, because an order of the selected columns is defined by the order of fields of Java model class. ( Account class for current example.)) |
|
The project source code used in the current subsection is available at the following link: |
|
When compiling, the RxMicro framework searches for When changing the |
9.7.1.4. Custom Select
The rxmicro.data.sql.r2dbc.postgresql module introduces a @CustomSelect
annotation that allows working with a Custom SELECT.
The Custom SELECT is a string parameter that sends to a repository method and contains a SQL, built dynamically during an execution of a microservice:
@PostgreSQLRepository
public interface CustomSelectRepository {
@Select
CompletableFuture<List<EntityFieldMap>> findAll(
@CustomSelect String sql (1)
);
@Select
CompletableFuture<Optional<Account>> findAccount(
@CustomSelect(supportUniversalPlaceholder = false) String sql, (2)
String firstName
);
@Select
CompletableFuture<Optional<Account>> findFirstAndLastName(
@CustomSelect(selectedColumns = {"first_name", "last_name"}) String sql, (3)
String firstName
);
@Select
CompletableFuture<Optional<Account>> findLastAndFirstName(
@CustomSelect(selectedColumns = {"last_name", "first_name"}) String sql, (4)
String firstName
);
}| 1 | This is example of a repository method that can execute any SELECT query. |
| 2 | This repository method selects all columns defined at Account entity.(Disabling of universal placeholder means that developer must use postgres specific placeholder ( $1, $2, etc) instead of universal placeholder (?).
Otherwise error will be thrown!) |
| 3 | This repository method selects only selected columns (first_name and last_name) from account table.(This method supports universal placeholder!) |
| 4 | This repository method selects only selected columns (last_name and first_name) from account table.(This method supports universal placeholder!) |
|
Using of the |
The following test describes how the Custom SELECT feature can be tested:
@Test
void findAll() {
final List<EntityFieldMap> entityFieldMaps = dataRepository.findAll(
"SELECT email, first_name, last_name FROM account WHERE id = 1"
).join();
assertEquals(
List.of(
orderedMap(
"email", "richard.hendricks@piedpiper.com",
"first_name", "Richard",
"last_name", "Hendricks"
)
),
entityFieldMaps
);
}
@Test
void findAccount() {
final Optional<Account> optionalAccount = dataRepository.findAccount(
"SELECT * FROM account WHERE first_name = $1",
"Richard"
).join();
assertEquals(
Optional.of(
new Account(
1L,
"richard.hendricks@piedpiper.com",
"Richard",
"Hendricks",
new BigDecimal("70000.00")
)
),
optionalAccount
);
}
@Test
void findFirstAndLastName() {
final Optional<Account> optionalAccount = dataRepository.findFirstAndLastName(
"SELECT first_name, last_name FROM account WHERE first_name = ?",
"Richard"
).join();
assertEquals(
Optional.of(new Account("Richard", "Hendricks")),
optionalAccount
);
}
@Test
void findLastAndFirstName() {
final Optional<Account> optionalAccount = dataRepository.findLastAndFirstName(
"SELECT last_name, first_name FROM account WHERE first_name = ?",
"Richard"
).join();
assertEquals(
Optional.of(new Account("Richard", "Hendricks")),
optionalAccount
);
}|
The project source code used in the current subsection is available at the following link: |
|
When compiling, the RxMicro framework searches for When changing the |
9.7.2. @Insert
The rxmicro.data.sql.r2dbc.postgresql module supports the INSERT SQL operation:
@PostgreSQLRepository
public interface DataRepository {
@Insert
CompletableFuture<Boolean> insert1(Account account);
@Insert
CompletableFuture<Account> insert2(Account account);
@Insert("INSERT INTO ${table} VALUES(nextval('account_seq'),?,?,?,?,?)")
(1)
@VariableValues({
"${table}", "account"
})
CompletableFuture<Long> insert3(
String email, String firstName, String lastName, BigDecimal balance, Role role
);
@Insert("INSERT INTO ${table} VALUES(nextval('account_seq'),?,?,?,?,?) RETURNING *")
CompletableFuture<Account> insert4(
String email, String firstName, String lastName, BigDecimal balance, Role role
);
@Insert(
value = "INSERT INTO ${table} VALUES(nextval('account_seq'),?,?,?,?,?)",
entityClass = Account.class
)
CompletableFuture<Long> insert5(
String email, String firstName, String lastName, BigDecimal balance, Role role
);
@Insert(
value = "INSERT INTO ${table} VALUES(nextval('account_seq'),?,?,?,?,?) RETURNING *",
entityClass = Account.class
)
CompletableFuture<EntityFieldMap> insert6(
String email, String firstName, String lastName, BigDecimal balance, Role role
);
@Insert("INSERT INTO ${table}(${inserted-columns}) VALUES(${values}) " +
"RETURNING ${returning-columns}")
CompletableFuture<AccountResult> insert7(Account account);
@Insert("INSERT INTO ${table}(${inserted-columns}) VALUES(${values}) " +
"ON CONFLICT (${id-columns}) DO UPDATE SET ${on-conflict-update-inserted-columns}" +
"RETURNING ${returning-columns}")
CompletableFuture<AccountResult> insert8(Account account);
@Insert("INSERT INTO ${table}(${inserted-columns}) VALUES(${values}) " +
"ON CONFLICT (${id-columns}) DO UPDATE SET ${on-conflict-update-inserted-columns}")
CompletableFuture<Void> insert9(Account account);
@Insert("INSERT INTO ${table}(${inserted-columns}) VALUES(${values}) " +
"ON CONFLICT (${id-columns}) DO NOTHING")
CompletableFuture<Void> insert10(Account account);
@Insert("INSERT INTO ${table} SELECT * FROM dump RETURNING *")
CompletableFuture<List<Account>> insertMany1();
@Insert("INSERT INTO account SELECT * FROM dump")
CompletableFuture<Long> insertMany2();
}| 1 | The variable values are used to resolve predefined variables at the SQL query. (Read more about the algorithm of the variables resolving at Section 9.8, “Variables Support”.) |
|
For more information, we recommend that You familiarize yourself with the following examples: |
|
The project source code used in the current subsection is available at the following link: |
|
When compiling, the RxMicro framework searches for When changing the |
9.7.3. @Update
The rxmicro.data.sql.r2dbc.postgresql module supports the UPDATE SQL operation:
@PostgreSQLRepository
public interface DataRepository {
@Update
CompletableFuture<Boolean> update1(Account account);
@Update("UPDATE ${table} SET first_name=?, last_name=? WHERE id=?")
(1)
@VariableValues({
"${table}", "account"
})
CompletableFuture<Long> update2(String firstName, String lastName, Long id);
@Update("UPDATE ${table} SET first_name=?, last_name=? WHERE ${by-id-filter} RETURNING *")
CompletableFuture<Account> update3(String firstName, String lastName, Long id);
@Update(
value = "UPDATE ${table} SET first_name=?, last_name=? " +
"WHERE id = ?",
entityClass = Account.class
)
CompletableFuture<Long> update4(String firstName, String lastName, Long id);
@Update(
value = "UPDATE ${table} SET first_name=?, last_name=? " +
"WHERE ${by-id-filter} RETURNING *",
entityClass = Account.class
)
CompletableFuture<EntityFieldMap> update5(String firstName, String lastName, Long id);
}| 1 | The variable values are used to resolve predefined variables at the SQL query. (Read more about the algorithm of the variables resolving at Section 9.8, “Variables Support”.) |
|
For more information, we recommend that You familiarize yourself with the following examples: |
|
The project source code used in the current subsection is available at the following link: |
|
When compiling, the RxMicro framework searches for When changing the |
9.7.4. @Delete
The rxmicro.data.sql.r2dbc.postgresql module supports the DELETE SQL operation:
@PostgreSQLRepository
public interface DataRepository {
@Delete
CompletableFuture<Boolean> delete1(Account account);
@Delete("DELETE FROM ${table} WHERE balance < ?")
(1)
@VariableValues({
"${table}", "account"
})
CompletableFuture<Long> delete2(BigDecimal minRequiredBalance);
@Delete("DELETE FROM ${table} WHERE ${by-id-filter} RETURNING *")
CompletableFuture<Account> delete3(Long id);
@Delete(entityClass = Account.class)
CompletableFuture<Long> delete4(Long id);
@Delete(
value = "DELETE FROM ${table} WHERE ${by-id-filter} RETURNING *",
entityClass = Account.class
)
CompletableFuture<EntityFieldMap> delete5(Long id);
}| 1 | The variable values are used to resolve predefined variables at the SQL query. (Read more about the algorithm of the variables resolving at Section 9.8, “Variables Support”.) |
|
For more information, we recommend that You familiarize yourself with the following examples: |
|
The project source code used in the current subsection is available at the following link: |
|
When compiling, the RxMicro framework searches for When changing the |
9.8. Variables Support
When building SQL queries, sometimes it is necessary to specify the table name as a string constant. This feature provides the developer with more flexibility: the table names may vary depending on the environment.
For better readability of SQL query, the RxMicro framework recommends using predefined variables instead of string concatenation:
(1)
public static final String TABLE_NAME = "table1";
(2)
@Select("SELECT id, value FROM " + TABLE_NAME + " WHERE id = ?")
CompletableFuture<EntityFieldMap> findById1(long id);
(3)
@Select("SELECT id, value FROM ${table} WHERE id = ?")
@VariableValues({
"${table}", TABLE_NAME
})
CompletableFuture<EntityFieldMap> findById2(long id);| 1 | String constant with table name. |
| 2 | When strings are concatenated, the readability of an entire SQL query gets worse. |
| 3 | Instead of string concatenation, the RxMicro framework recommends using predefined variables. |
All predefined variables supported by the RxMicro framework are declared in the SupportedVariables class
To determine the value of the predefined variable used in the query specified for the repository method, the RxMicro framework uses the following algorithm:
-
If the repository method returns or accepts the entity model as a parameter, the entity model class is used to define the variable value.
-
Otherwise, the RxMicro framework analyzes the optional
entityClassparameter defined in the@Select,@Insert,@Updateand@Deleteannotations. -
If the optional
entityClassparameter is set, the class specified in this parameter is used to define the variable value. -
If the optional
entityClassparameter is missing, the RxMicro framework tries to extract the variable value from the@VariableValuesannotation, which annotates this repository method. -
If the repository method is not annotated with the
@VariableValuesannotation or the@VariableValuesannotation does not contain the value of a predefined variable, then the RxMicro framework tries to extract the value of this variable from the@VariableValuesannotation, which annotates the repository interface. -
If the variable value is undefined in all specified places, then the RxMicro framework notifies the developer about the error.
@PostgreSQLRepository
@VariableValues({
"${table}", SelectDataRepository.GLOBAL_TABLE
})
public interface SelectDataRepository {
public static final String GLOBAL_TABLE = "global_table";
public static final String ENTITY_TABLE = "entity_table";
public static final String LOCAL_TABLE = "local_table";
(1)
@Select("SELECT * FROM ${table}")
CompletableFuture<List<Entity>> findFromEntityTable1();
(2)
@Select(value = "SELECT * FROM ${table}", entityClass = Entity.class)
CompletableFuture<List<EntityFieldMap>> findFromEntityTable2();
(3)
@Select("SELECT * FROM ${table}")
CompletableFuture<List<EntityFieldMap>> findFromGlobalTable();
(4)
@Select("SELECT * FROM ${table}")
@VariableValues({
"${table}", SelectDataRepository.LOCAL_TABLE
})
CompletableFuture<List<EntityFieldMap>> findFromLocalTable();
}| 1 | The ${table} variable value will be equal to entity_table.(The variable value is read from the Entity class, which is returned by this method.) |
| 2 | The ${table} variable value will be equal to entity_table.(The variable value is read from the Entity class, since this class is specified in the entityClass parameter.) |
| 3 | The ${table} variable value will be equal to global_table.(The variable value is read from the @VariableValues annotation, which annotates the repository interface.) |
| 4 | The ${table} variable value will be equal to local_table.(The variable value is read from the @VariableValues annotation, which annotates the repository method.) |
|
The project source code used in the current subsection is available at the following link: |
|
When compiling, the RxMicro framework searches for When changing the |
9.9. Primary Keys Support
The rxmicro.data.sql.r2dbc.postgresql module supports four types of the primary keys:
-
Auto generated primary key. (
SERIALtype.)
(A uniqueness of this type of primary key is controlled by the database server!):
@PrimaryKey
Long id;-
Auto generated primary key that uses a sequence to get the next unique value.
(A uniqueness of this type of primary key is controlled by the database server!):
@PrimaryKey
@SequenceGenerator
Long id;-
Manually set primary key.
(A developer must control a uniqueness of this type of primary key!):
@PrimaryKey(autoGenerated = false)
Integer id;-
Complex primary key:
(A developer must control a uniqueness of this type of primary key!):
@PrimaryKey(autoGenerated = false)
Long idCategory;
@PrimaryKey(autoGenerated = false)
@Column(length = Column.UNLIMITED_LENGTH)
String idType;
@PrimaryKey(autoGenerated = false)
Role idRole;|
The project source code used in the current subsection is available at the following link: |
|
When compiling, the RxMicro framework searches for When changing the |
9.10. @ExpectedUpdatedRowsCount annotation
Enables validation for updated rows count during DML operation, like Insert, Update and Delete operations.
This annotation adds additional runtime validator that validates the actual updated rows during SQL operation.
If current database has invalid state the InvalidDatabaseStateException will be thrown!
The following examples demonstrate the @ExpectedUpdatedRowsCount annotation usage:
@ExpectedUpdatedRowsCount(10)
@Insert("INSERT INTO ${table} SELECT * FROM dump")
Mono<Long> insert12();
@ExpectedUpdatedRowsCount(1)
@Insert("INSERT INTO ${table} VALUES(nextval('account_seq'),?,?)")
Mono<Boolean> insert13(String firstName, String lastName);
@ExpectedUpdatedRowsCount(1)
@Insert("INSERT INTO ${table} VALUES(nextval('account_seq'),?,?) RETURNING *")
Mono<Account> insert14(String firstName, String lastName);
@ExpectedUpdatedRowsCount(0)
@Insert("INSERT INTO ${table} VALUES(nextval('account_seq'),?,?) RETURNING *")
Mono<Account> insert15(String firstName, String lastName);@ExpectedUpdatedRowsCount(10)
@Update("UPDATE ${table} SET first_name=?, last_name=? WHERE email=?")
Mono<Long> update12(String firstName, String lastName, String email);
@ExpectedUpdatedRowsCount(1)
@Update("UPDATE ${table} SET first_name=?, last_name=? WHERE id=?")
Mono<Boolean> update13(String firstName, String lastName, Long id);
@ExpectedUpdatedRowsCount(1)
@Update("UPDATE ${table} SET first_name=?, last_name=? WHERE ${by-id-filter} RETURNING *")
Mono<Account> update14(String firstName, String lastName, Long id);
@ExpectedUpdatedRowsCount(0)
@Update("UPDATE ${table} SET first_name=?, last_name=? WHERE ${by-id-filter} RETURNING *")
Mono<Account> update15(String firstName, String lastName, Long id);@ExpectedUpdatedRowsCount(1)
@Delete(entityClass = Account.class)
Mono<Void> delete11(Long id);
@ExpectedUpdatedRowsCount(10)
@Delete("DELETE FROM ${table} WHERE first_name ILIKE ? OR last_name ILIKE ?")
Mono<Long> delete12(Transaction transaction, @RepeatParameter(2) String name);
@ExpectedUpdatedRowsCount(1)
@Delete(entityClass = Account.class)
Mono<Boolean> delete13(Long id);
@ExpectedUpdatedRowsCount(1)
@Delete("DELETE FROM ${table} WHERE ${by-id-filter} RETURNING *")
Mono<Account> delete14(Long id);
@ExpectedUpdatedRowsCount(0)
@Delete("DELETE FROM ${table} WHERE ${by-id-filter} RETURNING *")
Mono<Account> delete15(Long id);|
The project source code used in the current subsection is available at the following link: |
|
When compiling, the RxMicro framework searches for When changing the |
9.11. Transactions Support
9.11.1. DataBase Transactions
To work with database transactions the RxMicro framework introduces a basic transaction model:
public interface Transaction {
ReactiveType commit();
ReactiveType rollback();
ReactiveType create(SavePoint savePoint);
ReactiveType release(SavePoint savePoint);
ReactiveType rollback(SavePoint savePoint);
IsolationLevel getIsolationLevel();
ReactiveType setIsolationLevel(IsolationLevel isolationLevel);
}where ReactiveType can be Mono<Void>,
Completable or CompletableFuture<Void>.
This basic transaction model has adaptation for all supported reactive libraries:
-
If You want to use the Project Reactor library:
-
ReactiveTypewill be aMono<Void>. -
You must use the
io.rxmicro.data.sql.model.reactor.Transactioninterface. -
A repository method that creates a new transaction must return
Mono<io.rxmicro.data.sql.model.reactor.Transaction>reactive type:
-
import io.rxmicro.data.sql.model.reactor.Transaction;
@PostgreSQLRepository
public interface BeginReactorTransactionRepository {
Mono<Transaction> beginTransaction();
Mono<Transaction> beginTransaction(IsolationLevel isolationLevel);
}-
If You want to use the RxJava library:
-
ReactiveTypewill be aCompletable. -
You must use the
io.rxmicro.data.sql.model.rxjava3.Transactioninterface. -
A repository method that creates a new transaction must return
Single<io.rxmicro.data.sql.model.rxjava3.Transaction>reactive type:
-
import io.rxmicro.data.sql.model.rxjava3.Transaction;
@PostgreSQLRepository
public interface BeginRxJava3TransactionRepository {
Single<Transaction> beginTransaction();
Single<Transaction> beginTransaction(IsolationLevel isolationLevel);
}-
If You want to use the java.util.concurrent library:
-
ReactiveTypewill be aCompletableFuture<Void>. -
You must use the
io.rxmicro.data.sql.model.completablefuture.Transactioninterface. -
A repository method that creates a new transaction must return
CompletableFuture<io.rxmicro.data.sql.model.completablefuture.Transaction>reactive type:
-
import io.rxmicro.data.sql.model.completablefuture.Transaction;
@SuppressWarnings("unused")
@PostgreSQLRepository
public interface BeginCompletableFutureTransactionRepository {
CompletionStage<Transaction> beginTransaction1();
CompletionStage<Transaction> beginTransaction1(IsolationLevel isolationLevel);
CompletableFuture<Transaction> beginTransaction2();
CompletableFuture<Transaction> beginTransaction2(IsolationLevel isolationLevel);
}|
The project source code used in the current subsection is available at the following link: |
|
When compiling, the RxMicro framework searches for When changing the |
9.11.2. Concurrent Access Example
The following example demonstrates how developer can use the RxMicro framework to build microservice that requires concurrent access:
@PostgreSQLRepository
public interface ConcurrentRepository {
Mono<Transaction> beginTransaction();
@Select("SELECT * FROM ${table} WHERE id=? FOR UPDATE")
Mono<Account> findAccountById(Transaction transaction, long id);
@Select("SELECT * FROM ${table} WHERE id=? FOR UPDATE")
Mono<Product> findProductById(Transaction transaction, int id);
@Update(value = "UPDATE ${table} SET balance=? WHERE id=?", entityClass = Account.class)
Mono<Void> updateAccountBalance(Transaction transaction, BigDecimal balance, long id);
@Update(value = "UPDATE ${table} SET count=? WHERE id=?", entityClass = Product.class)
Mono<Void> updateProductCount(Transaction transaction, int count, long id);
@Insert
Mono<Order> createOrder(Transaction transaction, Order order);
}public final class ConcurrentBusinessService {
private final ConcurrentRepository repository = getRepository(ConcurrentRepository.class);
/**
* @return order id if purchase is successful or
* error signal if:
* - account not found or
* - product not found or
* - products ran out or
* - money ran out
*/
public Mono<Long> tryToBuy(final long idAccount,
final int idProduct,
final int count) {
return repository.beginTransaction()
.flatMap(transaction -> repository.findAccountById(transaction, idAccount)
.flatMap(account -> repository.findProductById(transaction, idProduct)
.flatMap(product ->
tryToBuy(transaction, account, product, count))
.switchIfEmpty(Mono.error(() ->
// product not found
new ProductNotFoundException(idProduct))))
// account not found
.switchIfEmpty(Mono.error(() -> new AccountNotFoundException(idAccount)))
.onErrorResume(transaction.createRollbackThenReturnErrorFallback())
);
}
private Mono<Long> tryToBuy(final Transaction transaction,
final Account account,
final Product product,
final int count) {
if (count <= product.getCount()) {
final BigDecimal cost = product.getPrice().multiply(BigDecimal.valueOf(count));
if (cost.compareTo(account.getBalance()) <= 0) {
return buy(transaction, account, product, count, cost);
} else {
// money ran out
return Mono.error(new NotEnoughFundsException(cost, account.getBalance()));
}
} else {
// products ran out
return Mono.error(new NotEnoughProductCountException(count, product.getCount()));
}
}
// purchase is successful, returns order id
private Mono<Long> buy(final Transaction transaction,
final Account account,
final Product product,
final int count,
final BigDecimal cost) {
final int newProductCount = product.getCount() - count;
final BigDecimal newBalance = account.getBalance().subtract(cost);
final Order order = new Order(account.getId(), product.getId(), count);
return repository.updateProductCount(transaction, newProductCount, product.getId())
.then(repository.updateAccountBalance(transaction, newBalance, account.getId())
.then(repository.createOrder(transaction, order)
.map(Order::getId)
.flatMap(id -> transaction.commit()
.thenReturn(id))
)
);
}
}|
For more information, we recommend that You familiarize yourself with the following examples: |
|
When compiling, the RxMicro framework searches for When changing the |
9.12. Partial Implementation
If the Postgre SQL data repository generated by the RxMicro Annotation Processor contains errors, incorrect or non-optimized logic, the developer can use the Partial Implementation feature.
This feature allows You to implement methods for the Postgre SQL data repository on Your own, instead of generating them by the RxMicro framework.
To activate this feature, You need to use the
@PartialImplementation
annotation, and specify an abstract class that contains a partial implementation of method(s) for Postgre SQL data repository:
@PostgreSQLRepository
(1)
@PartialImplementation(AbstractDataRepository.class)
public interface DataRepository {
@Select("SELECT 1 + 1")
CompletableFuture<Long> generatedMethod();
CompletableFuture<Long> userDefinedMethod();
}| 1 | Using the
@PartialImplementation
annotation, the AbstractDataRepository class is specified. |
An AbstractDataRepository contains the following content:
public abstract class AbstractDataRepository extends AbstractPostgreSQLRepository
implements DataRepository {
protected AbstractDataRepository(final Class<?> repositoryClass, final ConnectionPool pool) {
super(repositoryClass, pool);
}
@Override
public CompletableFuture<Long> userDefinedMethod() {
return CompletableFuture.completedFuture(100L);
}
}An abstract class that contains a partial implementation must meet the following requirements:
-
The class must be an
abstractone. -
The class must extend the
AbstractPostgreSQLRepositoryone. -
The class must implement the PostgreSQL data repository interface.
-
The class must contain an implementation of all methods that are not generated automatically.
In terms of infrastructure, the repository methods generated and defined by the developer for Postgre SQL data repository do not differ:
@Test
void generatedMethod() {
assertEquals(2L, dataRepository.generatedMethod().join());
}
@Test
void userDefinedMethod() {
assertEquals(100L, dataRepository.userDefinedMethod().join());
}|
The project source code used in the current subsection is available at the following link: |
|
When compiling, the RxMicro framework searches for When changing the |
9.13. Logging
PostgreSQL Data Repositories use the R2DBC PostgreSQL Driver, so in order to activate database request logging, You must configure the R2DBC PostgreSQL Driver Logger:
For example, if to the classpath of the current project add the jul.properties resource:
io.r2dbc.postgresql.QUERY.level=TRACE,then PostgreSQL Data Repositories will generate request logs to the database while working:
[DEBUG] io.r2dbc.postgresql.QUERY : Executing query: SHOW TRANSACTION ISOLATION LEVEL
[DEBUG] io.r2dbc.postgresql.QUERY : Executing query: SELECT 2+2
[DEBUG] io.r2dbc.postgresql.QUERY : Executing query: SELECT first_name, last_name FROM account WHERE email = $110. Mongo Data Repositories
The RxMicro framework supports creation of dynamic repositories for interaction with databases.
To interact with Mongo DB, the RxMicro framework provides the rxmicro.data.mongo module.
10.1. Basic Usage
To use the rxmicro.data.mongo module in the project, the following two steps must be taken:
-
Inject the
rxmicro.data.mongodependency to thepom.xmlfile:
<dependency>
<groupId>io.rxmicro</groupId>
<artifactId>rxmicro-data-mongo</artifactId>
<version>${rxmicro.version}</version>
</dependency>
<dependency>
<groupId>io.projectreactor</groupId>
<artifactId>reactor-core</artifactId> (1)
<version>${projectreactor.version}</version>
</dependency>| 1 | Besides the rxmicro.data.mongo dependency, it is also recommended to add the reactive programming library. |
|
Instead of adding a third-party reactive programming library, You can also use the java.util.concurrent library built into the JDK, but often in practice the java.util.concurrent library’s features are not enough. Therefore, it is recommended to use the Project Reactor or the RxJava library! |
-
Add the
rxmicro.data.mongomodule to themodule-info.javadescriptor:
module examples.data.mongo.basic {
requires rxmicro.data.mongo;
requires reactor.core; (1)
}| 1 | When using a third-party reactive programming library, do not forget to add the corresponding module. |
Once the rxmicro.data.mongo module is added, You can create a data model class and a dynamic repository:
public final class Account {
String firstName;
String lastName;
public String getFirstName() {
return firstName;
}
public String getLastName() {
return lastName;
}
}(1)
@MongoRepository(collection = "account")
public interface DataRepository {
(2)
@Find(query = "{email: ?}")
Mono<Account> findByEmail(String email);
}| 1 | In order for a standard interface to be recognized by the RxMicro framework as a dynamic repository for interaction with Mongo DB, this interface should be annotated with the @MongoRepository annotation. |
| 2 | The dynamic repository may contain methods that form a query to the Mongo DB.
(The query that used for a request for data uses the JSON format (Specialized request format for Mongo DB) and is specified in the annotation parameters.
For each operation supported by Mongo DB, the RxMicro framework defines a separate annotation:
The @Find annotation describes the
db.collection.find()operation.) |
Since the dynamic repository is a RxMicro component, for its testing You need to use the microservice component testing approach:
|
The common approach recommended for testing dynamic repositories, that interact with |
@Testcontainers
@RxMicroComponentTest(DataRepository.class)
final class DataRepositoryTest {
@Container
private final GenericContainer<?> mongoTestDb =
new GenericContainer<>("rxmicro/mongo-test-db")
.withExposedPorts(27017);
@WithConfig
private final MongoConfig mongoConfig = new MongoConfig()
.setDatabase("rxmicro");
private DataRepository dataRepository;
@BeforeEach
void beforeEach() {
mongoConfig
.setHost(mongoTestDb.getHost())
.setPort(mongoTestDb.getFirstMappedPort());
}
@Test
void Should_find_account() {
final Account account =
dataRepository.findByEmail("richard.hendricks@piedpiper.com")
.blockOptional()
.orElseThrow();
assertEquals("Richard", account.getFirstName());
assertEquals("Hendricks", account.getLastName());
}
}|
The project source code used in the current subsection is available at the following link: |
|
When compiling, the RxMicro framework searches for When changing the |
10.2. RxMicro Annotations
The RxMicro framework supports the following RxMicro Annotations:
| Annotation | Description |
|---|---|
Sets mapping between the field name in the (By default, the RxMicro framework uses the Java model class field name as the field name in the |
|
Sets the strategy of field name formation in the (If this annotation annotates the Java model class, then the set strategy will be used for all fields in this class.
For example, if You set the default |
|
Allows You to configure the repository generation process. |
|
Allows setting mapping between one method parameter marked with this annotation and several universal placeholders that are used in the request to |
|
Denotes a repository method that must execute a |
|
Denotes a repository method that must execute a |
|
Denotes a repository method that must execute a |
|
Denotes a repository method that must execute a |
|
Denotes a repository method that must execute a |
|
Denotes a repository method that must execute a |
|
Denotes a repository method that must execute a |
|
Denotes a repository method that must execute a |
|
Denotes a model field that must be used as document unique identifier. |
|
Denotes that an interface is a dynamic generated Mongo data repository. |
|
Denotes an abstract class that contains a partial implementation of the annotated by this annotation a Mongo Data Repository interface. |
10.3. Repositories Testing
For successful functional testing of dynamic repositories, that interact with Mongo DB, it is required:
-
Presence of a script that creates a test database.
-
Mechanism for preparing a database for testing: creating a database before starting the test and deleting a database after completing the test.
10.3.1. Test Database
A test database was created for testing the rxmicro.data.mongo, module features, which are described in this section.
The test database consists of one account collection, which contains 6 documents describing the accounts of the test users:
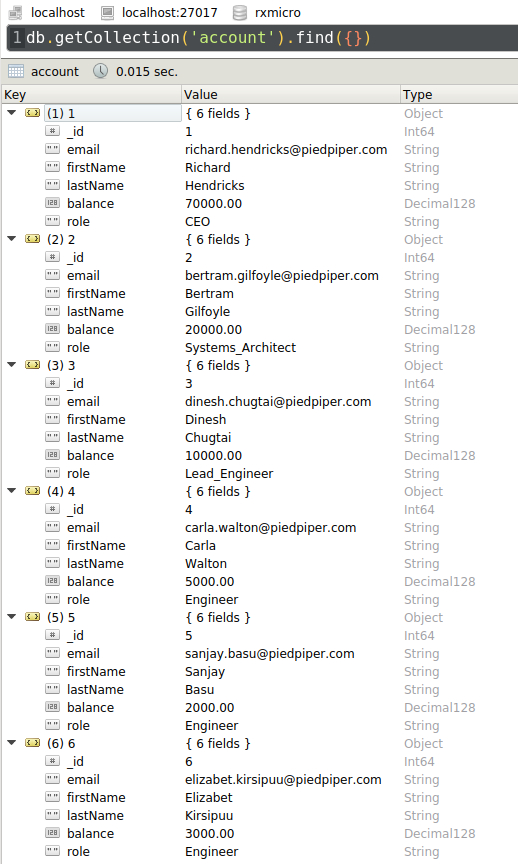
|
Scripts for creating a test database are available at the following link: |
The following classes of Java models correspond to the documents created in the test database:
public class Account {
@DocumentId
Long id;
String email;
String firstName;
String lastName;
BigDecimal balance;
Role role;
}public enum Role {
CEO,
Systems_Architect,
Lead_Engineer,
Engineer
}|
For ease of studying the The source code of the project used as a base for building this |
10.3.2. Test Templates
As a mechanism for preparing a database for testing (creating a database before starting the test and deleting a database after completing the test), it is most convenient to use docker.
To start docker containers in the functional test it is convenient to use the Testcontainers Java library:
(1)
@Testcontainers
(2)
@RxMicroComponentTest(DataRepository.class)
final class DataRepositoryTestTemplate1 {
(3)
@Container
private static final GenericContainer<?> MONGO_TEST_DB =
new GenericContainer<>("rxmicro/mongo-test-db")
.withExposedPorts(27017); (4)
(5)
@WithConfig
private static final MongoConfig MONGO_CONFIG = new MongoConfig()
.setDatabase("rxmicro"); (6)
@BeforeAll
static void beforeAll() {
MONGO_TEST_DB.start(); (7)
MONGO_CONFIG
.setHost(MONGO_TEST_DB.getHost()) (8)
.setPort(MONGO_TEST_DB.getFirstMappedPort());
}
private DataRepository dataRepository; (9)
// ... test methods must be here
@AfterAll
static void afterAll() {
MONGO_TEST_DB.stop(); (10)
}
}| 1 | The @Testcontainers
annotation activates the start and stop of the docker containers to be used in this test. |
| 2 | Since the dynamic repository is a RxMicro component, for its testing You need to use the microservice component testing approach. |
| 3 | The @Container
annotation indicates the docker container that will be used in this test.
As an image on the basis of which it is necessary to create the docker container, the Mongo DB ready-made image with the
rxmicro/mongo-test-db test database is used. |
| 4 | When starting the docker container, You need to open the standard port for Mongo DB. |
| 5 | Using the @WithConfig
annotation, the configuration available only during the test is declared. |
| 6 | Setting up the configuration to interact with the test database. |
| 7 | Before running all tests, You must start the docker container. |
| 8 | After starting the docker container, You need to read the random IP address and port that will be used when connecting to the running docker container. |
| 9 | When testing microservice components, it is necessary to specify a reference to the component in which the RxMicro framework will inject the tested component. |
| 10 | After completing all the tests, You must stop the docker container. |
The main advantage of this template is the speed of testing.
Since the docker container is created once before starting all test methods, the total runtime of all test methods is reduced.
The main disadvantage of this template is that if any test method changes the Mongo DB state, the following test method may end with an error.
Therefore, this functional test template should be used for queries to Mongo DB that do not change the database state!
If You need to test methods that change the Mongo DB state, You should use another template:
(1)
@Testcontainers
(2)
@RxMicroComponentTest(DataRepository.class)
final class DataRepositoryTestTemplate2 {
(3)
@Container
private final GenericContainer<?> mongoTestDb =
new GenericContainer<>("rxmicro/mongo-test-db")
.withExposedPorts(27017); (4)
(5)
@WithConfig
private final MongoConfig mongoConfig = new MongoConfig()
.setDatabase("rxmicro"); (6)
private DataRepository dataRepository; (7)
@BeforeEach
void beforeEach() {
mongoConfig
.setHost(mongoTestDb.getHost()) (8)
.setPort(mongoTestDb.getFirstMappedPort());
}
// ... test methods must be here
}| 1 | The @Testcontainers
annotation activates the start and stop of the docker containers to be used in this test. |
| 2 | Since the dynamic repository is a RxMicro component, for its testing You need to use the microservice component testing approach |
| 3 | The @Container
annotation indicates the docker container that will be used in this test.
As an image on the basis of which it is necessary to create the docker container, the Mongo DB ready-made image with the
rxmicro/mongo-test-db test database is used. |
| 4 | When starting the docker container, You need to open the standard port for Mongo DB. |
| 5 | Using the @WithConfig
annotation, the configuration available only during the test is declared. |
| 6 | Setting up the configuration to interact with the test database. |
| 7 | When testing microservice components, it is necessary to specify a reference to the component in which the RxMicro framework will inject the tested component. |
| 8 | After starting the docker container, You need to read the random IP address and port that will be used when connecting to the running docker container. |
This template for each test method will create and drop the docker container, which may increase the total runtime of all test methods.
Therefore, select the most appropriate functional test template based on the requirements of the tested functionality!
|
The So You should start and stop the |
10.4. Universal Placeholder
The RxMicro framework recommends using the universal placeholder (?) as parameter value placeholder in the Mongo DB queries:
@Find(query = "{email: ?}")
Mono<Account> findByEmail(String email);|
If this method invoked with the following parameter: the RxMicro framework will generate the following |
10.5. @RepeatParameter Annotation
The universal placeholder (?) is the simplest type of placeholders.
But unfortunately, it has one disadvantage: if a query parameter must be repeated, a developer must define a copy of this parameter:
@Find(query = "{$or: [{firstName: ?}, {lastName: ?}]}")
Mono<Account> findByFirstOrLastNames(String name1, String name2);The @RepeatParameter annotation fixes this disadvantage.
The following code is an equivalent to the code with a copy of the name parameter:
@Find(query = "{$or: [{firstName: ?}, {lastName: ?}]}")
Mono<Account> findByFirstOrLastNames(@RepeatParameter(2) String name);10.6. Mongo Operations
10.6.1. @Find
The rxmicro.data.mongo module supports the db.collection.find() operation:
@Find(query = "{_id: ?}")
Mono<Account> findById(long id);
@Find(query = "{_id: ?}", projection = "{firstName: 1, lastName: 1}")
Mono<Account> findWithProjectionById(long id);
@Find(query = "{role: ?}", sort = "{role: 1, balance: 1}")
Flux<Account> findByRole(Role role, Pageable pageable);
@Find(query = "{role: ?}", sort = "{role: ?, balance: ?}")
Flux<Account> findByRole(Role role, @RepeatParameter(2) SortOrder sortOrder, Pageable pageable);|
For more information, we recommend that You familiarize yourself with the following examples: |
|
The project source code used in the current subsection is available at the following link: |
|
When compiling, the RxMicro framework searches for When changing the |
10.6.2. @Aggregate
The rxmicro.data.mongo module supports the db.collection.aggregate() operation:
public final class Report {
@DocumentId
Role id;
BigDecimal total;
}@Aggregate(pipeline = {
"{ $group : { _id: '$role', total : { $sum: '$balance'}} }",
"{ $sort: {total: -1, _id: -1} }"
})
Flux<Report> aggregate();|
For more information, we recommend that You familiarize yourself with the following examples: |
|
The project source code used in the current subsection is available at the following link: |
|
When compiling, the RxMicro framework searches for When changing the |
10.6.3. @Distinct
The rxmicro.data.mongo module supports the db.collection.distinct() operation:
@Distinct(field = "email", query = "{_id: ?}")
Mono<String> getEmailById(long id);
@Distinct(field = "role")
Flux<Role> getAllUsedRoles();|
For more information, we recommend that You familiarize yourself with the following examples: |
|
The project source code used in the current subsection is available at the following link: |
|
When compiling, the RxMicro framework searches for When changing the |
10.6.4. @CountDocuments
The rxmicro.data.mongo module supports the db.collection.countDocuments() operation:
@CountDocuments
Mono<Long> countDocuments();
@CountDocuments(query = "{role:?}", skip = 0, limit = 100)
Mono<Long> countDocuments(Role role);|
For more information, we recommend that You familiarize yourself with the following examples: |
|
The project source code used in the current subsection is available at the following link: |
|
When compiling, the RxMicro framework searches for When changing the |
10.6.5. @EstimatedDocumentCount
The rxmicro.data.mongo module supports the db.collection.estimatedDocumentCount() operation:
@EstimatedDocumentCount
Mono<Long> estimatedDocumentCount();|
For more information, we recommend that You familiarize yourself with the following examples: |
|
The project source code used in the current subsection is available at the following link: |
|
When compiling, the RxMicro framework searches for When changing the |
10.6.6. @Insert
The rxmicro.data.mongo module supports the db.collection.insertOne() operation:
@Insert
Mono<Void> insert(Account account);|
For more information, we recommend that You familiarize yourself with the following examples: |
|
The project source code used in the current subsection is available at the following link: |
|
When compiling, the RxMicro framework searches for When changing the |
10.6.7. @Update
The rxmicro.data.mongo module supports the db.collection.updateOne() operation:
@Update
Mono<Boolean> updateEntity(AccountEntity accountEntity);
@Update(filter = "{_id: ?}")
Mono<Void> updateDocument(AccountDocument accountDocument, long id);
@Update(update = "{$set: {balance: ?}}", filter = "{_id: ?}")
Mono<Long> updateById(BigDecimal balance, long id);
@Update(update = "{$set: {balance: ?}}", filter = "{role: ?}")
Mono<UpdateResult> updateByRole(BigDecimal balance, Role role);
@Update(update = "{$set: {balance: ?}}")
Mono<UpdateResult> updateAll(BigDecimal balance);|
For more information, we recommend that You familiarize yourself with the following examples: |
|
The project source code used in the current subsection is available at the following link: |
|
When compiling, the RxMicro framework searches for When changing the |
10.6.8. @Delete
The rxmicro.data.mongo module supports the db.collection.deleteOne()
and db.collection.deleteMany() operations:
@Delete
Mono<Boolean> deleteById(Long id);
@Delete(filter = "{role: ?}")
Mono<Long> deleteByRole(Role role);|
For more information, we recommend that You familiarize yourself with the following examples: |
|
The project source code used in the current subsection is available at the following link: |
|
When compiling, the RxMicro framework searches for When changing the |
10.7. Partial Implementation
If the Mongo data repository generated by the RxMicro Annotation Processor contains errors, incorrect or non-optimized logic, the developer can use the Partial Implementation feature.
This feature allows You to implement methods for the Mongo data repository on Your own, instead of generating them by the RxMicro framework.
To activate this feature, You need to use the
@PartialImplementation
annotation, and specify an abstract class that contains a partial implementation of method(s) for Mongo data repository:
@MongoRepository(collection = DataRepository.COLLECTION_NAME)
(1)
@PartialImplementation(AbstractDataRepository.class)
public interface DataRepository {
String COLLECTION_NAME = "account";
@CountDocuments
CompletableFuture<Long> generatedMethod();
CompletableFuture<Long> userDefinedMethod();
}| 1 | Using the
@PartialImplementation
annotation, the AbstractDataRepository class is specified. |
An AbstractDataRepository contains the following content:
public abstract class AbstractDataRepository extends AbstractMongoRepository
implements DataRepository {
protected AbstractDataRepository(final Class<?> repositoryClass,
final MongoCollection<Document> collection) {
super(repositoryClass, collection);
}
@Override
public CompletableFuture<Long> userDefinedMethod() {
return CompletableFuture.completedFuture(100L);
}
}An abstract class that contains a partial implementation must meet the following requirements:
-
The class must be an
abstractone. -
The class must extend the
AbstractMongoRepositoryone. -
The class must implement the Mongo data repository interface.
-
The class must contain an implementation of all methods that are not generated automatically.
In terms of infrastructure, the repository methods generated and defined by the developer for Mongo data repository do not differ:
@Test
void generatedMethod() {
assertEquals(6L, dataRepository.generatedMethod().join());
}
@Test
void userDefinedMethod() {
assertEquals(100L, dataRepository.userDefinedMethod().join());
}|
The project source code used in the current subsection is available at the following link: |
|
When compiling, the RxMicro framework searches for When changing the |
10.8. Logging
Mongo Data Repositories use the MongoDB Async Driver, so in order to activate database request logging to the Mongo DB, You must configure the MongoDB Async Driver Logger:
For example, if to the classpath of the current project add the jul.properties resource:
org.mongodb.driver.protocol.level=TRACE,then Mongo Data Repositories will generate request logs to the Mongo DB while working:
2020-03-08 13:15:03.912 [DEBUG] org.mongodb.driver.protocol.command : Sending command '{"find": "account", "filter": {"_id": 1}, "batchSize": 2147483647, "$db": "rxmicro"}' with request id 6 to database rxmicro on connection [connectionId{localValue:2, serverValue:4}] to server localhost:27017
2020-03-08 13:15:03.914 [DEBUG] org.mongodb.driver.protocol.command : Execution of command with request id 6 completed successfully in 3.11 ms on connection [connectionId{localValue:2, serverValue:4}] to server localhost:2701711. Contexts and Dependency Injection
The rxmicro.cdi module is an implementation of the Dependency Injection design pattern, that is integrated to the RxMicro framework.
11.1. Basic Usage
To use the rxmicro.cdi module in the project, the following two steps must be taken:
-
Add the
rxmicro-cdidependency to thepom.xmlfile:
<dependency>
<groupId>io.rxmicro</groupId>
<artifactId>rxmicro-cdi</artifactId>
<version>${rxmicro.version}</version>
</dependency>-
Add the
rxmicro.cdimodule to themodule-info.javadescriptor:
module examples.cdi.basic {
requires rxmicro.rest.server.netty;
requires rxmicro.rest.server.exchange.json;
requires rxmicro.cdi; (1)
}After adding the rxmicro.cdi module, You can create a business service:
public interface BusinessService {
String getValue();
}public final class BusinessServiceImpl implements BusinessService {
@Override
public String getValue() {
return "IMPL";
}
}In order to inject a business service implementation, it is necessary to use the
@Inject annotation:
public final class RestController {
(1)
@Inject
BusinessService businessService;
@PATCH("/")
void handle() {
System.out.println(businessService.getValue());
}
}| 1 | The usage of the @io.rxmicro.cdi.Inject
annotation does not differ fundamentally from that of the
@javax.inject.Inject or
@com.google.inject.Inject annotations. |
The correctness of injection can be checked using REST-based microservice test:
@RxMicroRestBasedMicroServiceTest(RestController.class)
final class RestControllerTest {
private BlockingHttpClient blockingHttpClient;
private SystemOut systemOut;
@Test
void Should_print_to_system_out() {
blockingHttpClient.patch("/");
assertEquals("IMPL", systemOut.asString());
}
}Business service implementation can be injected not only into REST controller, but into any component:
public final class BusinessServiceFacade {
@Inject
BusinessService businessService;
public String getValue() {
return businessService.getValue();
}
}Since the injection is performed into any component, it is necessary to use the microservice component testing approach:
@RxMicroComponentTest(BusinessServiceFacade.class)
final class BusinessServiceFacadeTest {
private BusinessServiceFacade businessServiceFacade;
@Test
void Should_invoke_BusinessService_getValue() {
assertEquals("IMPL", businessServiceFacade.getValue());
}
}|
The project source code used in the current subsection is available at the following link: |
|
When compiling, the RxMicro framework searches for When changing the |
11.2. RxMicro Annotations
The RxMicro framework supports the following RxMicro Annotations:
| Annotation | Description |
|---|---|
Indicates the need to inject the component implementation into the annotated class field or method parameter. (Is a synonym of the |
|
Allows to customize an injection point by specifying a string value or custom annotation. This annotation can also be used to specify a component name. (Is a synonym of the |
|
|
(In its semantics, it completely corresponds to the |
|
Denotes a factory method or a factory, that creates instances of the specified class. |
|
Indicates the need to inject the external resource into the annotated class field or method parameter. |
11.3. All Beans are Singletons!
The RxMicro framework focuses on creating microservice projects.
One of the key features of microservices is their simplicity.
That’s why singleton scope was chosen as the main and only one.
Thus, all CDI components are singletons!
It means that when starting a microservice project, only one instance of the component implementation class is created and injected into all necessary injection points.
|
If it is necessary to inject a separate implementation class instance ( |
This behavior can be checked with the following code:
public final class BusinessServiceImpl implements BusinessService1, BusinessService2 {
}public final class BusinessServiceFacade {
@Inject
BusinessService1 businessService1;
@Inject
BusinessService2 businessService2;
}@RxMicroComponentTest(BusinessServiceFacade.class)
final class BusinessServiceFacadeTest {
private BusinessServiceFacade facade;
@Test
void Should_use_singleton_instance() {
assertSame(facade.businessService1, facade.businessService2); (1)
}
}| 1 | Since the BusinessServiceImpl class implements two interfaces, the same implementation instance is injected when injecting different types of interfaces! |
|
The project source code used in the current subsection is available at the following link: |
|
When compiling, the RxMicro framework searches for When changing the |
11.4. Constructor Injection
The RxMicro framework also supports constructor injection:
public final class BusinessServiceFacade {
private final BusinessService businessService;
(1)
@Inject
public BusinessServiceFacade(final BusinessService businessService) {
System.out.println(businessService.getClass().getSimpleName());
this.businessService = businessService;
}
}| 1 | To enable constructor injection, it is necessary to create a constructor with parameters and annotate it by the
@Inject or
@Autowired annotation. |
When using the constructor injection mechanism, this constructor is automatically invoked by the RxMicro framework:
@RxMicroComponentTest(BusinessServiceFacade.class)
final class BusinessServiceFacadeTest {
private SystemOut systemOut;
@Test
void Should_support_constructor_injection() {
assertEquals(BusinessServiceImpl.class.getSimpleName(), systemOut.asString());
}
}Constructor injection requires more code to be written, but also allows You to create final fields as injection points.
|
The project source code used in the current subsection is available at the following link: |
|
When compiling, the RxMicro framework searches for When changing the |
11.5. Method Injection
The RxMicro framework also supports injection with setters (method injection):
public final class BusinessServiceFacade {
private BusinessService businessService;
(1)
@Inject
public void setBusinessService(final BusinessService businessService) {
System.out.println(businessService.getClass().getSimpleName());
this.businessService = businessService;
}
}| 1 | To enable the injection with setters, it is necessary to create setter and annotate it by the
@Inject or
@Autowired annotation. |
When using the injection mechanism with setters, this method is invoked automatically by the RxMicro framework:
@RxMicroComponentTest(BusinessServiceFacade.class)
final class BusinessServiceFacadeTest {
private SystemOut systemOut;
@Test
void Should_support_constructor_injection() {
assertEquals(BusinessServiceImpl.class.getSimpleName(), systemOut.asString());
}
}|
The project source code used in the current subsection is available at the following link: |
|
When compiling, the RxMicro framework searches for When changing the |
11.6. Ambiguity Resolving
If there are two or more implementations of the same interface in the current project module, the problem of ambiguity resolving may arise in the process of dependencies injection. In the field with the interface type potentially can be injected an implementation of any of the child classes of this interface, that’s why such a problem occurs.
In order to solve such problems definitively, the RxMicro framework uses the ambiguity resolving algorithm by default.
11.6.1. Default Ambiguity Resolving
If there are two or more implementations of the same interface in the current project module, then the RxMicro framework implicitly sets the name for each implementation. This name corresponds to a simple class name starting with a small letter, for example:
-
For the
io.rxmicro.examples.cdi.ProductionBusinessServiceclass, the name is equal toproductionBusinessService. -
For the
io.rxmicro.examples.cdi.DevelopmentBusinessServiceclass, the name is equal todevelopmentBusinessService. -
For the
io.rxmicro.ProductionBusinessServiceclass, the name is equal toproductionBusinessService. -
For the
ProductionBusinessServiceclass, the name is equal toproductionBusinessService.
|
The ambiguity resolving problem may occur only between classes implementing the same interface!. This means that if there are two following interfaces in the project:
and four implementation classes:
then despite the same names for different classes:
no implementation errors will occur! Everything will work correctly as the same component names are created for different data types! |
Thus, for ProductionBusinessService and DevelopmentBusinessService implementation classes, the following names are set accordingly: productionBusinessService and developmentBusinessService:
public final class ProductionBusinessService implements BusinessService {
@Override
public String getValue() {
return "PRODUCTION";
}
}public final class DevelopmentBusinessService implements BusinessService {
@Override
public String getValue() {
return "DEVELOPMENT";
}
}When injecting implementations, the RxMicro framework reads the name of the class or method parameter field. If the names of the class fields correspond to the names of implementation components, the successful injection is performed:
|
If there is only one implementation class, in the current module, then regardless of the class field names or method parameters, the instance of this class will be successfully injected! In other words, the ambiguity resolving algorithm is enabled by default only if there are such ambiguities! |
public final class BusinessServiceFacade {
@Inject
BusinessService productionBusinessService; (1)
@Inject
BusinessService developmentBusinessService; (2)
public String getValue(final boolean production) {
if (production) {
return productionBusinessService.getValue();
} else {
return developmentBusinessService.getValue();
}
}
}| 1 | In the productionBusinessService field, the ProductionBusinessService class instance is injected. |
| 2 | In the developmentBusinessService field, the DevelopmentBusinessService class instance is injected. |
This behavior can be tested with the following test:
@RxMicroComponentTest(BusinessServiceFacade.class)
final class BusinessServiceFacadeTest {
private BusinessServiceFacade businessServiceFacade;
@Test
void Should_return_PRODUCTION() {
assertEquals("PRODUCTION", businessServiceFacade.getValue(true));
}
@Test
void Should_return_DEVELOPMENT() {
assertEquals("DEVELOPMENT", businessServiceFacade.getValue(false));
}
}|
The project source code used in the current subsection is available at the following link: |
|
When compiling, the RxMicro framework searches for When changing the |
11.6.2. The @Named (@Qualifier) Annotation Usage
In case if the ambiguity resolving algorithm by default does not meet the needs of a business task, the developer can set up the implementation process using the following annotations: @Named or
@Qualifier:
public final class BusinessServiceFacade {
@Inject
(1)
@Named("productionBusinessService")
BusinessService businessService1;
@Inject
(2)
@Named("developmentBusinessService")
BusinessService businessService2;
public String getValue(final boolean production) {
if (production) {
return businessService1.getValue();
} else {
return businessService2.getValue();
}
}
}| 1 | To inject the ProductionBusinessService class instance to the businessService1 field, in the
@Named
annotation parameter, You need to specify the productionBusinessService name.(This is an implicit name that is set by the RxMicro framework for the ProductionBusinessService class!) |
| 2 | To inject the DevelopmentBusinessService class instance to the businessService2 field, in the
@Named
annotation parameter, You need to specify the developmentBusinessService name.(This is an implicit name that is set by the RxMicro framework for the DevelopmentBusinessService class!) |
This behavior can be tested with the following test:
@RxMicroComponentTest(BusinessServiceFacade.class)
final class BusinessServiceFacadeTest {
private BusinessServiceFacade businessServiceFacade;
@Test
void Should_return_PRODUCTION() {
assertEquals("PRODUCTION", businessServiceFacade.getValue(true));
}
@Test
void Should_return_DEVELOPMENT() {
assertEquals("DEVELOPMENT", businessServiceFacade.getValue(false));
}
}|
The project source code used in the current subsection is available at the following link: |
|
When compiling, the RxMicro framework searches for When changing the |
An implicitly created name for an implementation class can be set explicitly using the
@Named or
@Qualifier annotations:
@Named("Production")
public final class ProductionBusinessService implements BusinessService {
@Override
public String getValue() {
return "PRODUCTION";
}
}@Named("Development")
public final class DevelopmentBusinessService implements BusinessService {
@Override
public String getValue() {
return "DEVELOPMENT";
}
}When using explicit names for implementation classes, it is necessary to specify these explicit names as the qualifier of an injection point:
public final class BusinessServiceFacade {
@Inject
(1)
@Named("Production")
BusinessService businessService1;
@Inject
(2)
@Named("Development")
BusinessService businessService2;
public String getValue(final boolean production) {
if (production) {
return businessService1.getValue();
} else {
return businessService2.getValue();
}
}
}| 1 | To inject the ProductionBusinessService class instance to the businessService1 field, in the
@Named
annotation parameter, You need to specify the Production name.(This name is explicitly set for the ProductionBusinessService class, using the
@Named annotation!) |
| 2 | To inject the DevelopmentBusinessService class instance to the businessService2 field, in the
@Named
annotation parameter, You need to specify the Development name.(This name is explicitly set for the DevelopmentBusinessService class, using the
@Named annotation!) |
|
The project source code used in the current subsection is available at the following link: |
|
When compiling, the RxMicro framework searches for When changing the |
11.6.3. Custom Annotations Usage
When using string names for implementation classes and injection points, the developer may make a mistake. Since the compiler does not check the specified names, the error can be detected only during runtime.
If such a situation is unacceptable, custom annotations should be used as qualifiers:
@Documented
@Retention(CLASS)
@Target({FIELD, METHOD, TYPE})
(1)
@Named("")
public @interface EnvironmentType {
Type value(); (2)
enum Type {
PRODUCTION,
DEVELOPMENT
}
}| 1 | For a custom annotation to be defined by the RxMicro framework as a qualifier, it must be annotated by the
@Named or
@Qualifier annotation with an empty string value. |
| 2 | To control the component names with the compiler, it is recommended to use enumerations. |
After creating the custom annotation that serves as a qualifier, it is necessary to annotate the implementation classes by it
@EnvironmentType(EnvironmentType.Type.PRODUCTION)
public final class ProductionBusinessService implements BusinessService {
@Override
public String getValue() {
return "PRODUCTION";
}
}@EnvironmentType(EnvironmentType.Type.DEVELOPMENT)
public final class DevelopmentBusinessService implements BusinessService {
@Override
public String getValue() {
return "DEVELOPMENT";
}
}and injection points:
public final class BusinessServiceFacade {
@Inject
(1)
@EnvironmentType(EnvironmentType.Type.PRODUCTION)
BusinessService businessService1;
@Inject
(2)
@EnvironmentType(EnvironmentType.Type.DEVELOPMENT)
BusinessService businessService2;
public String getValue(final boolean production) {
if (production) {
return businessService1.getValue();
} else {
return businessService2.getValue();
}
}
}When using custom annotations, the result of ambiguity resolving will be the same as when using string names:
@RxMicroComponentTest(BusinessServiceFacade.class)
final class BusinessServiceFacadeTest {
private BusinessServiceFacade businessServiceFacade;
@Test
void Should_return_PRODUCTION() {
assertEquals("PRODUCTION", businessServiceFacade.getValue(true));
}
@Test
void Should_return_DEVELOPMENT() {
assertEquals("DEVELOPMENT", businessServiceFacade.getValue(false));
}
}|
The project source code used in the current subsection is available at the following link: |
|
When compiling, the RxMicro framework searches for When changing the |
11.7. Dependency Injection Using Spring Style
The developers with a rich experience in using Spring in their previous projects can instead of the following annotations:
@Inject and
@Named
use the
@Autowired and
@Qualifier annotations respectively, which are absolutely similar in features:
@Qualifier("Production")
public final class ProductionBusinessService implements BusinessService {
@Override
public String getValue() {
return "PRODUCTION";
}
}@Qualifier("Development")
public final class DevelopmentBusinessService implements BusinessService {
@Override
public String getValue() {
return "DEVELOPMENT";
}
}public final class BusinessServiceFacade {
@Autowired
(1)
@Qualifier("Production")
BusinessService businessService1;
@Autowired
(2)
@Qualifier("Development")
BusinessService businessService2;
public String getValue(final boolean production) {
if (production) {
return businessService1.getValue();
} else {
return businessService2.getValue();
}
}
}| 1 | To inject the ProductionBusinessService class instance in the businessService1 field, it is necessary in the
@Qualifier
annotation parameter specify the Production name.(This is the name that is set explicitly for the ProductionBusinessService class by the
@Qualifier annotation!) |
| 2 | To inject the DevelopmentBusinessService class instance in the businessService2 field, it is necessary in the
@Qualifier
annotation parameter specify the Development name.(This is the name that is set explicitly for the DevelopmentBusinessService class by the
@Qualifier annotation!) |
|
The project source code used in the current subsection is available at the following link: |
|
When compiling, the RxMicro framework searches for When changing the |
11.8. @PostConstruct
If You need to run some code while creating a class instance, Java provides a special method for doing so, namely the constructor.
However, when using the dependency injection mechanisms, the dependencies are injected after creating an instance, and accordingly after invoking the constructor.
(Except for the constructor injection mechanism!).
In order to run some code while creating an instance, but only after introducing all dependencies into this instance, the RxMicro framework provides a special
@PostConstruct annotation.
Thus, if there is a class method, annotated by the @PostConstruct annotation, then this method is automatically invoked after all dependencies are injected into the created instance of this class.
public final class BusinessService2Facade {
@Inject
BusinessService businessService;
@PostConstruct
void anyName() { (1)
System.out.println(businessService.getClass().getSimpleName());
}
}| 1 | After injection of the implementation class instance in the businessService field, the RxMicro framework will automatically invoke the anyName method, since this method is annotated by the
@PostConstruct annotation. |
For the convenience of developers, the RxMicro framework introduces an additional convention:
If there is a method with the postConstruct name in the class, this method may not be annotated by the @PostConstruct annotation!
The method with the specified name will be invoked automatically after all dependencies are injected:
public final class BusinessService1Facade {
@Inject
BusinessService businessService;
void postConstruct() { (1)
System.out.println(businessService.getClass().getSimpleName());
}
}Thus, for any method in the class to be defined by the RxMicro framework as the method to be invoked automatically after all dependencies are injected, it is necessary to:
-
to annotate this method by the
@PostConstructannotation; -
or has the predefined
postConstructname.
The postConstruct method must meet the following requirements:
-
This method should be a single method in the class.
-
The method must not be
static. -
The method must not be
abstract. -
The method must be non-
native. -
The method must not be
synchronized. -
The method must not contain parameters.
-
The method must return the
voidtype.
The facts of invoking the postConstruct and anyName methods can be checked using the following tests:
@RxMicroComponentTest(BusinessService1Facade.class)
final class BusinessService1FacadeTest {
private SystemOut systemOut;
@Test
void Should_invoke_postConstruct_method() {
assertEquals(BusinessServiceImpl.class.getSimpleName(), systemOut.asString());
}
}@RxMicroComponentTest(BusinessService2Facade.class)
final class BusinessService2FacadeTest {
private SystemOut systemOut;
@Test
void Should_invoke_postConstruct_method() {
assertEquals(BusinessServiceImpl.class.getSimpleName(), systemOut.asString());
}
}|
The project source code used in the current subsection is available at the following link: |
|
When compiling, the RxMicro framework searches for When changing the |
|
In many frameworks implementing the Dependency Injection design template, besides the For a microservice project that uses the RxMicro framework, there is no need for the |
11.9. RxMicro Components Injection
11.9.1. Basic Usage
Besides custom classes, the RxMicro framework supports the RxMicro components injection.
For example, if a declarative REST client is declared in the project:
@RestClient
public interface RESTClient {
@PATCH("/")
CompletableFuture<Void> patch();
}then instead of getting an explicit reference to the implementation class instance using the
RestClientFactory.getRestClient(Class<?>), the developer can use the dependency injection mechanism:
public final class BusinessServiceFacade {
(1)
@Inject
RESTClient restClient;
(2)
@Inject
RestClientConfig config;
void postConstruct() {
System.out.println(restClient.getClass().getSimpleName());
System.out.println(config.getClass().getSimpleName());
}
}| 1 | To get a reference to the REST client implementation class, the developer can use the @Inject annotation. |
| 2 | Besides injecting REST clients, the RxMicro framework also supports the configuration injection. (A list of all supported RxMicro components that can be injected is described in the Section 11.9.2, “All Supported RxMicro Components”.) |
|
The project source code used in the current subsection is available at the following link: |
|
When compiling, the RxMicro framework searches for When changing the |
11.9.2. All Supported RxMicro Components
This section describes all supported RxMicro components that can be injected in any class using the injection mechanisms.
| Name | Feature |
|---|---|
Config instance. |
Any class that extends the basic configuration class: (For example: |
Mongo repository. |
The interface annotated by the |
Mongo client. |
Predefined type: |
PostgreSQL repository. |
The interface annotated by the |
R2DBC connection factory. |
Predefined type: |
R2DBC connection pool. |
Predefined type: |
REST client. |
The interface annotated by the |
|
The source code of the project demonstrating all supported for injection RxMicro components is available at the following link: |
11.10. Factory Method
When using the dependency injection mechanisms, the RxMicro framework creates instances of the specified classes and injects references to them to injection points.
For successful implementation of this behavior, each class, the instance of which should be injected, must contain an accessible constructor without parameters or a constructor annotated by the
@Inject or
@Autowired annotation.
In other words, the RxMicro framework determines the instance of which class should be created and creates this instance automatically at the start of the CDI container. If it is necessary to get more control over creation of the implementation instance, it is necessary to use the Factory Method template:
public final class BusinessServiceFacade {
@Inject
BusinessService businessService;
(1)
@Factory
static BusinessServiceFacade create() {
System.out.println("Use factory method");
return new BusinessServiceFacade();
}
(2)
private BusinessServiceFacade() {
}
void postConstruct() {
System.out.println(businessService.getClass().getSimpleName());
}
}| 1 | The class must contain the static method annotated by the @Factoryannotation. |
| 2 | The private constructor restricts the possibility of creating the instance of this class externally.
Thus, the instance of this class can only be created using the create() factory method. |
If the RxMicro framework detects a method in the class, annotated by the @Factoryannotation, then this method is used instead of the constructor when creating the instance of this class:
@RxMicroComponentTest(BusinessServiceFacade.class)
final class BusinessServiceFacadeTest {
private SystemOut systemOut;
@Test
void Should_support_constructor_injection() {
assertEquals(
List.of(
"Use factory method",
BusinessServiceImpl.class.getSimpleName()
),
systemOut.asStrings()
);
}
}The factory method must meet the following requirements:
-
The method must be
static. -
The method must be non-
native. -
The method must not be
synchronized. -
The method must return the class instance in which it is declared.
-
The method must not contain parameters.
|
The project source code used in the current subsection is available at the following link: |
|
When compiling, the RxMicro framework searches for When changing the |
11.11. Factory Class
The RxMicro framework supports creation of factory classes, that can be used to create instances of other types.
By using factory classes, it is possible to get the following benefits:
-
Create dynamic classes. (For example, using the
Proxyclass.) -
Implement a
prototypescope.
To create a factory class, it is necessary:
For example, to create a dynamic class, it is necessary to use the following factory class:
@Factory
public final class BusinessServiceFactoryImpl implements Supplier<BusinessService> {
@Override
public BusinessService get() {
final Object o = new Object();
return (BusinessService) Proxy.newProxyInstance(
BusinessService.class.getClassLoader(),
new Class[]{BusinessService.class},
(proxy, method, args) -> {
if ("getValue".equals(method.getName())) {
return "PROXY";
} else {
return method.invoke(o, args);
}
}
);
}
}Injection of an instance created by the factory class does not differ from injection of an instance automatically created by the RxMicro framework:
public final class BusinessServiceFacade {
@Inject
BusinessService businessService;
public String getValue() {
return businessService.getValue();
}
}When invoking the getValue method, the dynamic class returns a predefined value:
@RxMicroComponentTest(BusinessServiceFacade.class)
final class BusinessServiceFacadeTest {
private BusinessServiceFacade businessServiceFacade;
@Test
void Should_support_factory_classes() {
assertEquals("PROXY", businessServiceFacade.getValue());
}
}|
The project source code used in the current subsection is available at the following link: |
|
When compiling, the RxMicro framework searches for When changing the |
11.12. External resource injection
11.12.1. Basic Usage
Indicates the need to inject the external resource into the annotated class field or method parameter.
External resource is:
-
File.
-
Directory.
-
Classpath resource.
-
URL Resource.
-
etc.
The RxMicro framework uses blocking API to inject resource during startup!
To inject external resource it is necessary to use
@Resource annotation:
public class Component {
@Resource("classpath:resources.properties")
Map<String, String> resources;
public Map<String, String> getResources() {
return resources;
}
}Content of the classpath:resources.properties is:
name=valueAfter startup external resource is injected successful:
@RxMicroComponentTest(Component.class)
final class ComponentTest {
private Component component;
@Test
void Should_the_resources_be_injected() {
assertEquals(Map.of("name", "value"), component.getResources());
}
}11.12.2. Additional Info
To customize resource injection mechanism it is necessary to use @Resource annotation.
Example of valid resource paths:
-
/home/rxmicro/config.json; -
/home/rxmicro/config.properties; -
classpath:config.json; -
classpath:config.properties;
If converter class is not specified, the RxMicro framework tries to detect valid resource converter automatically using the following algorithm:
-
io.rxmicro.cdi.resource.ClasspathJsonArrayResourceConverteris used if:-
Resource path starts with
classpath:prefix. -
Resource path ends with
jsonextension. -
Annotated by
@Resourceannotation field hasjava.util.List<Object>type.
-
-
io.rxmicro.cdi.resource.ClasspathJsonObjectResourceConverteris used if:-
Resource path starts with
classpath:prefix. -
Resource path ends with
jsonextension. -
Annotated by
@Resourceannotation field hasjava.util.Map<String, Object>type.
-
-
io.rxmicro.cdi.resource.ClasspathPropertiesResourceConverteris used if:-
Resource path starts with
classpath:prefix. -
Resource path ends with
propertiesextension.
-
-
io.rxmicro.cdi.resource.FileJsonArrayResourceConverteris used if:-
Resource path starts with
file://prefix or prefix is missing. -
Resource path ends with
jsonextension. -
Annotated by
@Resourceannotation field hasjava.util.List<Object>type.
-
-
io.rxmicro.cdi.resource.FileJsonObjectResourceConverteris used if:-
Resource path starts with
file://prefix or prefix is missing. -
Resource path ends with
jsonextension. -
Annotated by
@Resourceannotation field hasjava.util.Map<String, Object>type.
-
-
io.rxmicro.cdi.resource.FilePropertiesResourceConverteris used if:-
Resource path starts with
file://prefix or prefix is missing. -
Resource path ends with
propertiesextension.
-
11.13. Optional Injection
By default, all injection points are required. Thus, if during the process of dependencies injection, the RxMicro framework does not find a suitable instance, an error will occur.
If the current project allows the situation when a suitable instance may be missing, then the optional injection mode should be used:
public final class BusinessServiceFacade {
(1)
@Inject(optional = true)
BusinessService productionBusinessService = null;
(2)
@Autowired(required = false)
BusinessService developmentBusinessService = new BusinessService() {
@Override
public String toString() {
return "DefaultImpl";
}
};
void postConstruct() {
System.out.println(productionBusinessService);
System.out.println(developmentBusinessService);
}
}| 1 | When using the @Inject annotation, the optional = true parameter must be set to enable the optional injection mode. |
| 2 | When using the @Autowired annotation, the required = false parameter must be set to enable the optional injection mode. |
If the optional injection mode is enabled, the RxMicro framework uses the following injection algorithm:
-
If the dependency is found, it will be successfully injected.
-
If there’s no dependency, nothing happens.
(In this case, the behaviour appears to be as if the field is not annotated by any annotation!)
The correctness of this algorithm can be checked with the following test:
@RxMicroComponentTest(BusinessServiceFacade.class)
final class BusinessServiceFacadeTest {
private SystemOut systemOut;
@Test
void Should_support_optional_injection() {
assertEquals(
List.of(
"null",
"DefaultImpl"
),
systemOut.asStrings()
);
}
}|
The project source code used in the current subsection is available at the following link: |
|
When compiling, the RxMicro framework searches for When changing the |
11.14. Multibindings
The RxMicro framework supports Multibindings.
Multibindings is a function of the CDI container, that allows You to find all implementations of this type and inject them.
For example, if there are two implementation classes of the BusinessService interface:
public final class ProductionBusinessService implements BusinessService {
@Override
public String getValue() {
return "PRODUCTION";
}
}public final class DevelopmentBusinessService implements BusinessService {
@Override
public String getValue() {
return "DEVELOPMENT";
}
}then the instances of these classes can be injected by the RxMicro framework into the java.util.Set type field:
public final class BusinessServiceFacade {
@Inject
Set<BusinessService> businessServices;
void postConstruct() {
System.out.println(
businessServices.stream()
.map(s -> s.getClass().getSimpleName())
.collect(joining(", "))
);
}
}After successful injection, the businessServices field will contain the ProductionBusinessService and DevelopmentBusinessService class instances:
@RxMicroComponentTest(BusinessServiceFacade.class)
final class BusinessServiceFacadeTest {
private SystemOut systemOut;
@Test
void Should_support_multibinder() {
assertEquals(
"DevelopmentBusinessService, ProductionBusinessService",
systemOut.asString()
);
}
}|
The project source code used in the current subsection is available at the following link: |
|
When compiling, the RxMicro framework searches for When changing the |
12. Monitoring
TODO
12.1. Request Id
To track an HTTP request when using a microservice architecture, the RxMicro framework provides an HTTP request identification feature.
12.1.1. Basic Rules
If the current request is identified, the provided unique id is used during the life-cycle of the current request. If the request is not identified, the RxMicro framework generates a unique id, which is further used in the life-cycle of the current request.
To store the request id, the
Request-Id HTTP additional header is used.
If the HTTP request id is necessary for business logic, a separate field in the HTTP request Java model must be created:
public final class Request {
(1)
//@Header(HttpHeaders.REQUEST_ID)
(2)
@RequestId
String requestId;
public String getRequestId() {
return requestId;
}
}| 1 | For convenience, instead of specifying an HTTP header using the @Header annotation and the
Request-Id name, |
| 2 | the special @RequestId annotation can be used, which is an alternative to the @Header(HttpHeaders.REQUEST_ID) configuration. |
Having declared a field in the HTTP request Java model, You can use its value in the handler:
final class MicroService {
@GET("/")
void handle(final Request request) {
System.out.println(request.getRequestId()); (1)
}
}| 1 | Displaying the value of the current request id in the console. |
The following test describes the basic requirements for the behavior of the request id function:
@RxMicroRestBasedMicroServiceTest(MicroService.class)
final class MicroServiceTest {
@WithConfig
private static final RestServerConfig CONFIG = new RestServerConfig()
.setRequestIdGeneratorProvider(restServerConfig -> () -> "TestRequestId") (6)
.setDevelopmentMode(true);
private BlockingHttpClient blockingHttpClient;
private SystemOut systemOut;
@Test
void Should_generate_RequestId_automatically() {
final ClientHttpResponse response = blockingHttpClient.get("/");
assertEquals("TestRequestId", systemOut.asString()); (1)
assertEquals("TestRequestId", response.getHeaders().getValue(REQUEST_ID)); (2)
}
@Test
void Should_use_provided_RequestId() {
final ClientHttpResponse response =
blockingHttpClient.get("/", HttpHeaders.of(REQUEST_ID, "Qwerty")); (3)
assertEquals("Qwerty", systemOut.asString()); (4)
assertEquals("Qwerty", response.getHeaders().getValue(REQUEST_ID)); (5)
}
}| 1 | For HTTP requests without id, the RxMicro framework must generate a unique id automatically. (This id can be used in the HTTP request handler body.) |
| 2 | Each HTTP response must contain the required
Request-Id
HTTP header with the value of the generated request id.(If the configuration parameter RestServerConfig.returnGeneratedRequestId = false, the HTTP response will not contain the Request-Id header.) |
| 3 | If the current HTTP request already contains an id, the RxMicro framework must use it instead of generating a new value. |
| 4 | The id set by the client can be used in the HTTP request handler body. |
| 5 | Each HTTP response must contain the required
Request-Id
HTTP header with a client specified request id value.(If the configuration parameter RestServerConfig.returnGeneratedRequestId = false, the HTTP response will not contain the Request-Id header.) |
| 6 | For test purposes it is necessary to set deterministic request id provider with constant value. |
|
The project source code used in the current subsection is available at the following link: |
|
When compiling, the RxMicro framework searches for When changing the |
12.1.2. Supported Generator Providers
The RxMicro framework provides the following predefined request id generator providers.
| Type | Implementation class | Description |
|---|---|---|
Generates unique 16 bytes (128 bits) request id According to specification this generator is similar to the
|
||
Generates unique 12 bytes (96 bits) request id |
||
Generates unique 12 bytes (96 bits) request id Each request id contains 52 random and 44 deterministic bits. |
||
Generates unique 12 bytes (96 bits) request id Each request id contains 44 deterministic bits + 24 incremental counter bits + 28 checksum bits. |
||
|
Generates unique 12 bytes (96 bits) request id This is default request id generator provider. By default this request id generator provider tries to use |
To change the request id generator provider, You must use the
RestServerConfig configuration class:
new Configs.Builder()
.withConfigs(new RestServerConfig()
.setRequestIdGeneratorProvider(
PredefinedRequestIdGeneratorProvider.UUID_128_BITS (1)
)
)
.build();or
export rest-server.requestIdGeneratorProvider=\
@io.rxmicro.rest.server.PredefinedRequestIdGeneratorProvider:UUID_128_BITor using any other supported config types
|
To get additional information about how custom type can be used as valid config parameters read Section 4.8.6.2, “Supported Custom Parameter Types” |
12.2. Request Tracing Usage Example
The following example demonstrates how request tracing feature can be used:
public final class Request implements RequestIdSupplier { (1)
(2)
@RequestId
String requestId;
@PathVariable
Long id;
@Override
public String getRequestId() {
return requestId;
}
public Long getId() {
return id;
}
}public final class AccountController {
@Inject
private AccountService accountService;
@GET("/account/${id}")
Mono<Response> findById(final Request request) {
return accountService.findById(request);
}
}public final class AccountService {
(1)
private static final Logger LOGGER = LoggerFactory.getLogger(AccountService.class);
@Inject
private AccountRepository accountRepository;
public Mono<Response> findById(final Request request) {
LOGGER.debug(
request, (2)
"Finding account by id=?...", request.getId()
);
return accountRepository.findById(request, request.getId())
.switchIfEmpty(Mono.error(() -> {
LOGGER.error(
request, (3)
"Account not found by id=?!", request.getId()
);
return new AccountNotFound404Exception();
}))
.map(account -> {
LOGGER.debug(
request, (4)
"Account exists by id=?: ?",
request.getId(), account
);
return new Response(
account.getEmail(), account.getFirstName(), account.getLastName()
);
});
}
}@PostgreSQLRepository
public interface AccountRepository {
@Select("SELECT * FROM ${table} WHERE ${by-id-filter}")
Mono<Account> findById(RequestIdSupplier requestIdSupplier, long id); (1)
}The `jul.properties' config classpath resource:
(1)
io.rxmicro.logger.jul.PatternFormatter.pattern=%date{HH:mm:ss.SSS} {%id} [%level] %logger{0}: %message%n
io.rxmicro.rest.server.level=TRACE
io.rxmicro.examples.monitoring.request.tracing.level=TRACEInvoke the test request:
:$ curl -v localhost:8080/account/1
* Trying 127.0.0.1...
* TCP_NODELAY set
* Connected to localhost (127.0.0.1) port 8080 (#0)
> GET /account/1 HTTP/1.1
> Host: localhost:8080
> User-Agent: curl/7.58.0
> Accept: /
>
< HTTP/1.1 200 OK
< Content-Length: 88
< Server: RxMicro-NettyServer/0.7-SNAPSHOT
< Date: Wed, 25 Nov 2020 17:30:51 GMT
< Content-Type: application/json
< Request-Id: AkinnfVzx1752012 (1)
<
* Connection #0 to host localhost left intact
{"email":"richard.hendricks@piedpiper.com","firstName":"Richard","lastName":"Hendricks"}The log output:
19:30:50.494 {null} [TRACE] NettyClientConnectionController: Client connection created: Channel=eaaf0399, IP=/127.0.0.1:33312
19:30:50.589 {AkinnfVzx1752012} [TRACE] NettyRequestHandler: HTTP request: (Channel=eaaf0399, IP=/127.0.0.1:33312):
GET /account/1 HTTP/1.1
Host: localhost:8080
User-Agent: curl/7.58.0
Accept: /
content-length: 0
19:30:50.591 {AkinnfVzx1752012} [DEBUG] AccountService: Finding account by id=1...
19:30:50.998 {AkinnfVzx1752012} [TRACE] AccountRepository: Execute SQL 'SELECT id, email, first_name, last_name FROM account WHERE id = $1' with params: [1] using connection: class='PooledConnection', id='c1275307250'...
19:30:51.074 {AkinnfVzx1752012} [TRACE] AccountRepository: SQL 'SELECT id, email, first_name, last_name FROM account WHERE id = $1' with params: [1] executed successful
19:30:51.148 {AkinnfVzx1752012} [DEBUG] AccountService: Account exists by id=1: Account{id=1, email=richard.hendricks@piedpiper.com, firstName=Richard, lastName=Hendricks}
19:30:51.166 {AkinnfVzx1752012} [TRACE] AccountRepository: Connection closed: class='PooledConnection', id='c1275307250', signal='onComplete'
19:30:51.167 {AkinnfVzx1752012} [TRACE] NettyRequestHandler: HTTP response: (Channel=eaaf0399, Duration=588.093042ms):
HTTP/1.1 200 OK
Content-Length: 88
Server: RxMicro-NettyServer/0.7-SNAPSHOT
Date: Wed, 25 Nov 2020 17:30:51 GMT
Content-Type: application/json
Request-Id: AkinnfVzx1752012
{"email":"richard.hendricks@piedpiper.com","firstName":"Richard","lastName":"Hendricks"}|
For more information, we recommend that You familiarize yourself with the following examples: |
|
When compiling, the RxMicro framework searches for When changing the |
13. Java EcoSystem Integration
13.1. Unnamed Modules Support
On September 21, 2017, Java 9 has introduced JPMS.
|
There are four types of modules in the
|
Currently, the majority of existing frameworks and libraries are focused on JDK 8 and do not support JPMS.
To support compatibility with libraries that do not support JPMS, Java 9 provides the unnamed modules mechanism.
The feature of this mechanism is that the code written in Java 9 and higher does not use the module-info.java module descriptor, and uses class-path instead of module-path.
For integration with libraries that do not support JPMS, the RxMicro framework allows You to enable the unnamed module mode for the RxMicro Annotation Processor.
To enable this mode, You need to add the RX_MICRO_BUILD_UNNAMED_MODULE configuration parameter to the maven-compiler-plugin settings:
<plugin>
<artifactId>maven-compiler-plugin</artifactId>
<version>${maven-compiler-plugin.version}</version>
<configuration>
<release>11</release>
<!-- ... -->
<compilerArgs>
<arg>-ARX_MICRO_BUILD_UNNAMED_MODULE=true</arg> (1)
</compilerArgs>
</configuration>
<!-- ... -->
</plugin>| 1 | The RxMicro Annotation Processor will use the unnamed module mode for the current microservice project. |
13.1.1. Uber Jar
An uber JAR (also known as a fat JAR or JAR with dependencies) is a JAR file that contains not only a Java program, but embeds its dependencies as well. This means that the JAR functions as an "all-in-one" distribution of the software, without needing any other Java code.
(You still need a Java runtime, and an underlying operating system, of course.)
To build a microservice project in the form of uber.jar, You need to enable the unnamed module mode and configure the maven-shade-plugin.
13.1.1.1. Enable the unnamed module Mode
To enable the unnamed module mode, add the RX_MICRO_BUILD_UNNAMED_MODULE compiler option to maven-compiler-plugin:
<plugin>
<artifactId>maven-compiler-plugin</artifactId>
<version>${maven-compiler-plugin.version}</version>
<configuration>
<release>11</release>
<!-- ... -->
<compilerArgs>
<arg>-ARX_MICRO_BUILD_UNNAMED_MODULE=true</arg> (1)
</compilerArgs>
</configuration>
<!-- ... -->
</plugin>| 1 | The RxMicro Annotation Processor will use the unnamed module mode for the current microservice project. |
13.1.1.2. Configuration of maven-shade-plugin
<plugin>
<groupId>org.apache.maven.plugins</groupId>
<artifactId>maven-shade-plugin</artifactId>
<version>${maven-shade-plugin.version}</version>
<executions>
<execution>
<phase>package</phase>
<goals>
<goal>shade</goal>
</goals>
<configuration>
<createDependencyReducedPom>false</createDependencyReducedPom>
<transformers>
<transformer implementation=
"org.apache.maven.plugins.shade.resource.ManifestResourceTransformer">
<manifestEntries>
<Main-Class>
io.rxmicro.examples.unnamed.module.uber.jar.HelloWorldMicroService (1)
</Main-Class>
</manifestEntries>
</transformer>
</transformers>
<filters>
<filter>
<artifact>*:*</artifact>
<excludes>
<exclude>ModuleInfo.*</exclude> (2)
</excludes>
</filter>
</filters>
<minimizeJar>true</minimizeJar> (3)
</configuration>
</execution>
</executions>
</plugin>| 1 | It is necessary to specify a class with the main method, which will be used as an entry point into the microservice. |
| 2 | The resulting uber.jar must not contain the module virtual descriptor, as this descriptor is only needed at the compilation level.
(More information about the virtual descriptor can be found in Section 13.1.2, “Module Configuration”.) |
| 3 | The resulting uber.jar can be reduced by excluding unused classes and packages. |
|
The |
13.1.1.3. Rebuild Project
After pom.xml setting, it is necessary to rebuild the project:
mvn clean packageAs a result, the uber.jar with all the necessary dependencies will be created:
:$ ls -lh
-rw-rw-r-- 1 nedis nedis 1,4M Mar 28 11:03 unnamed-module-uber-jar-1.0-SNAPSHOT.jar (1)
-rw-rw-r-- 1 nedis nedis 9,8K Mar 28 11:03 original-unnamed-module-uber-jar-1.0-SNAPSHOT.jar (2)| 1 | The uber.jar size is equal to 1,4 MB. |
| 2 | The size of the original jar file is equal to 9.8 KB. |
The uber.jar contains the source code of the microservice project, the code of the RxMicro and the Netty frameworks:
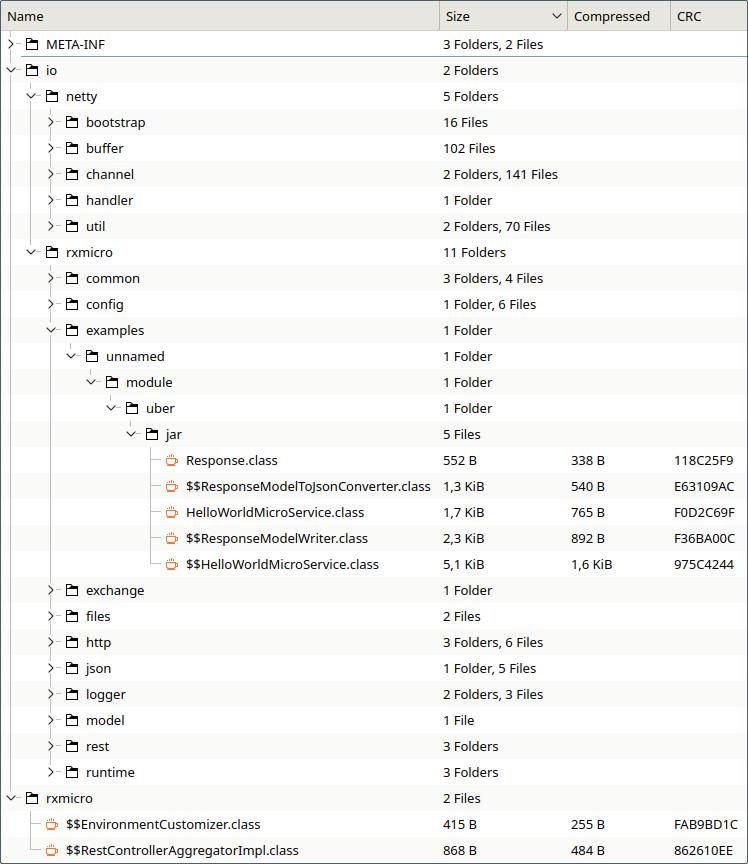
uber.jar content for a simple microservice project13.1.1.4. Run uber.jar
To run uber.jar it is necessary to provider jar file only:
> java -jar unnamed-module-uber-jar-1.0-SNAPSHOT.jar
2020-02-02 20:14:11.707 [INFO] io.rxmicro.rest.server.netty.internal.component.NettyServer :
Server started at 0.0.0.0:8080 using NETTY transport in 500 millis (1)| 1 | The Server started in … millis message format means that the RxMicro HTTP server has been successfully started. |
|
To run a modularized micro service project the java requires more arguments: |
|
The project source code used in the current subsection is available at the following link: |
|
When compiling, the RxMicro framework searches for When changing the |
13.1.2. Module Configuration
Some RxMicro modules allow You to set the common configuration with RxMicro Annotations, which annotate the module-info.java module descriptor.
But for the unnamed module, the module-info.java module descriptor does not exist!
In such cases a virtual descriptor must be created:
@Retention(CLASS)
@Target({})
public @interface ModuleInfo {
}A virtual descriptor is a custom annotation that meets the following requirements:
-
The name of the virtual descriptor is fixed and equal to:
ModuleInfo. -
The annotation must be contained in the default package (
unnamed package). -
The annotation should be available only during the compilation process:
@Retention(CLASS). -
The annotation must contain an empty list of targets:
@Target({}).
|
Since the virtual descriptor is available only during the compilation process, then during the |
13.1.2.1. Configuration of the Code Generation Process for Rest Controller
The RxMicro framework provides the option to configure the code generation process for REST controllers.
For this purpose, the @RestServerGeneratorConfig annotation should be used to annotate the
module-info.java module descriptor.
For the unnamed module instead of the module-info.java module descriptor, use the ModuleInfo annotation:
@Retention(CLASS)
@Target({})
@RestServerGeneratorConfig(
exchangeFormat = ServerExchangeFormatModule.JSON,
generateRequestValidators = GenerateOption.DISABLED,
generateResponseValidators = GenerateOption.AUTO_DETECT
)
public @interface ModuleInfo {
}|
The project source code used in the current subsection is available at the following link: |
|
When compiling, the RxMicro framework searches for When changing the |
13.1.2.2. Configuration of the Code Generation Process for Rest Client
The RxMicro framework provides the option to configure the code generation process for REST clients.
For this purpose, the @RestClientGeneratorConfig annotation should be used to annotate the
module-info.java module descriptor.
For the unnamed module instead of the module-info.java module descriptor, use the ModuleInfo annotation:
@Retention(CLASS)
@Target({})
@RestClientGeneratorConfig(
exchangeFormat = ClientExchangeFormatModule.JSON,
generateRequestValidators = GenerateOption.AUTO_DETECT,
requestValidationMode = RestClientGeneratorConfig.RequestValidationMode.RETURN_ERROR_SIGNAL,
generateResponseValidators = GenerateOption.DISABLED
)
public @interface ModuleInfo {
}|
The project source code used in the current subsection is available at the following link: |
|
When compiling, the RxMicro framework searches for When changing the |
13.1.2.3. REST-based Microservice Metadata Configuration
The RxMicro framework provides the option to configure the REST-based microservice documentation generation process, using the annotations.
These annotations annotate the module-info.java module descriptor.
For the unnamed module instead of the module-info.java module descriptor, use the ModuleInfo annotation:
@Retention(CLASS)
@Target({})
@Title("Metadata Annotations")
@Description("*Project* _Description_")
@Author(
name = "Richard Hendricks",
email = "richard.hendricks@piedpiper.com"
)
@Author(
name = "Bertram Gilfoyle",
email = "bertram.gilfoyle@piedpiper.com"
)
@Author(
name = "Dinesh Chugtai",
email = "dinesh.chugtai@piedpiper.com"
)
@BaseEndpoint("https://api.rxmicro.io")
@License(
name = "Apache License 2.0",
url = "https://github.com/rxmicro/rxmicro/blob/master/LICENSE"
)
@DocumentationDefinition(
introduction = @IntroductionDefinition(
sectionOrder = {
IntroductionDefinition.Section.BASE_ENDPOINT,
IntroductionDefinition.Section.LICENSES
}
),
resource = @ResourceDefinition(
withInternalErrorResponse = false
),
withGeneratedDate = false
)
public @interface ModuleInfo {
}|
The project source code used in the current subsection is available at the following link: |
|
When compiling, the RxMicro framework searches for When changing the |
13.2. Using GraalVM to Build a Native Image
GraalVM is a universal virtual machine for running applications written in different languages.
GraalVM contains a Native Image Tool, that allows You to ahead-of-time compile Java code to a standalone executable, called a native image.
The GraalVM Native Image Tool can be used to build a native image of any RxMicro microservice project. Before build a native image it is necessary to setup a GraalVM developer environment.
13.2.1. Setup a GraalVM
GraalVM is distributed as Community Edition and Enterprise Edition.
Current guide describes a use of the GraalVM Community Edition (GraalVM CE)!
Setup of the GraalVM CE contains a few simple steps:
-
Make a GraalVM Home Directory.
-
Select a GraalVM CE Distribution for Your Platform.
-
Download the GraalVM CE Distribution.
-
Unzip the GraalVM CE Distribution.
-
Set a
GRAALVM_HOMEEnvironment Variable. -
Install a Native Image Module.
-
Add the Native Image Tool to
PATH.
13.2.1.1. Make a GraalVM Home Directory
Make a directory, that will contain a GraalVM distribution:
mkdir ~/GraalVM13.2.1.2. Select a GraalVM CE Distribution for Your Platform
Visit the github release page
https://github.com/graalvm/graalvm-ce-builds/releases
and select a distribution for Your platform.
|
Please select a GraalVM CE based on Java 11! A GraalVM CE based on Java 8 is not supported by the RxMicro framework! |
13.2.1.3. Download the GraalVM CE Distribution
Download the selected GraalVM CE distribution onto the GraalVM home directory:
wget -P ~/GraalVM https://github.com/graalvm/graalvm-ce-builds/releases/download/vm-20.0.0/graalvm-ce-java11-linux-amd64-20.0.0.tar.gz13.2.1.4. Unzip the GraalVM CE Distribution
Unzip the GraalVM CE distribution onto the GraalVM home directory:
tar --strip-components=1 -vzxf ~/GraalVM/graalvm-ce-java11-linux-amd64-20.0.0.tar.gz -C ~/GraalVM
rm ~/GraalVM/graalvm-ce-java11-linux-amd64-20.0.0.tar.gz13.2.1.5. Set a GRAALVM_HOME Environment Variable
Set a GRAALVM_HOME environment variable:
export GRAALVM_HOME=~/GraalVMand verify the installation:
$GRAALVM_HOME/bin/java -version
openjdk version "11.0.6" 2020-01-14
OpenJDK Runtime Environment GraalVM CE 20.0.0 (build 11.0.6+9-jvmci-20.0-b02)
OpenJDK 64-Bit Server VM GraalVM CE 20.0.0 (build 11.0.6+9-jvmci-20.0-b02, mixed mode, sharing)|
If You would use the GraalVM CE only, You can add the If You use any other version of JDK, add only the separate utils to |
13.2.1.6. Install a Native Image Module
Starting from GraalVM 19.0, Native Image was extracted from the base distribution. So the Native Image Tool must be installed to GraalVM using a GraalVM Updater utility:
$GRAALVM_HOME/bin/gu install native-image
Downloading: Component catalog from www.graalvm.org
Processing Component: Native Image
Downloading: Component native-image: Native Image from github.com
Installing new component: Native Image (org.graalvm.native-image, version 20.0.0)To verify the installation show a version of the native Native Image Tool:
$GRAALVM_HOME/bin/native-image --version
GraalVM Version 20.0.0 CE13.2.1.7. Add the Native Image Tool to PATH
In order not to indicate the folder where the Native Image Tool was installed, add the Native Image Tool to the PATH variable:
ln -s $GRAALVM_HOME/bin/native-image ~/binAfter that logout and login to the system again. The Native Image Tool must be available at the terminal:
native-image --version
GraalVM Version 20.0.0 CE13.2.2. RxMicro Project Configuration
The first release of GraalVM based on Java 11 is 19.3.0 (2019-11-19).
But unfortunately the GraalVM Native Image Tool does not support JPMS yet.
Thus we need to use the unnamed module mode for RxMicro project.
13.2.2.1. Setup pom.xml
13.2.2.1.1. Using RX_MICRO_BUILD_UNNAMED_MODULE Option
To enable the unnamed module mode, it is necessary to add RX_MICRO_BUILD_UNNAMED_MODULE option to the maven-compiler-plugin:
<plugin>
<artifactId>maven-compiler-plugin</artifactId>
<configuration>
<!-- ... -->
<compilerArgs>
<arg>-ARX_MICRO_BUILD_UNNAMED_MODULE=true</arg>
</compilerArgs>
</configuration>
<!-- ... -->
</plugin>13.2.2.1.2. Maven-shade-plugin Configuration
To build a native image we need a uber jar.
For that it is necessary to add maven-shade-plugin:
<plugin>
<groupId>org.apache.maven.plugins</groupId>
<artifactId>maven-shade-plugin</artifactId>
<version>${maven-shade-plugin.version}</version>
<executions>
<execution>
<phase>package</phase>
<goals>
<goal>shade</goal>
</goals>
<configuration>
<createDependencyReducedPom>false</createDependencyReducedPom>
<transformers>
<transformer implementation=
"org.apache.maven.plugins.shade.resource.ManifestResourceTransformer">
<manifestEntries>
<Main-Class>
io.rxmicro.examples.graalvm.nativeimage.quick.start.HelloWorldMicroService
</Main-Class>
</manifestEntries>
</transformer>
</transformers>
</configuration>
</execution>
</executions>
</plugin>13.2.2.1.3. Exec-maven-plugin Configuration
To build a native image from maven it is necessary to use exec-maven-plugin:
<plugin>
<groupId>org.codehaus.mojo</groupId>
<artifactId>exec-maven-plugin</artifactId>
<version>${exec-maven-plugin.version}</version>
<executions>
<execution>
<phase>package</phase>
<goals>
<goal>exec</goal>
</goals>
<configuration>
<executable>native-image</executable> (1)
<arguments>
<argument>--verbose</argument>
<argument>-jar</argument>
<argument>--install-exit-handlers</argument> (2)
<argument>${project.build.directory}/${project.build.finalName}.jar</argument>
</arguments>
</configuration>
</execution>
</executions>
</plugin>| 1 | An executable will be the native-image tool with specified arguments. |
| 2 | This option adds the exit handler for native image. |
|
The Native Image Tool ( |
13.2.2.2. Microservice Source Code
A microservice source code contains two classes only:
final class Response {
final String message;
Response(final String message) {
this.message = requireNonNull(message);
}
}public final class HelloWorldMicroService {
@GET("/")
CompletableFuture<Response> sayHelloWorld() {
return CompletableFuture.supplyAsync(() ->
new Response("Hello World!"));
}
public static void main(final String[] args) {
new Configs.Builder()
.withContainerConfigSources() (1)
.build();
RxMicroRestServer.startRestServer(HelloWorldMicroService.class);
}
}| 1 | Docker based configuration activates the configuration via annotations and environment variables only. |
13.2.2.3. Classpath Resources
A RxMicro logger is configured using jul.properties classpath resource.
jul.properties contains the following content:
io.rxmicro.rest.server.level=TRACEA native image is configured using META-INF/native-image classpath directory with two files:
-
native-image.properties -
resource-config.json
(Read more about native image configuration: https://www.graalvm.org/docs/reference-manual/native-image/#native-image-configuration)
native-image.properties contains the following content:
Args = --no-fallback \
--allow-incomplete-classpath \
-H:ResourceConfigurationResources=${.}/resource-config.jsonresource-config.json contains the following content:
{
"resources":[
{"pattern":"\\Qjul.properties\\E"}
],
"bundles":[]
}13.2.3. Creation of the Native Image
To build a native image run:
mvn clean packageThe built native image executable will be available at the project home directory:
ls -lh
drwxrwxr-x 5 nedis nedis 4,0K Mar 25 20:44 src
drwxrwxr-x 8 nedis nedis 4,0K Mar 28 21:30 target
-rw-rw-r-- 1 nedis nedis 8,8K Mar 28 21:02 pom.xml
-rwxrwxr-x 1 nedis nedis 17M Mar 28 21:32 HelloWorldMicroService (1)| 1 | The built native image executable |
13.2.4. Verification of the Native Image
To verify the built native image run:
./HelloWorldMicroService|
The project source code used in the current subsection is available at the following link: |
|
When compiling, the RxMicro framework searches for When changing the |
14. Testing
To help You write tests efficiently, the RxMicro framework provides the following modules:
-
The
rxmicro.testis a basic module designed for test writing using any modern testing framework; -
The
rxmicro.test.junitis a module designed for test writing using the JUnit 5 framework; -
The
rxmicro.test.mockitois a module designed for test writing using the Mockito framework; -
The
rxmicro.test.mockito.junitis a module designed for test writing using the JUnit 5 and Mockito frameworks. -
The
rxmicro.test.dbunitis a module designed for test writing using the DbUnit framework; -
The
rxmicro.test.dbunit.junitis a module designed for test writing using the DbUnit and JUnit 5 frameworks;
Using these modules, the developer can create the following types of tests:
14.1. Preparatory Steps
Before writing tests, using the RxMicro framework, the following steps must be taken:
-
Define the versions of used libraries.
-
Add the required dependencies to the
pom.xml. -
Configure the
maven-compiler-plugin. -
Configure the
maven-surefire-plugin.
14.1.1. Definition the Versions of the Used Libraries:
<properties>
<project.build.sourceEncoding>UTF-8</project.build.sourceEncoding>
<rxmicro.version>0.11</rxmicro.version> (1)
<maven-compiler-plugin.version>3.10.1</maven-compiler-plugin.version> (2)
<maven-surefire-plugin.version>3.0.0-M7</maven-surefire-plugin.version>(3)
</properties>14.1.2. Adding the Required Dependencies:
Before using the RxMicro modules for testing, You need to add the following dependencies to the project:
<dependencies>
<dependency>
<groupId>io.rxmicro</groupId>
<artifactId>rxmicro-test-junit</artifactId> (1)
<version>${rxmicro.version}</version>
<scope>test</scope>
</dependency>
<dependency>
<groupId>io.rxmicro</groupId>
<artifactId>rxmicro-test-mockito-junit</artifactId> (2)
<version>${rxmicro.version}</version>
<scope>test</scope>
</dependency>
<dependency>
<groupId>io.rxmicro</groupId>
<artifactId>rxmicro-rest-client-exchange-json</artifactId> (3)
<version>${rxmicro.version}</version>
<scope>test</scope>
</dependency>
</dependencies>| 1 | rxmicro-test-junit - a unit testing library based on the JUnit 5 framework. |
| 2 | rxmicro-test-mockito-junit - a unit testing library based on the JUnit 5 framework with integration of the Mockito framework. |
| 3 | rxmicro-rest-client-exchange-json - a library for converting Java models to JSON format and vice versa on the HTTP client side. |
|
The The
|
14.1.3. Configuring the maven-compiler-plugin:
To solve problems with the Java module system when writing the tests, it is necessary to add the additional execution to the maven-compiler-plugin configuration:
<plugin>
<artifactId>maven-compiler-plugin</artifactId>
<version>${maven-compiler-plugin.version}</version> (1)
<configuration>
<release>11</release>
<annotationProcessorPaths>
<annotationProcessorPath>
<groupId>io.rxmicro</groupId>
<artifactId>rxmicro-annotation-processor</artifactId>
<version>${rxmicro.version}</version>
</annotationProcessorPath>
</annotationProcessorPaths>
</configuration>
<executions>
<execution>
<id>source-compile</id>
<goals>
<goal>compile</goal>
</goals>
<configuration>
<annotationProcessors>
<annotationProcessor>
io.rxmicro.annotation.processor.RxMicroAnnotationProcessor
</annotationProcessor>
</annotationProcessors>
<generatedSourcesDirectory>
${project.build.directory}/generated-sources/
</generatedSourcesDirectory>
</configuration>
</execution>
<execution>
<id>test-compile</id> (2)
<goals>
<goal>testCompile</goal>
</goals>
<configuration>
<annotationProcessors>
<annotationProcessor>
io.rxmicro.annotation.processor.RxMicroTestsAnnotationProcessor (3)
</annotationProcessor>
</annotationProcessors>
<generatedTestSourcesDirectory>
${project.build.directory}/generated-test-sources/ (4)
</generatedTestSourcesDirectory>
</configuration>
</execution>
</executions>
</plugin>| 1 | The plugin version defined in the properties section. |
| 2 | The separate configuration is required for the tests, so a new execution must be added. |
| 3 | The annotation processor class that handles the test configuration. |
| 4 | Location of Java classes generated by the RxMicro Test Annotation Processor. |
|
The Therefore, You must always specify a separate folder for the generated classes! |
14.1.4. Configuring the maven-surefire-plugin:
For a successful tests launch while building a project with maven it is necessary to update maven-surefire-plugin:
<plugin>
<artifactId>maven-surefire-plugin</artifactId>
<version>${maven-surefire-plugin.version}</version> (1)
<configuration>
<properties>
<!-- https://junit.org/junit5/docs/5.5.1/api/org/junit/jupiter/api/Timeout.html -->
<configurationParameters>
junit.jupiter.execution.timeout.default = 60 (2)
junit.jupiter.execution.timeout.mode = disabled_on_debug (3)
junit.jupiter.execution.parallel.enabled = false (4)
</configurationParameters>
</properties>
</configuration>
</plugin>| 1 | Last stable version of maven-surefire-plugin.(The plugin version must be 2.22.1 or higher, otherwise maven will ignore the tests!.) |
| 2 | In case of an error in the code which uses reactive programming, an infinite function execution may occur. In order to detect such cases, it is necessary to set a global timeout for all methods in the tests. (By default, timeout is set in seconds. More detailed information on timeouts configuration is available in official JUnit5 documentation.) |
| 3 | While debugging, timeouts can be turned off. |
| 4 | This property is useful for the tests debugging from IDE or maven.(By setting this property the speed of test performance will decrease, so use this property for debugging only!) |
|
At the end of each subsection describing any the RxMicro framework feature, there is a link to the project, the source codes of which were used in this subsection. Use these links to access a working example demonstrating the RxMicro framework feature described above! |
14.2. RxMicro Test Annotations
The RxMicro framework supports additional RxMicro Test annotations, that extend the features of the JUnit 5, Mockito and DbUnit
test frameworks and add additional features required for efficient writing of all supported test types.
|
The RxMicro framework supports two types of annotations:
These types of annotations do not complement each other! Each of these types is designed to perform its tasks. So when writing tests, be careful not to use the |
| Annotation | Description |
|---|---|
Declares the test class field as an alternative. The RxMicro framework supports alternatives only for REST-based microservice tests and component unit tests. |
|
Declares the static field of the test class as a configuration which must be registered in the configuration manager before starting the test. This annotation allows declaring a configuration using Java classes. (The configuration defined in this way is only available while the test is running.) The source code of the project that uses the
The RxMicro framework supports test configuration only for REST-based microservice tests and component unit tests. |
|
Allows overriding the default value for any configuration available only for the test environment. This annotation allows declaring a configuration using annotations.
(The configuration defined in this way is only available while the test is running.
It means that this annotation is analogous to the The RxMicro framework supports test configuration only for REST-based microservice tests and component unit tests. |
|
Allows to configure the following component:
(This annotation applies only to the
The RxMicro framework supports the |
|
Declares the test class as a REST-based microservice test. |
|
Declares the test class as a component unit test. |
|
Declares the test class as a REST-based microservice integration test. |
|
Declares the test class as a DBUnit integration test. |
|
It is used to specify the method to be invoked by the RxMicro framework before running the test method. The RxMicro framework supports the |
|
It is used to specify the methods to be invoked by the RxMicro framework before performing each iteration of the parameterized test. The RxMicro framework supports the |
|
Informs the test framework about the need to create mocks and inject them into the test class fields, annotated by the
(Using the |
|
Provides the init state of tested database before execution of the test method. |
|
Provides the expected state of tested database after execution of the test method. If expected state does not match to the actual database state the |
|
Declares the transactional test. The transaction test means that all changes made by test will rolled back after the test execution. |
14.3. Alternatives
For efficient unit testing, the RxMicro framework supports the mechanism of alternatives.
Alternatives are test components, usually being mocks with predefined behaviors, that are injected by the RxMicro framework into the tested classes. Alternatives are a powerful mechanism for writing unit tests.
The RxMicro framework supports alternatives only for REST-based microservice tests and component unit tests.
When developing a microservice project, two types of components are distinguished:
-
RxMicro component - a class that is part of the RxMicro framework (for example,
HttpClientFactory) or a class generated by theRxMicro Annotation Processor(Data Repository, Rest client, etc). -
Custom component - a developer-written class that is part of a microservice project.
These two types of components have different life cycles:
-
The instances of the RxMicro components are created in the classes generated by the
RxMicro Annotation Processor, and are registered in the runtime container. When a reference to the RxMicro component is required, the custom class requests it in the runtime container. -
The instances of custom components are created independently by the developer in the code.
Due to the difference in life cycles between the two types of the RxMicro components, the RxMicro framework also supports two types of alternatives:
-
alternatives of the RxMicro components;
-
alternatives of custom components.
These types of alternatives differ in the algorithms of injection into the tested class.
14.3.1. Injection Algorithm for the Alternative of the RxMicro Component
To inject the alternative of the RxMicro component, the RxMicro framework uses the following algorithm:
-
The alternative instance is created by the developer in the test code or by the testing framework automatically.
-
Once all alternatives have been created, they are registered in the runtime container.
-
Once all alternatives have been registered, the RxMicro framework creates an instance of the tested class.
-
In the constructor or static section of the tested class, a request to the runtime container to get a reference to the RxMicro component is executed.
-
Since the runtime container already contains an alternative instead of the real component, the alternative is injected into the instance of the tested class.
-
After initialization, the instance of the tested class contains references to alternatives instead of the real RxMicro components.
14.3.2. Injection Algorithm for the Alternative of the Custom Component
To inject the alternative of the custom component, the RxMicro framework uses the following algorithm:
-
The alternative instance is created by the developer in the test code or by the testing framework automatically.
-
The RxMicro framework creates an instance of the tested class.
-
In the constructor or static section of the tested class, instances of the real custom components are created.
-
After initialization, the instance of the tested class contains references to the real custom components.
-
After creating an instance of the tested class, the RxMicro framework injects the custom component alternatives using the
reflectionmechanism.
(I.e. the alternatives replace the real instances already after creating an instance of the tested class.); -
After alternative injection, the instance of the tested class contains references to the alternatives of the RxMicro components instead of the real RxMicro components.
(The real component instances will be removed by the garbage collector later.);
Thus, the main difference of the injection algorithm for the custom component alternatives is that during the injection process, the real component instances are always created.
|
If the real component creates a reference to an external resource, then this resource will not be released automatically when injecting the alternative! |
It is recommended to use the rxmicro.cdi module to create the custom component alternatives that work with external resources.
|
If the |
14.3.3. Alternative Usage
The alternative mechanism is a universal tool that can be applied to the simplest project, which doesn’t use the RxMicro Annotations.
Let’s look at the project consisting of two components: the ChildComponent interface and the ParentComponent class:
public interface ChildComponent {
String getValue();
}public final class ParentComponent {
private final ChildComponent childComponent = () -> "production"; (1)
public String getEnvironment() {
return childComponent.getValue();
}
}| 1 | The ParentComponent class depends on the ChildComponent.(This dependency specified explicitly in the source code.) |
When writing a unit test for the ParentComponent, it is necessary to replace the real ChildComponent with a mock.
Otherwise, it wouldn’t be a unit test, but an integration one.
For this replacement, it is most convenient to use the alternative:
(1)
@RxMicroComponentTest(ParentComponent.class)
final class ParentComponent1Test {
(3)
@Alternative
private final ChildComponent childComponent = () -> "test"; (4)
private ParentComponent parentComponent; (2)
@Test
void Should_use_alternative() {
assertEquals("test", parentComponent.getEnvironment()); (5)
}
}| 1 | The alternatives are supported by the RxMicro framework only during component unit tests or REST-based microservice tests.
Therefore, it must be declared that this test is a test of the ParentComponent component. |
| 2 | The instance of the tested component will be created by the RxMicro framework automatically. (The instance is created using the reflection mechanism, so the tested class must contain an available constructor without parameters.)In order to invoke any method of the tested component, a reference to that component is required. Therefore, the RxMicro framework requires that the developer declares an uninitialized field of the tested component. After starting the test, a reference to the instance of the tested component will be injected into this field using the reflection mechanism. |
| 3 | In order to use the alternative mechanism, it is necessary to declare test field as alternative by using the
@Alternative annotation. |
| 4 | Alternative is a test component with predefined behavior.
Therefore, it is necessary to define what value should be returned when invoking the getValue method. |
| 5 | When testing the getEnvironment method, the alternative method is invoked instead of the real component one. |
|
If You would like to inject the alternative to the final field, don’t forget to configure
|
When using alternatives it is very convenient to use a dynamic class with programmable behavior. For this purpose, it is very convenient to use the Mockito framework:
(2)
@InitMocks
@RxMicroComponentTest(ParentComponent.class)
final class ParentComponent2Test {
private ParentComponent parentComponent;
(1)
@Mock
@Alternative
private ChildComponent childComponent;
@Test
void Should_use_alternative() {
when(childComponent.getValue()).thenReturn("test"); (3)
assertEquals("test", parentComponent.getEnvironment()); (4)
}
}| 1 | To create a mock instance, it is necessary to use the @Mock annotation. |
| 2 | In order for JUnit to handle all fields annotated by the @Mock annotation before invoking test methods, it is necessary to annotate the test class by the @InitMocks annotation. |
| 3 | Before testing, it is necessary to program the behavior of the getValue method of the declared mock. |
| 4 | When testing the getEnvironment method, the method from the alternative is invoked instead of the real component one. |
|
If You would like to inject the alternative to the final field, don’t forget to configure
|
|
When creating mock alternatives, the |
|
The project source code used in the current subsection is available at the following link: |
14.3.4. Components with Custom Constructors
In case the custom component does not contain an available constructor without parameters:
public final class ParentComponent {
private final String prefix;
private final ChildComponent childComponent = () -> "production"; (1)
public ParentComponent(final String prefix) { (2)
this.prefix = requireNonNull(prefix);
}
public String getEnvironment() {
return prefix + " " + childComponent.getValue();
}
}| 1 | The ParentComponent depends on the ChildComponent.(This dependency is specified explicitly in the source code.) |
| 2 | When creating the ParentComponent class instance in the constructor, the value of the prefix parameter must be passed. |
then the RxMicro framework won’t be able to create an instance of this class.
Therefore, the developer should create an instance of this class in one of the following methods: @BeforeEach,
@BeforeThisTest or
@BeforeIterationMethodSource:
@InitMocks
@RxMicroComponentTest(ParentComponent.class)
final class ParentComponentTest {
private ParentComponent parentComponent;
(2)
@Mock
@Alternative
private ChildComponent childComponent;
@BeforeEach
void beforeEach() {
parentComponent = new ParentComponent("prefix"); (1)
}
@Test
void Should_use_alternative() {
when(childComponent.getValue()).thenReturn("test");
assertEquals("prefix test", parentComponent.getEnvironment()); (3)
}
}| 1 | The ParentComponent class instance is created inside the method annotated by the @BeforeEach annotation. |
| 2 | The childComponent alternative will be injected into the ParentComponent class instance after invoking the beforeEach() method and before the Should_use_alternative() test method. |
| 3 | When testing the getEnvironment method, the alternative method is invoked instead of the real component one. |
|
If You would like to inject the alternative to the final field, don’t forget to configure
|
|
The project source code used in the current subsection is available at the following link: |
14.3.5. Ambiguity Resolving
The alternative created by the developer can be injected by the RxMicro framework not only in the tested component, but also in any of its child components.
During such injection, the ambiguity problem may occur.
14.3.5.1. Ambiguity Resolving Demonstration
Let’s assume there is some business service in the project:
public interface BusinessService {
String getValue();
}This business service is a dependency for three interdependent components: Child, Parent, GrandParent:
public final class Child {
private final BusinessService childBusinessService = () -> "Child";
public String getValue() {
return childBusinessService.getValue();
}
}public final class Parent {
private final Child child = new Child();
private final BusinessService parentBusinessService = () -> "Parent";
public String getValue() {
return parentBusinessService.getValue() + " : " + child.getValue();
}
}public final class GrandParent {
private final Parent parent = new Parent();
private final BusinessService grandParentBusinessService = () -> "GrandParent";
public String getValue() {
return grandParentBusinessService.getValue() + " : " + parent.getValue();
}
}When invoking the GrandParent.getValue method, this method is invoked on the business services of all Child, Parent and GrandParent dependent components according to the dependency hierarchy:
final class GrandParent1Test {
private final GrandParent grandParent = new GrandParent();
@Test
void Should_return_default_values() {
assertEquals("GrandParent : Parent : Child", grandParent.getValue());
}
}When using an alternative, the behavior of the GrandParent.getValue method is changed:
@InitMocks
@RxMicroComponentTest(GrandParent.class)
final class GrandParent2Test {
private GrandParent grandParent;
@Mock
(1)
@Alternative
private BusinessService businessService;
@Test
void Should_inject_alternatives_correctly() {
when(businessService.getValue()).thenReturn("Mock"); (2)
assertEquals("Mock : Mock : Mock", grandParent.getValue()); (3)
}
}| 1 | An alternative to the business service is created. |
| 2 | Before testing, the behavior of the getValue method of created mock is programmed. |
| 3 | As a result of the test, You can see that this alternative is injected into all Child, Parent and GrandParent dependent components. |
|
If You would like to inject the alternative to the final field, don’t forget to configure
|
If You create 2 or more (no more than 3 in this test example) alternatives, then each alternative can be injected in a separate business component:
@InitMocks
@RxMicroComponentTest(GrandParent.class)
final class GrandParent3Test {
private GrandParent grandParent;
@Mock
@Alternative
private BusinessService grandParentBusinessService;
@Mock
@Alternative(name = "childBusinessService")
private BusinessService businessService;
@Test
void Should_inject_alternatives_correctly() {
when(grandParentBusinessService.getValue()).thenReturn("GrandParentMock");
when(businessService.getValue()).thenReturn("ChildMock");
assertEquals("GrandParentMock : Parent : ChildMock", grandParent.getValue()); (1)
}
}| 1 | The grandParentBusinessService alternative is injected into the GrandParent component, and the businessService alternative is injected into the Child component; |
|
If You would like to inject the alternative to the final field, don’t forget to configure
|
|
The project source code used in the current subsection is available at the following link: |
14.3.5.2. Ambiguity Resolving Algorithm
To resolve ambiguities, the RxMicro framework uses the following algorithm:
-
For each tested component, a search for injection candidates is performed.
-
As a result, a map is formed with a user type as its key and a list of candidates for injection as its value. (The RxMicro framework does not support polymorphism rules when injecting alternatives. Thus, the alternative of the
Atype can only be injected in the field with theAtype). -
After receiving a map with candidates for injection, the RxMicro framework passes through this map.
-
For each user type, a list of candidates and a list of alternatives is requested.
-
If there is only one alternative and only one candidate for the user type, the RxMicro framework injects this alternative into the candidate field;
-
If more than one alternative and only one candidate is found, the RxMicro framework will throw out an error;
-
If there is more than one candidate and only one alternative, then:
-
The RxMicro framework analyzes the injection candidate field name:
-
if the candidate field name matches the alternative field name, the RxMicro framework injects this alternative;
-
if the candidate field name matches the value of the
nameparameter of the@Alternativeannotation, the RxMicro framework injects this alternative; -
otherwise this candidate will be skipped;
-
-
if no alternative has been injected, the RxMicro framework injects this alternative in all candidate fields.
(This is the behavior that occurs in theGrandParent2Testtest.)
-
-
If there is more than one candidate and more than one alternative, then:
-
The RxMicro framework analyzes the injection candidate field name:
-
if the candidate field name matches the alternative field name, the RxMicro framework injects this alternative;
(In theGrandParent3Testtest, thegrandParentBusinessServicealternative is injected in theGrandParentcomponent field, because the names of the alternative and component fields are equal.); -
if the candidate field name matches the value of the
nameparameter of the@Alternativeannotation, the RxMicro framework injects this alternative;
(In theGrandParent3Testtest, thebusinessServicealternative is injected in theChildcomponent field, because thenameparameter of the@Alternativeannotation is equal to thechildBusinessService. And in theChildclass, the field name with theBusinessServicetype is also equal to thechildBusinessService.) -
otherwise this candidate will be skipped;
-
-
(When more than one candidate and more than one alternative is found, it is possible that none of the alternatives will be injected.)
-
14.3.6. CDI Beans Alternatives
If the developer uses the rxmicro.cdi module in the project, then all custom components are considered as beans and follow the injection algorithm for the alternatives of the RxMicro components.
When using the rxmicro.cdi module, You must always inject dependencies using the CDI mechanism only:
public final class ParentComponent {
@Inject
ChildComponent childComponent; (1)
@Inject
ChildComponentImpl childComponentImpl; (1)
public String getEnvironment() {
return childComponent.getValue() + " " + childComponentImpl.getValue();
}
}| 1 | The ParentComponent class depends on the ChildComponent and ChildComponentImpl components.(These dependencies are injected using the CDI mechanisms.) |
|
The above example is a demonstration of the features of alternatives of custom components if Please note that since the |
public final class ChildComponentImpl implements ChildComponent {
public ChildComponentImpl() {
System.out.println("ChildComponentImpl created"); (1)
}
@Override
public String getValue() {
return "production";
}
}| 1 | When creating the ChildComponentImpl instance, an information message is displayed in the console.(This message is required to ensure that no real custom instance is created when CDI bean alternatives are used!) |
When testing, if no alternatives are created, the tested component uses the real custom component instances:
@InitMocks
@RxMicroComponentTest(ParentComponent.class)
final class ParentComponent1Test {
private ParentComponent parentComponent;
private SystemOut systemOut;
@Test
void Should_use_alternatives() {
assertEquals("production production", parentComponent.getEnvironment()); (1)
assertEquals("ChildComponentImpl created", systemOut.asString()); (2)
}
}| 1 | When invoking the getEnvironment method, the real instances of custom components are used. |
| 2 | When starting the test, only one ChildComponentImpl class instance is created. |
When testing, if alternatives are created, the tested component uses them instead of the real custom component instances:
@InitMocks
@RxMicroComponentTest(ParentComponent.class)
final class ParentComponent2Test {
private ParentComponent parentComponent;
@Mock
@Alternative
private ChildComponent childComponent;
@Mock
@Alternative
private ChildComponentImpl childComponentImpl;
private SystemOut systemOut;
@Test
void Should_use_alternatives() {
when(childComponent.getValue()).thenReturn("mock");
when(childComponentImpl.getValue()).thenReturn("mock");
assertEquals("mock mock", parentComponent.getEnvironment()); (1)
assertTrue(
systemOut.isEmpty(), (2)
format("Output not empty: '?'", systemOut.asString())
);
}
}| 1 | When invoking the getEnvironment method, the alternatives of the real custom component instances are used. |
| 2 | When starting the test, the ChildComponentImpl class instance is not created. |
When using alternatives for complex components, it is possible to use alternatives together with real components:
@InitMocks
@RxMicroComponentTest(ParentComponent.class)
final class ParentComponent3Test {
private ParentComponent parentComponent;
@Mock
@Alternative
private ChildComponent childComponent;
private SystemOut systemOut;
@Test
void Should_use_alternatives() {
when(childComponent.getValue()).thenReturn("mock");
assertEquals("mock production", parentComponent.getEnvironment()); (1)
assertEquals("ChildComponentImpl created", systemOut.asString()); (2)
}
}| 1 | When invoking the getEnvironment method, an alternative and a real instance are used. |
| 2 | When starting the test, only one ChildComponentImpl class instance is created. |
|
The project source code used in the current subsection is available at the following link: |
14.4. How It Works
Java 9 has introduced the JPMS.
This system requires that a developer defines the module-info.java descriptor for each project.
In this descriptor, the developer must describe all the dependencies of the current project.
In the context of the unit module system, the tests required for each project should be configured as a separate module, since they depend on libraries that should not be available in the runtime.
Usually such libraries are unit testing libraries (e.g. JUnit 5), mock creation libraries (e.g. Mockito), etc.
When trying to create a separate module-info.java descriptor available only for unit tests, many modern IDEs report an error.
Therefore, the simplest and most common solution to this problem is to organize unit tests in the form of
automatic module.
This solution allows You to correct compilation errors, but when starting tests, there will be runtime errors.
To fix runtime errors, when starting the Java virtual machine, You must add
options that configure the Java module system at runtime.
In case the tests are run, these options must be added to the maven-surefire-plugin:
<plugin>
<artifactId>maven-surefire-plugin</artifactId>
<version>2.22.1</version>
<configuration>
<argLine>
@{argLine}
--add-exports ...
--add-opens ...
--patch-module ...
--add-modules ...
--add-reads ...
</argLine>
</configuration>
</plugin>The specified configuration options for the Java module system at runtime can also be added using the features of the
java.lang.Module class.
In order the developer is relieved of the need to add the necessary options to the maven-surefire-plugin configuration, the RxMicro framework provides a special
io.rxmicro.annotation.processor.RxMicroTestsAnnotationProcessor component.
To activate this component, it is necessary to add a new execution to the maven-compiler-plugin configuration:
<execution>
<id>test-compile</id>
<goals>
<goal>testCompile</goal> (1)
</goals>
<configuration>
<annotationProcessors>
<annotationProcessor>
io.rxmicro.annotation.processor.RxMicroTestsAnnotationProcessor (2)
</annotationProcessor>
</annotationProcessors>
<generatedTestSourcesDirectory>
${project.build.directory}/generated-test-sources/ (3)
</generatedTestSourcesDirectory>
</configuration>
</execution>| 1 | The separate configuration is required for the tests, so a new execution must be added. |
| 2 | The annotation processor class that handles the test configuration. |
| 3 | Location of Java classes generated by the RxMicro Test Annotation Processor. |
This annotation processor generates one single rxmicro.$$ComponentTestFixer class, that automatically opens access to all packages of the current project to unnamed modules:
public final class $$ComponentTestFixer {
static {
final Module currentModule = $$ComponentTestFixer.class.getModule();
currentModule.addExports("rxmicro", RX_MICRO_REFLECTION_MODULE);
}
public $$ComponentTestFixer() {
final Module currentModule = getClass().getModule();
if (currentModule.isNamed()) {
logInfoTestMessage("Fix the environment for componnet test(s)...");
final Module unnamedModule = getClass().getClassLoader().getUnnamedModule(); (1)
final Set<Module> modules = unmodifiableOrderedSet(
unnamedModule, RX_MICRO_REFLECTION_MODULE
);
for (final Module module : modules) {
for (final String packageName : currentModule.getPackages()) {
currentModule.addOpens(packageName, module); (2)
logInfoTestMessage(
"opens ?/? to ?", (3)
currentModule.getName(),
packageName,
module.isNamed() ? module.getName() : "ALL-UNNAMED"
);
}
}
}
}
}| 1 | Using the standard Java API, the RxMicro framework retrieves the references to the current and unnamed modules. |
| 2 | Using the features of the java.lang.Module class, the RxMicro framework opens the full access to all classes from all packages from the current module. |
| 3 | To inform the developer about the successful performance of the rxmicro.$$ComponentTestFixer class, the RxMicro framework displays to the console the information that access was successfully provided. |
|
When running different types of tests, sometimes a different configuration of the Java module system is required.
Thus, for each type of test, the RxMicro framework creates a separate class in the
|
Before starting tests, the RxMicro framework uses a generated class to configure the module system for the test environment:
[INFO] -------------------------------------------------------
[INFO] T E S T S
[INFO] -------------------------------------------------------
...
[INFO] Fix the environment for component test(s)...
[INFO] opens examples.testing/io.rxmicro.examples.testing to ALL-UNNAMED (1)
[INFO] opens examples.testing/rxmicro to ALL-UNNAMED
[INFO] Running io.rxmicro.examples.testing.ParentComponent1Test (2)
[INFO] Tests run: 1, Failures: 0, Errors: 0, Skipped: 0, Time elapsed: 0.278 s
[INFO] Running io.rxmicro.examples.testing.ParentComponent2Test
[INFO] Tests run: 1, Failures: 0, Errors: 0, Skipped: 0, Time elapsed: 1.378 s
[INFO]
[INFO] Results:
[INFO]
[INFO] Tests run: 2, Failures: 0, Errors: 0, Skipped: 0
[INFO]
[INFO] ------------------------------------------------------------------------
[INFO] BUILD SUCCESS
[INFO] ------------------------------------------------------------------------| 1 | All packages of the current module are opened before starting tests. |
| 2 | After configuring the module system for the test environment, Unit tests are started. |
Thus, for the successful writing of tests using the RxMicro framework, besides adding the required libraries, do not forget to configure the maven-compiler-plugin by adding the following annotation processor for the test environment: io.rxmicro.annotation.processor.RxMicroTestsAnnotationProcessor.
14.5. The @BeforeThisTest and @BeforeIterationMethodSource Annotations
In order to perform any actions before invoking the test method, the
JUnit 5 framework provides a special @BeforeEach annotation.
According to the working rules of the JUnit 5 framework, if the test class contains a method annotated by the
@BeforeEach annotation, then this method should be invoked before invoking each test method in the test class.
Let’s consider the possibilities of using the @BeforeEach annotation.
We’ll use the example of a project consisting of two components: ChildComponent interface and ParentComponent class.
public interface ChildComponent {
String getValue();
}public final class ParentComponent {
private final ChildComponent childComponent = () -> "production";
public String getEnvironment() {
return childComponent.getValue();
}
}When using the mock alternative, it is possible to program the behavior in the method annotated by the @BeforeEach annotation:
@InitMocks
@RxMicroComponentTest(ParentComponent.class)
final class ParentComponent1Test {
private ParentComponent parentComponent;
@Mock
@Alternative
private ChildComponent childComponent;
(1)
@BeforeEach
void beforeEach() {
when(childComponent.getValue()).thenReturn("mock");
}
@Test
void Should_use_alternative() {
assertEquals("mock", parentComponent.getEnvironment());
}
}| 1 | Since the beforeEach() method will be surely invoked by the JUnit 5
framework before invoking the Should_use_alternative() test method, the programmed mock behavior will be used during the test; |
The weak point in using the method annotated by the @BeforeEach
annotation, is that it is impossible to program different behavior for two or more test methods in the same class:
@BeforeEach
void beforeEach() {
when(childComponent.getValue()).thenReturn("mock");
}
@Test
void Should_use_alternative1() {
assertEquals("mock1", parentComponent.getEnvironment()); // failed
}
@Test
void Should_use_alternative2() {
assertEquals("mock2", parentComponent.getEnvironment()); // failed
}The standard solution to this problem consists in programming behavior in the test method:
@Test
void Should_use_alternative1() {
when(childComponent.getValue()).thenReturn("mock1");
assertEquals("mock1", parentComponent.getEnvironment());
}
@Test
void Should_use_alternative2() {
when(childComponent.getValue()).thenReturn("mock2");
assertEquals("mock2", parentComponent.getEnvironment());
}However, the alternative configuration in the test method is not always convenient.
This can cause a problem, especially when it is necessary to configure the RxMicro component alternative before its registration in the runtime container!
To solve this problem, the RxMicro framework provides two additional annotations:
The @BeforeThisTest
annotation allows You to specify the method to be invoked before invoking a specific test method:
@InitMocks
@RxMicroComponentTest(ParentComponent.class)
final class ParentComponent4Test {
private ParentComponent parentComponent;
@Mock
@Alternative
private ChildComponent childComponent;
void beforeTest1() { (1)
when(childComponent.getValue()).thenReturn("mock1");
}
@Test
(2)
@BeforeThisTest(method = "beforeTest1")
void Should_use_alternative1() {
assertEquals("mock1", parentComponent.getEnvironment());
}
void beforeTest2() {
when(childComponent.getValue()).thenReturn("mock2");
}
@Test
@BeforeThisTest(method = "beforeTest2")
void Should_use_alternative2() {
assertEquals("mock2", parentComponent.getEnvironment());
}
}| 1 | To configure the mock alternative, it is necessary to create a method in the test class. |
| 2 | If this method needs to be invoked before the test method, it is necessary to specify the name of this method using the
@BeforeThisTest annotation.(The @BeforeThisTest annotation must annotate the test method!). |
When creating parametrized tests, it is necessary to use the
@BeforeIterationMethodSource
annotation instead of the
@BeforeThisTest annotation:
@InitMocks
@RxMicroComponentTest(ParentComponent.class)
final class ParentComponent5Test {
private ParentComponent parentComponent;
@Mock
@Alternative
private ChildComponent childComponent;
void beforeEachPreparer1() {
when(childComponent.getValue()).thenReturn(new BigDecimal("23").toString());
}
void beforeEachPreparer2() {
when(childComponent.getValue()).thenReturn("23");
}
@ParameterizedTest
(1)
@BeforeIterationMethodSource(methods = {
"beforeEachPreparer1",
"beforeEachPreparer2"
})
void Should_use_alternative2(final String method) { (2)
assertEquals("23", parentComponent.getEnvironment());
}
}| 1 | Using the @BeforeIterationMethodSource
annotation, the developer specifies an array of methods.
Each method in this array must be invoked before executing a new iteration of the parameterized test. |
| 2 | For reporting it is recommended to specify the final String method parameter of the parameterized test.
This parameter is not used in the test, but if it is present, the JUnit 5 framework automatically passes the method name to it.
Thus, in the execution report of the parameterized test, for each iteration the method that was invoked before execution of this iteration will be specified. |
|
The project source code used in the current subsection is available at the following link: |
14.6. REST-based Microservice Testing
The REST-based microservice test is a standard Unit test that tests only the source code of a microservice. If the current microservice depends on external services (e.g. database, other REST-based microservices, etc.), then it is allowed to use mocks for these external services during its testing. If several REST-based microservices need to be tested, it is recommended to use the REST-based microservice integration testing.
For easy writing of microservice tests, the RxMicro framework provides:
-
The additional
@RxMicroRestBasedMicroServiceTestannotation, that informs the RxMicro framework about the need to start the tested REST-based microservice and prepare the environment to execute test HTTP requests. -
A special blocking HTTP client to execute HTTP requests during testing:
BlockingHttpClient. -
The
SystemOutinterface for easy console access.
For each microservice test, the RxMicro framework performs the following actions:
-
Before starting all the test methods in the class:
-
checks the test class for compliance with the rules of REST-based microservice testing defined by the RxMicro framework;
-
starts an HTTP server on a random free port;
-
creates an instance of the
BlockingHttpClienttype; -
connects the created
BlockingHttpClientto the running HTTP server.
-
-
Before starting each test method:
-
if necessary, invokes the methods defined using the
@BeforeThisTestor@BeforeIterationMethodSourceannotations; -
if necessary, registers the RxMicro component alternatives in the RxMicro container;
-
registers the tested REST-based microservice on the running HTTP server;
-
if necessary, injects the custom component alternatives to the REST-based microservice;
-
injects a reference to the
BlockingHttpClientinstance into the test class; -
if necessary, creates the
System.outmock, and injects it into the test class.
-
-
After performing each test method:
-
deletes all registered components from the RxMicro container;
-
deletes all registered REST-based microservices on the running HTTP server;
-
if necessary, restores the
System.out.
-
-
After performing all the tests in the class:
-
clears the resources of the
BlockingHttpClientcomponent; -
stops the HTTP server and releases the selected resources.
-
14.6.1. Basic Principles
To understand the REST-based microservice testing principles, let’s create the simplest microservice that returns the "Hello World!" message.
Since the microservice will return a JSON object, it is necessary to create a response model:
public final class Response {
final String message;
public Response(final String message) {
this.message = requireNonNull(message);
}
}When there is the GET request to the microservice, it should return the "Hello World!" message:
final class MicroService {
@GET("/")
CompletableFuture<Response> get() {
return completedFuture(new Response("Hello World!"));
}
}The testing process of the REST-based microservice is to perform an HTTP request after the RxMicro framework starts the tested microservice on the HTTP server. After receiving a response from the microservice, this response is compared to the expected response:
(1)
@RxMicroRestBasedMicroServiceTest(MicroService.class)
class MicroServiceTest {
private BlockingHttpClient blockingHttpClient; (2)
@Test
void Should_handle_GET_request() {
final ClientHttpResponse response = blockingHttpClient.get("/");
assertEquals(jsonObject("message", "Hello World!"), response.getBody()); (3)
assertEquals(200, response.getStatusCode());
}
}| 1 | To start the HTTP server and register the tested REST-based microservice, it is necessary to annotate the test class by the
@RxMicroRestBasedMicroServiceTest annotation.
In the parameter of this annotation it is specified which REST-based microservice class will be tested in the current test. |
| 2 | To execute blocking HTTP requests, the RxMicro framework supports the special
BlockingHttpClient component.
The developer must declare a reference to this component, and while starting the test, the RxMicro framework will automatically inject the created
BlockingHttpClient class instance, using the reflection mechanism. |
| 3 | Upon receiving the HTTP response from the microservice, the developer should compare the response body with the expected result in the test. |
|
To get additional info about writing tests that require JSON object comparison, please read |
|
The project source code used in the current subsection is available at the following link: |
|
When compiling, the RxMicro framework searches for When changing the |
14.6.2. Features of Testing Complex Microservices that use Alternatives
14.6.2.1. Features of REST Client Testing
This section will cover the features of testing REST-based microservices that use REST clients.
The source code of such REST-based microservice consists of the Response model class, ExternalMicroService REST client and ConsumeMicroService HTTP request handler:
public final class Response {
String message;
public Response(final String message) {
this.message = requireNonNull(message);
}
public Response() {
}
}@RestClient
public interface ExternalMicroService {
@GET("/")
CompletableFuture<Response> get();
}final class MicroService {
private final ExternalMicroService externalMicroService =
getRestClient(ExternalMicroService.class);
@GET("/")
CompletableFuture<Response> get() {
return externalMicroService.get();
}
}The most logical way to test such microservice is to create a mock alternative for the ExternalMicroService component:
@InitMocks
@RxMicroRestBasedMicroServiceTest(MicroService.class)
final class MicroServiceBusinessLogicOnlyTest {
private BlockingHttpClient blockingHttpClient;
@Mock
@Alternative
private ExternalMicroService externalMicroService;
@Test
void Should_delegate_call_to_ExternalMicroService() {
when(externalMicroService.get()).thenReturn(completedFuture(new Response("mock")));
final ClientHttpResponse response = blockingHttpClient.get("/");
assertEquals(jsonObject("message", "mock"), response.getBody());
}
}|
To get additional info about writing tests that require JSON object comparison, please read |
But if on the basis of such test we build the source code coverage report, this report will show a low degree of coverage:

Such a result is caused by the fact that after creating a mock alternative for the ExternalMicroService component, the classes generated by the RxMicro framework are not used in the testing process for the REST client work.
If such a result is not acceptable, it is necessary to:
-
create a mock alternative to the
HttpClientFactoryRxMicro component; -
use the static methods of the
HttpClientMockFactoryclass to program the mock behavior.
@InitMocks
@RxMicroRestBasedMicroServiceTest(MicroService.class)
final class MicroServiceWithAllGeneratedCodeTest {
private BlockingHttpClient blockingHttpClient;
@Mock
@Alternative
private HttpClientFactory httpClientFactory;
void prepareExternalMicroServiceHttpClient() {
prepareHttpClientMock(
httpClientFactory,
new HttpRequestMock.Builder()
.setMethod(GET)
.setPath("/")
.build(),
jsonObject("message", "mock")
);
}
@Test
@BeforeThisTest(method = "prepareExternalMicroServiceHttpClient")
void Should_delegate_call_to_ExternalMicroService() {
final ClientHttpResponse response = blockingHttpClient.get("/");
assertEquals(jsonObject("message", "mock"), response.getBody());
}
}The modified test shows a coverage rate of 100%:

HttpClientFactory mock alternative.|
The project source code used in the current subsection is available at the following link: |
|
When compiling, the RxMicro framework searches for When changing the |
14.6.2.2. Features of Testing Mongo Repositories
This section will cover the features of testing REST-based microservices that use mongo repositories.
The source code of such REST-based microservice consists of the Entity entity model, Response model class, DataRepository mongo repository and ConsumeMicroService HTTP request handler:
public final class Response {
final String message;
public Response(final String message) {
this.message = requireNonNull(message);
}
}public final class Entity {
String data;
public String getData() {
return data;
}
}@MongoRepository(collection = "collection")
public interface DataRepository {
@Find(query = "{_id: ?}")
CompletableFuture<Optional<Entity>> findById(long id);
}final class MicroService {
private final DataRepository dataRepository =
getRepository(DataRepository.class);
@GET("/")
CompletableFuture<Optional<Response>> get(final Long id) {
return dataRepository.findById(id).thenApply(optionalEntity ->
optionalEntity.map(entity ->
new Response(entity.getData())));
}
}The most logical way to test such microservice is to create a mock alternative for the DataRepository component:
@InitMocks
@RxMicroRestBasedMicroServiceTest(MicroService.class)
final class MicroServiceBusinessLogicOnlyTest {
private BlockingHttpClient blockingHttpClient;
@Mock
@Alternative
private DataRepository dataRepository;
@Mock
private Entity entity;
@Test
void Should_return_Entity_data() {
when(entity.getData())
.thenReturn("data");
when(dataRepository.findById(1))
.thenReturn(completedFuture(Optional.of(entity)));
final ClientHttpResponse response = blockingHttpClient.get("/?id=1");
assertEquals(jsonObject("message", "data"), response.getBody());
assertEquals(200, response.getStatusCode());
}
@Test
void Should_return_Not_Found_error() {
when(dataRepository.findById(1))
.thenReturn(completedFuture(Optional.empty()));
final ClientHttpResponse response = blockingHttpClient.get("/?id=1");
assertEquals(jsonObject("message", "Not Found"), response.getBody());
assertEquals(404, response.getStatusCode());
}
}|
To get additional info about writing tests that require JSON object comparison, please read |
But if on the basis of such test we build the source code coverage report, this report will show a low degree of coverage:

Such a result is caused by the fact that after creating a mock alternative for the DataRepository component, the classes generated by the RxMicro framework are not used in the testing process for the mongo repository work.
If such a result is not acceptable, it is necessary to:
-
create a mock alternative to the
MongoDatabaseRxMicro component; -
use the static methods of the
MongoMockFactoryclass to program the mock behavior.
@InitMocks
@RxMicroRestBasedMicroServiceTest(MicroService.class)
final class MicroServiceWithAllGeneratedCodeTest {
private static final FindOperationMock FIND_OPERATION_MOCK =
new FindOperationMock.Builder()
.setAnyQuery()
//.setQuery("{_id: 1}")
.build();
private BlockingHttpClient blockingHttpClient;
@Mock
@Alternative
private MongoDatabase mongoDatabase;
void prepareOneEntityFound() {
prepareMongoOperationMocks(
mongoDatabase,
"collection",
FIND_OPERATION_MOCK,
new Document("data", "data")
);
}
@Test
@BeforeThisTest(method = "prepareOneEntityFound")
void Should_return_Entity_data() {
final ClientHttpResponse response = blockingHttpClient.get("/?id=1");
assertEquals(jsonObject("message", "data"), response.getBody());
assertEquals(200, response.getStatusCode());
}
void prepareNoEntityFound() {
prepareMongoOperationMocks(
mongoDatabase,
"collection",
FIND_OPERATION_MOCK
);
}
@Test
@BeforeThisTest(method = "prepareNoEntityFound")
void Should_return_Not_Found_error() {
final ClientHttpResponse response = blockingHttpClient.get("/?id=1");
assertEquals(jsonObject("message", "Not Found"), response.getBody());
assertEquals(404, response.getStatusCode());
}
}The modified test shows a coverage rate of 100%:

MongoDatabase mock alternative.|
The project source code used in the current subsection is available at the following link: |
|
When compiling, the RxMicro framework searches for When changing the |
14.6.2.3. Features of Testing Postgres Repositories
This section will cover the features of testing REST-based microservices that use postgres repositories.
The source code of such REST-based microservice consists of the Entity entity model, Response model class, DataRepository mongo repository and ConsumeMicroService HTTP request handler:
public final class Response {
final String message;
public Response(final String message) {
this.message = requireNonNull(message);
}
}@Table
public final class Entity {
@Column(length = Column.UNLIMITED_LENGTH)
String data;
public String getData() {
return data;
}
}@PostgreSQLRepository
public interface DataRepository {
@Select("SELECT data FROM ${table} WHERE id=?")
CompletableFuture<Optional<Entity>> findById(long id);
}final class MicroService {
private final DataRepository dataRepository = getRepository(DataRepository.class);
@GET("/")
CompletableFuture<Optional<Response>> get(final Long id) {
return dataRepository.findById(id).thenApply(optionalEntity ->
optionalEntity.map(entity ->
new Response(entity.getData())));
}
}The most logical way to test such microservice is to create a mock alternative for the DataRepository component:
@InitMocks
@RxMicroRestBasedMicroServiceTest(MicroService.class)
final class MicroServiceBusinessLogicOnlyTest {
private BlockingHttpClient blockingHttpClient;
@Mock
@Alternative
private DataRepository dataRepository;
@Mock
private Entity entity;
@Test
void Should_return_Entity_data() {
when(entity.getData())
.thenReturn("data");
when(dataRepository.findById(1))
.thenReturn(completedFuture(Optional.of(entity)));
final ClientHttpResponse response = blockingHttpClient.get("/?id=1");
assertEquals(jsonObject("message", "data"), response.getBody());
assertEquals(200, response.getStatusCode());
}
@Test
void Should_return_Not_Found_error() {
when(dataRepository.findById(1))
.thenReturn(completedFuture(Optional.empty()));
final ClientHttpResponse response = blockingHttpClient.get("/?id=1");
assertEquals(jsonObject("message", "Not Found"), response.getBody());
assertEquals(404, response.getStatusCode());
}
}|
To get additional info about writing tests that require JSON object comparison, please read |
But if on the basis of such test we build the source code coverage report, this report will show a low degree of coverage:

Such a result is caused by the fact that after creating a mock alternative for the DataRepository component, the classes generated by the RxMicro framework are not used in the testing process for the postgres repository work.
If such a result is not acceptable, it is necessary to:
-
create a mock alternative to the
ConnectionPoolRxMicro component; -
use the static methods of the
SQLMockFactoryclass to program the mock behavior.
@InitMocks
@RxMicroRestBasedMicroServiceTest(MicroService.class)
final class MicroServiceWithAllGeneratedCodeTest {
private static final SQLQueryWithParamsMock SQL_PARAMS_MOCK =
new SQLQueryWithParamsMock.Builder()
.setAnySql()
//.setSql("SELECT data FROM entity WHERE id = $1")
//.setBindParams(1L)
.build();
private BlockingHttpClient blockingHttpClient;
@Mock
@Alternative
private ConnectionPool connectionPool;
void prepareOneEntityFound() {
prepareSQLOperationMocks(
connectionPool,
SQL_PARAMS_MOCK,
"data"
);
}
@Test
@BeforeThisTest(method = "prepareOneEntityFound")
void Should_return_Entity_data() {
final ClientHttpResponse response = blockingHttpClient.get("/?id=1");
assertEquals(jsonObject("message", "data"), response.getBody());
assertEquals(200, response.getStatusCode());
}
void prepareNoEntityFound() {
prepareSQLOperationMocks(
connectionPool,
SQL_PARAMS_MOCK,
List.of()
);
}
@Test
@BeforeThisTest(method = "prepareNoEntityFound")
void Should_return_Not_Found_error() {
final ClientHttpResponse response = blockingHttpClient.get("/?id=1");
assertEquals(jsonObject("message", "Not Found"), response.getBody());
assertEquals(404, response.getStatusCode());
}
}The modified test shows a coverage rate of 100%:

ConnectionPool mock alternative.|
The project source code used in the current subsection is available at the following link: |
|
When compiling, the RxMicro framework searches for When changing the |
14.6.3. Custom and the RxMicro Framework Code Execution Order
For efficient writing of Rest-based microservice tests, it is necessary to know the execution order of user, and the RxMicro framework code.
When testing a Rest-based microservice, using the following test:
@InitMocks
@RxMicroRestBasedMicroServiceTest(MicroService.class)
final class MicroServiceTest {
@BeforeAll
static void beforeAll() {
}
private BlockingHttpClient blockingHttpClient;
private SystemOut systemOut;
@Mock
@Alternative
private BusinessService businessService;
public MicroServiceTest() {
}
@BeforeEach
void beforeEach() {
}
void beforeTest1UserMethod() {
}
@Test
@BeforeThisTest(method = "beforeTest1UserMethod")
void test1() {
}
void beforeTest2UserMethod() {
}
@Test
@BeforeThisTest(method = "beforeTest2UserMethod")
void test2() {
}
@AfterEach
void afterEach() {
}
@AfterAll
static void afterAll() {
}
}the execution order will be as follows:
RX-MICRO: Test class validated.
RX-MICRO: HTTP server started without any REST-based microservices using random free port.
RX-MICRO: Blocking HTTP client created and connected to the started HTTP server.
USER-TEST: '@org.junit.jupiter.api.BeforeAll' invoked.
USER-TEST: new instance of the REST-based microservice test class created.
MOCKITO: All mocks created and injected.
RX-MICRO: Alternatives of the RxMicro components registered in the RxMicro runtime containers.
RX-MICRO: Blocking HTTP client injected to the instance of the test class.
RX-MICRO: SystemOut instance created and injected to the instance of the test class.
USER-TEST: '@org.junit.jupiter.api.BeforeEach' invoked.
USER-TEST: 'beforeTest1UserMethod' invoked.
RX-MICRO: Current REST-based microservice instance created and registered in the HTTP server.
RX-MICRO: Alternatives of the user components injected to the REST-based microservice instance.
USER-TEST: 'test1()' invoked.
USER-TEST: '@org.junit.jupiter.api.AfterEach' invoked.
RX-MICRO: All registered alternatives removed from the RxMicro runtime containers.
RX-MICRO: Current REST-based microservice instance unregistered from the HTTP server.
RX-MICRO: System.out reset.
MOCKITO: All mocks destroyed.
USER-TEST: new instance of the REST-based microservice test class created.
MOCKITO: All mocks created and injected.
RX-MICRO: Alternatives of the RxMicro components registered in the RxMicro runtime containers.
RX-MICRO: Blocking HTTP client injected to the instance of the test class.
RX-MICRO: SystemOut instance created and injected to the instance of the test class.
USER-TEST: '@org.junit.jupiter.api.BeforeEach' invoked.
USER-TEST: 'beforeTest2UserMethod' invoked.
RX-MICRO: Current REST-based microservice instance created and registered in the HTTP server.
RX-MICRO: Alternatives of the user components injected to the REST-based microservice instance.
USER-TEST: 'test2()' invoked.
USER-TEST: '@org.junit.jupiter.api.AfterEach' invoked.
RX-MICRO: All registered alternatives removed from the RxMicro runtime containers.
RX-MICRO: Current REST-based microservice instance unregistered from the HTTP server.
RX-MICRO: System.out reset.
MOCKITO: All mocks destroyed.
USER-TEST: '@org.junit.jupiter.api.AfterAll' invoked.
RX-MICRO: Blocking HTTP client released.
RX-MICRO: HTTP server stopped.In the above execution order of user, and the RxMicro framework code the following clarifications are implied:
-
The
MOCKITOprefix means that the action is activated by the@InitMocksannotation. -
The
RX-MICROprefix means that the action is activated by the@RxMicroRestBasedMicroServiceTestannotation. -
The
USER-TESTprefix means that at this stage a custom method from theMicroServiceTestclass is invoked.
14.7. Testing of Microservice Components
14.7.1. Basic Principles
The basic principles of component testing are covered by the Section 14.3.3, “Alternative Usage” section.
14.7.2. Features of Testing Complex Components that Use Alternatives
The features of testing complex components that use alternatives are the same as for REST-based microservice testing.
For more information, we recommend that You familiarize yourself with the following examples:
-
Features of testing components that use REST clients:
-
Features of testing components that use mongo repositories:
-
Features of testing components that use postgres repositories:
14.7.3. Custom and the RxMicro Framework Execution Order
For efficient writing of component tests, it is necessary to know the execution order of user, and the RxMicro framework code.
When testing a component, using the following test:
@InitMocks
@RxMicroComponentTest(BusinessService.class)
final class BusinessServiceTest {
@BeforeAll
static void beforeAll() {
}
private BusinessService businessService;
private SystemOut systemOut;
@Mock
@Alternative
private BusinessService.ChildBusinessService childBusinessService;
public BusinessServiceTest() {
}
@BeforeEach
void beforeEach() {
}
void beforeTest1UserMethod() {
}
@Test
@BeforeThisTest(method = "beforeTest1UserMethod")
void test1() {
}
void beforeTest2UserMethod() {
}
@Test
@BeforeThisTest(method = "beforeTest2UserMethod")
void test2() {
}
@AfterEach
void afterEach() {
}
@AfterAll
static void afterAll() {
}
}the execution order will be as follows:
RX-MICRO: Test class validated.
USER-TEST: '@org.junit.jupiter.api.BeforeAll' invoked.
USER-TEST: new instance of the component test class created.
MOCKITO: All mocks created and injected.
RX-MICRO: Alternatives of the RxMicro components registered in the RxMicro runtime containers.
RX-MICRO: SystemOut instance created and injected to the instance of the test class.
USER-TEST: '@org.junit.jupiter.api.BeforeEach' invoked.
USER-TEST: 'beforeTest1UserMethod' invoked.
RX-MICRO: Tested component instance created, if it is not created by user.
RX-MICRO: Alternatives of the user components injected to the tested component instance.
USER-TEST: 'test1()' method invoked.
USER-TEST: '@org.junit.jupiter.api.AfterEach' invoked.
RX-MICRO: All registered alternatives removed from the RxMicro runtime containers.
RX-MICRO: System.out reset.
MOCKITO: All mocks destroyed.
USER-TEST: new instance of the component test class created.
MOCKITO: All mocks created and injected.
RX-MICRO: Alternatives of the RxMicro components registered in the RxMicro runtime containers.
RX-MICRO: SystemOut instance created and injected to the instance of the test class.
USER-TEST: '@org.junit.jupiter.api.BeforeEach' invoked.
USER-TEST: 'beforeTest2UserMethod' invoked.
RX-MICRO: Tested component instance created, if it is not created by user.
RX-MICRO: Alternatives of the user components injected to the tested component instance.
USER-TEST: 'test2()' method invoked.
USER-TEST: '@org.junit.jupiter.api.AfterEach' invoked.
RX-MICRO: All registered alternatives removed from the RxMicro runtime containers.
RX-MICRO: System.out reset.
MOCKITO: All mocks destroyed.
USER-TEST: '@org.junit.jupiter.api.AfterAll' invoked.In the above execution order of user, and the RxMicro framework code the following clarifications are implied:
-
The
MOCKITOprefix means that the action is activated by the@InitMocksannotation. -
The
RX-MICROprefix means that the action is activated by the@RxMicroComponentTestannotation. -
The
USER-TESTprefix means that at this stage a custom method from theBusinessServiceTestclass is invoked.
14.8. REST-based Microservice Integration Testing
The REST-based microservice integration testing allows You to test a complete system, which can consist of several REST-based microservices.
For easy writing of the REST-based microservices integration tests, the RxMicro framework provides:
-
The additional
@RxMicroIntegrationTestannotation, that informs the RxMicro framework about the need to create an HTTP client and inject it into the tested class. -
A special blocking HTTP client to execute HTTP requests during testing:
BlockingHttpClient. -
The
SystemOutinterface for easy console access.
The main differences between integration testing and REST-based microservice testing:
-
for integration tests, the RxMicro framework does not run an HTTP server;
-
the developer has to start and stop the system consisting of REST-based microservices;
-
the RxMicro framework does not support alternatives and additional configuration for integration tests;
14.8.1. Basic Principles
To demonstrate the features of the integration testing, let’s look at the following microservice:
public final class MicroService {
@GET("/")
void handle() {
System.out.println("handle");
}
}The integration test for this microservice will be as follows:
(1)
@RxMicroIntegrationTest
final class MicroServiceIntegrationTest {
(2)
private static final int PORT = 55555;
private static ServerInstance serverInstance;
(5)
@BeforeAll
static void beforeAll() {
new Configs.Builder()
.withConfigs(new HttpServerConfig()
.setPort(PORT))
.build(); (4)
serverInstance = startRestServer(MicroService.class);(3)
}
(6)
@BlockingHttpClientSettings(port = PORT)
private BlockingHttpClient blockingHttpClient;
(7)
private SystemOut systemOut;
@Test
void test() {
final ClientHttpResponse response = blockingHttpClient.get("/");
assertEquals(200, response.getStatusCode()); (8)
assertTrue(response.isBodyEmpty(), "Body not empty: " + response.getBody());(8)
assertEquals("handle", systemOut.asString()); (9)
}
@AfterAll
static void afterAll() throws InterruptedException {
serverInstance.shutdownAndWait();
}
}| 1 | The @RxMicroIntegrationTest
annotation informs the RxMicro framework that this test is an integration test. |
| 2 | The constant declares the port that will be used to start the HTTP server. |
| 3 | The integration test requires the developer to start the HTTP server manually. |
| 4 | Before running the HTTP server, You must set the necessary HTTP port. |
| 5 | The configuration and start of the HTTP server must be done before running the test method. |
| 6 | Since a port other than the standard HTTP port is used, You need to specify which port the
BlockingHttpClient component should use for connecting to the HTTP server.
The BlockingHttpClient
component configuration is performed using the special
@BlockingHttpClientSettings annotation. |
| 7 | The integration test supports the possibility of creating the System.out mock. |
| 8 | After receiving a response from the microservice, ensure that the request has been executed successfully. |
| 9 | After receiving a response from the microservice, ensure that the microservice has sent the specified message to the System.out. |
|
This integration test demonstrates all features of the integration test activated by the
Thus, the integration test unlike the REST-based microservice test can only inject a blocking HTTP client and create a mock for the |
|
To get additional info about writing tests that require JSON object comparison, please read |
|
The project source code used in the current subsection is available at the following link: |
|
When compiling, the RxMicro framework searches for When changing the |
14.8.2. The BlockingHttpClient Settings
The BlockingHttpClient component, which is used for writing REST-based microservices and integration tests, is configured by the
@BlockingHttpClientSettings annotation:
private static final int SERVER_PORT = getRandomFreePort(); (4)
@BlockingHttpClientSettings(
schema = HTTPS, (1)
host = "examples.rxmicro.io", (2)
port = 9876, (3)
randomPortProvider = "SERVER_PORT", (4)
versionValue = "v1.1", (5)
versionStrategy = HEADER, (6)
requestTimeout = 15, (7)
followRedirects = Option.ENABLED (8)
)
private BlockingHttpClient blockingHttpClient;| 1 | The schema parameter allows You to specify the HTTP protocol schema. |
| 2 | The host parameter allows You to specify the remote host on which the microservice is running.(This parameter allows performing integration testing for remote microservices.) |
| 3 | The port parameter allows You to specify the static connection port. |
| 4 | The randomPortProvider parameter allows You to specify the dynamic connection port.(The port will be read from the static final variable of the current class with the SERVER_PORT name.)(The port and randomPortProvider parameters are mutually exclusive.) |
| 5 | The versionValue allows You to specify the microservice version. |
| 6 | The versionStrategy parameter allows specifying the versioning strategy, which is used in the tested microservice. |
| 7 | The requestTimeout parameter allows specifying the request timeout. |
| 8 | The followRedirects parameter returns follow redirect option for the blocking HTTP client |
14.8.3. The docker Usage
To perform the integration testing of microservices, it is convenient to use the docker.
This demonstration example uses the docker image: rxmicro/simple-hello-world.
|
The source code of the project, on the basis of which this |
To start the docker containers in the integration test it is convenient to use the Testcontainers Java library:
(1)
@RxMicroIntegrationTest
(2)
@Testcontainers
final class HelloWorldMicroService_IT {
(3)
@Container
private static final DockerComposeContainer<?> compose =
new DockerComposeContainer<>(new File("docker-compose.yml").getAbsoluteFile())
.withLocalCompose(true)
.withPull(false)
.withTailChildContainers(true)
.waitingFor("rxmicro-hello-world", Wait.forHttp("/http-health-check"));
private BlockingHttpClient blockingHttpClient;
@Test
void Should_return_Hello_World() {
final ClientHttpResponse response = blockingHttpClient.get("/");
assertEquals(jsonObject("message", "Hello World!"), response.getBody()); (4)
assertEquals(200, response.getStatusCode());
}
}| 1 | The @RxMicroIntegrationTest
annotation informs the RxMicro framework that this test is an integration test. |
| 2 | The @Testcontainers
annotation activates the start and stop of the docker containers to be used in this test. |
| 3 | The @Container
annotation indicates the docker container to be used in this test.
(To start microservices in the docker containers the docker-compose utility is used.) |
| 4 | During the testing process, ensure that the tested microservice returns the "Hello World!" message. |
|
To start the REST-based microservice in the |
|
To get additional info about writing tests that require JSON object comparison, please read |
|
The project source code used in the current subsection is available at the following link: |
14.9. Database Testing Using DBUnit
DbUnit is an extension targeted at database-driven projects that, among other things, puts your database into a known state between test runs. This is an excellent way to avoid the myriad of problems that can occur when one test case corrupts the database and causes subsequent tests to fail or exacerbate the damage.
14.9.1. Test Database Configuration
To communicate with test database the RxMicro framework uses the predefined
TestDatabaseConfig config class.
This class is the usual RxMicro configuration class.
It means that settings for test database can be configured using:
-
test-database.propertiesclasspath resource. -
./test-database.propertiesfile. -
$HOME/test-database.propertiesfile. -
$HOME/.rxmicro/test-database.propertiesfile. -
environment variables.
-
Java system properties.
-
@WithConfigannotation.
Besides that the settings for test database can be changed using TestDatabaseConfig.getCurrentTestDatabaseConfig() static method.
This approach useful if test database is working at the docker container:
@BeforeEach
void beforeEach() {
getCurrentTestDatabaseConfig()
.setHost(postgresqlTestDockerContainer.getHost())
.setPort(postgresqlTestDockerContainer.getFirstMappedPort());
}14.9.2. Retrieve Connection Strategies
The RxMicro framework provides the following retrieve connection to the test database strategies:
-
One connection per all test classes.
-
One connection per test class (default strategy).
-
One connection per test method.
14.9.2.1. One connection per all test classes
This strategy informs the DBUnit to use single connection per all tests for your project.
The RxMicro team recommends using this strategy for external databases only.
@RxMicroIntegrationTest
@Testcontainers
(1)
@DbUnitTest(retrieveConnectionStrategy = PER_ALL_TEST_CLASSES)
@TestMethodOrder(MethodOrderer.OrderAnnotation.class)
// FIXME "org.postgresql.util.PSQLException: FATAL: the database system is starting up" and remove @Ignore
@Ignore
final class DbStateUsingPerAllTestClassesConnectionTest {
private static final int DB_PORT = getRandomFreePort();
@WithConfig
private static final TestDatabaseConfig CONFIG = new TestDatabaseConfig()
.setType(DatabaseType.POSTGRES)
.setPort(DB_PORT)
.setUser("rxmicro")
.setPassword("password")
.setDatabase("rxmicro");
@Container
private static final GenericContainer<?> POSTGRESQL_TEST_DB =
new FixedHostPortGenericContainer<>("rxmicro/postgres-test-db")
.withExposedPorts(5432)
.withFixedExposedPort(DB_PORT, 5432);
@Test
@ExpectedDataSet("dataset/rxmicro-test-dataset.xml")
@Order(1)
void Should_contain_expected_dataset() {
}
@Test
@InitialDataSet("dataset/rxmicro-test-dataset-two-rows-only.xml")
@ExpectedDataSet("dataset/rxmicro-test-dataset-two-rows-only.xml")
@Order(2)
void Should_set_and_compare_dataset() {
}
}|
The project source code used in the current subsection is available at the following link: |
14.9.2.2. One connection per test class
This strategy informs the DBUnit to create a new connection before run all tests for each test class and to close after running all tests for each test class.
@RxMicroIntegrationTest
@Testcontainers
(1)
@DbUnitTest
@TestMethodOrder(MethodOrderer.OrderAnnotation.class)
// FIXME "org.postgresql.util.PSQLException: FATAL: the database system is starting up" and remove @Ignore
@Ignore
final class DbStateUsingPerClassConnectionTest {
@Container
private static final GenericContainer<?> POSTGRESQL_TEST_DB =
new GenericContainer<>("rxmicro/postgres-test-db")
.withExposedPorts(5432);
@BeforeAll
static void beforeAll() {
getCurrentTestDatabaseConfig()
.setHost(POSTGRESQL_TEST_DB.getHost())
.setPort(POSTGRESQL_TEST_DB.getFirstMappedPort());
}
@Test
@ExpectedDataSet("dataset/rxmicro-test-dataset.xml")
@Order(1)
void Should_contain_expected_dataset() {
}
@Test
@InitialDataSet("dataset/rxmicro-test-dataset-two-rows-only.xml")
@ExpectedDataSet("dataset/rxmicro-test-dataset-two-rows-only.xml")
@Order(2)
void Should_set_and_compare_dataset() {
}
}|
The project source code used in the current subsection is available at the following link: |
14.9.2.3. One connection per test method
This strategy informs the DBUnit to create a new connection before each test method and to close after each one.
@RxMicroIntegrationTest
@Testcontainers
(1)
@DbUnitTest(retrieveConnectionStrategy = PER_TEST_METHOD)
@TestMethodOrder(MethodOrderer.OrderAnnotation.class)
// FIXME "org.postgresql.util.PSQLException: FATAL: the database system is starting up" and remove @Ignore
@Ignore
final class DbStateUsingPerMethodConnectionTest {
@Container
private final GenericContainer<?> postgresqlTestDb =
new GenericContainer<>("rxmicro/postgres-test-db")
.withExposedPorts(5432);
@BeforeEach
void beforeEach() {
getCurrentTestDatabaseConfig()
.setHost(postgresqlTestDb.getHost())
.setPort(postgresqlTestDb.getFirstMappedPort());
}
@Test
@ExpectedDataSet("dataset/rxmicro-test-dataset.xml")
@Order(1)
void Should_contain_expected_dataset() {
}
@Test
@InitialDataSet("dataset/rxmicro-test-dataset-two-rows-only.xml")
@ExpectedDataSet("dataset/rxmicro-test-dataset-two-rows-only.xml")
@Order(2)
void Should_set_and_compare_dataset() {
}
}|
The project source code used in the current subsection is available at the following link: |
14.9.3. @InitialDataSet Annotation
The @InitialDataSet annotation inform the RxMicro framework that it is necessary to prepare the tested database using DbUnit framework before test execution.
The @InitialDataSet annotation contains the dataset files that must be exported to the tested database before test execution.
@Test
(1)
@InitialDataSet("dataset/rxmicro-test-dataset-two-rows-only.xml")
void prepare_database() {
// do something with prepared database
}| 1 | Using data from the @InitialDataSet annotation the RxMicro framework prepares the tested database. |
The init dataset can be provided using flat xml format:
<?xml version='1.0' encoding='UTF-8'?>
<!DOCTYPE dataset SYSTEM "rxmicro-test-dataset.dtd">
<dataset>
<account id="1"
email="richard.hendricks@piedpiper.com"
first_name="Richard"
last_name="Hendricks"
balance="70000.00"
role="CEO"/>
<account id="3"
email="dinesh.chugtai@piedpiper.com"
first_name="Dinesh"
last_name="Chugtai"
balance="10000.00"
role="Lead_Engineer"/>
<product id="24"
name="Apple iMac 27" with Retina 5K Display Late (MQ2Y2)"
price="6200.00"
count="7"/>
<product id="25"
name="Apple iMac 27" 2017 5K (MNEA2)"
price="2100.00"
count="17"/>
<order/>
</dataset>|
The project source code used in the current subsection is available at the following link: |
14.9.4. @ExpectedDataSet Annotation
The @ExpectedDataSet annotation inform the RxMicro framework that it is necessary to compare the actual database state with the expected one, defined using dataset file(s) after test execution.
@Test
(1)
@ExpectedDataSet("dataset/rxmicro-test-dataset-two-rows-only.xml")
void verify_database_state() {
// change database state
}| 1 | Using data from the @ExpectedDataSet annotation the RxMicro framework compares actual database state with the expected one after test execution. |
The expected dataset can be provided using flat xml format:
<?xml version='1.0' encoding='UTF-8'?>
<!DOCTYPE dataset SYSTEM "rxmicro-test-dataset.dtd">
<dataset>
<account id="1"
email="richard.hendricks@piedpiper.com"
first_name="Richard"
last_name="Hendricks"
balance="70000.00"
role="CEO"/>
<account id="3"
email="dinesh.chugtai@piedpiper.com"
first_name="Dinesh"
last_name="Chugtai"
balance="10000.00"
role="Lead_Engineer"/>
<product id="24"
name="Apple iMac 27" with Retina 5K Display Late (MQ2Y2)"
price="6200.00"
count="7"/>
<product id="25"
name="Apple iMac 27" 2017 5K (MNEA2)"
price="2100.00"
count="17"/>
<order/>
</dataset>|
The project source code used in the current subsection is available at the following link: |
14.9.5. @RollbackChanges Annotation
The @RollbackChanges annotation starts a new transaction before initialization of database by the @InitialDataSet annotation (if it is present) and rolls back this transaction after comparing actual database state with expected one provided by the @ExpectedDataSet annotation (if it is present).
The isolation level of the test transaction can be configured using isolationLevel parameter declared at the @RollbackChanges annotation.
@RxMicroIntegrationTest
@Testcontainers
(1)
@DbUnitTest
@TestMethodOrder(MethodOrderer.OrderAnnotation.class)
// FIXME "org.postgresql.util.PSQLException: FATAL: the database system is starting up" and remove @Ignore
@Ignore
final class RollbackChangesTest {
@Container
private static final GenericContainer<?> POSTGRESQL_TEST_DB =
new GenericContainer<>("rxmicro/postgres-test-db")
.withExposedPorts(5432);
@BeforeAll
static void beforeAll() {
getCurrentTestDatabaseConfig()
.setHost(POSTGRESQL_TEST_DB.getHost())
.setPort(POSTGRESQL_TEST_DB.getFirstMappedPort());
}
@Test
(2)
@RollbackChanges
@InitialDataSet("dataset/rxmicro-test-dataset-empty.xml")
@ExpectedDataSet("dataset/rxmicro-test-dataset-empty.xml")
@Order(1)
void Should_set_and_compare_dataset() {
}
@Test
@ExpectedDataSet("dataset/rxmicro-test-dataset.xml")
@Order(2)
void Should_contain_expected_dataset() {
}
}| 1 | For database testing it is necessary to inform the RxMicro framework that current test is DBUnit test. |
| 2 | If test method annotated by the @RollbackChanges annotation all changes made by this test method will be rolled back. |
|
The project source code used in the current subsection is available at the following link: |
14.9.6. Ordered Comparison
If the expected dataset is ordered, it is necessary to inform the RxMicro framework how to compare this dataset correctly.
For this case the @ExpectedDataSet annotation has orderBy parameter:
@Test
@ExpectedDataSet(
value = "dataset/rxmicro-test-dataset-products-order-by-price.xml",
orderBy = "price" (1)
)
@Order(1)
void Should_contain_expected_dataset() {
}| 1 | The orderBy parameter contains the column name(s) that must be used to sort the actual dataset before comparison. |
The dataset/rxmicro-test-dataset-products-order-by-price.xml dataset is the following:
<?xml version='1.0' encoding='UTF-8'?>
<!DOCTYPE dataset SYSTEM "rxmicro-test-dataset.dtd">
<dataset>
<product id="19" name="Apple iPod Touch 6 16Гб (MKGX2)" price="310.00" count="48"/>
<product id="17" name="Apple iPod Touch 6 16Гб (MKH62)" price="320.00" count="54"/>
<product id="18" name="Apple iPod Touch 6 32Гб (MKJ02)" price="380.00" count="52"/>
<product id="20" name="Apple iPod Touch 6 32Гб (MKHV2)" price="420.00" count="55"/>
<product id="14" name="Apple iPhone 7 Plus 32GB Black" price="510.00" count="3"/>
<product id="6" name="Apple iPad (2019) 10.2" Wi-Fi 32GB Gold (MW762)" price="540.00"
count="32"/>
<product id="7" name="Apple iPad (2019) 10.2" Wi-Fi 128GB Silver (MW782)" price="620.00"
count="37"/>
<product id="8" name="Apple iPad mini 5 Wi-Fi 64Gb Space Gray (MUQW2)" price="645.00"
count="26"/>
<product id="12" name="Apple iPhone Xr 64GB Black (MRY42)" price="760.00" count="14"/>
<product id="10" name="Apple iPhone Xs 64GB Space Gray (MT9E2)" price="840.00" count="21"/>
<product id="13" name="Apple iPhone Xs 256GB Space Gray (MT9H2)" price="910.00" count="10"/>
<product id="11" name="Apple iPhone 11 128GB Black" price="980.00" count="18"/>
<product id="2" name="Apple MacBook A1534 12" Space Gray (MNYF2)" price="985.00"
count="12"/>
<product id="9" name="Apple iPad Pro 11" Wi-Fi 64GB Space Gray 2018 (MTXN2)" price="1100.00"
count="18"/>
<product id="4" name="Apple MacBook Pro 13 Retina Space Gray (MPXT2) 2017" price="1345.00"
count="17"/>
<product id="15" name="Apple iPhone 11 Pro 64GB Space Gray" price="1450.00" count="42"/>
<product id="16" name="Apple iPhone 11 Pro 256GB Midnight Green" price="1720.00" count="38"/>
<product id="22" name="Apple iMac 21.5' Middle 2017 (MMQA2)" price="1740.00" count="14"/>
<product id="5" name="Apple MacBook Pro 15" Retina Z0RF00052 (Mid 2015)" price="1860.00"
count="11"/>
<product id="23" name="Apple iMac 21" Retina 4K MRT32 (Early 2019)" price="1920.00"
count="11"/>
<product id="25" name="Apple iMac 27" 2017 5K (MNEA2)" price="2100.00" count="17"/>
<product id="3" name="Apple MacBook Pro 16" 512GB 2019 (MVVJ2) Space Gray" price="2540.00"
count="8"/>
<product id="1" name="Apple MacBook Pro 15" Retina Z0WW00024 Space Gray" price="5750.00"
count="10"/>
<product id="24" name="Apple iMac 27" with Retina 5K Display Late (MQ2Y2)" price="6200.00"
count="7"/>
<product id="21" name="Apple iMac Pro 27" Z0UR000AC / Z0UR8 (Late 2017)" price="7800.00"
count="6"/>
</dataset>|
The project source code used in the current subsection is available at the following link: |
14.9.7. Supported Expressions
The RxMicro framework supports expressions for datasets.
Expressions can be useful to set dynamic parameters.
The RxMicro framework supports the following expressions:
-
${null}- null value. -
${now}- isjava.time.Instant.now()value for the initial dataset;-
${instant:now}is alias for${now}; -
${timestamp:now}is alias for${now};
-
-
${now}- isjava.time.Instant.now()value for the expected dataset;-
${instant:now}is alias for${now}; -
${timestamp:now}is alias for${now}; -
${now:${CUSTOM-DURATION}}is alias for${now}; -
${instant:now:${CUSTOM-DURATION}}is alias for${now}; -
${timestamp:now:${CUSTOM-DURATION}}is alias for${now};
-
-
${interval:${MIN}:${MAX}}- is an instant interval that can be compared withjava.time.Instantandjava.sql.Timestampinstances correctly.-
${interval:${MEDIAN}:${LEFT-DELTA}:${RIGHT-DELTA}}is alias for${interval:${MIN}:${MAX}}; -
${instant:interval:${MEDIAN}:${LEFT-DELTA}:${RIGHT-DELTA}}is alias for${interval:${MIN}:${MAX}}; -
${timestamp:interval:${MEDIAN}:${LEFT-DELTA}:${RIGHT-DELTA}}is alias for${interval:${MIN}:${MAX}}; -
${instant:interval:${MIN}:${MAX}}is alias for${interval:${MIN}:${MAX}}; -
${timestamp:interval:${MIN}:${MAX}}is alias for${interval:${MIN}:${MAX}};
-
-
${int:interval:${MIN}:${MAX}}- is an integer number interval that can be compared withjava.lang.Short,java.lang.Integerandjava.lang.Longinstances correctly.-
${integer:interval:${MIN}:${MAX}}is alias for${int:interval:${MIN}:${MAX}}; -
${tinyint:interval:${MIN}:${MAX}}is alias for${int:interval:${MIN}:${MAX}}; -
${short:interval:${MIN}:${MAX}}is alias for${int:interval:${MIN}:${MAX}}; -
${smallint:interval:${MIN}:${MAX}}is alias for${int:interval:${MIN}:${MAX}}; -
${long:interval:${MIN}:${MAX}}is alias for${int:interval:${MIN}:${MAX}}; -
${bigint:interval:${MIN}:${MAX}}is alias for${int:interval:${MIN}:${MAX}};
-
14.9.7.1. ${null} Expression
If dataset must contain null value, the ${null} expression must be used:
<?xml version='1.0' encoding='UTF-8'?>
<!DOCTYPE dataset SYSTEM "rxmicro-test-dataset.dtd">
<dataset>
<account id="1"
email="richard.hendricks@piedpiper.com"
first_name="Richard"
last_name="Hendricks"
role="CEO"
balance="${null}"/> (1)
</dataset>| 1 | Set null value to the balance column. |
@Test
@InitialDataSet(
(1)
value = "dataset/with-null-expression-dataset.xml",
(2)
executeStatementsBefore = "ALTER TABLE account ALTER COLUMN balance DROP NOT NULL")
(4)
@ExpectedDataSet("dataset/with-null-expression-dataset.xml")
void Should_set_and_compare_null_correctly() throws SQLException {
try (Connection connection = getJDBCConnection()) {
try (Statement st = connection.createStatement()) {
try (ResultSet rs = st.executeQuery("SELECT balance FROM account WHERE id=1")) {
if (rs.next()) {
(3)
assertNull(rs.getTimestamp(1, GREGORIAN_CALENDAR_WITH_UTC_TIME_ZONE));
} else {
fail("Test database does not contain account with id=1");
}
}
}
}
}| 1 | The dataset with ${null} expression. |
| 2 | The test database does not support null values for account.balance column.
To demonstrate how ${null} expression is worked it is necessary to drop NOT NULL constraint. |
| 3 | The actual row contains null value. |
| 4 | After test execution the test database must contain null value. |
|
The project source code used in the current subsection is available at the following link: |
14.9.7.2. ${now} Expression
The ${now} expression useful if it is necessary to work with current instant: set and compare.
If dataset must contain java.time.Instant.now() value, the ${now} expression must be used:
<?xml version='1.0' encoding='UTF-8'?>
<!DOCTYPE dataset SYSTEM "rxmicro-test-dataset.dtd">
<dataset>
<order id="1"
id_account="1"
id_product="1"
count="10"
created="${now}"/> (1)
</dataset>| 1 | Set current instant value to the created column. |
@Test
@InitialDataSet(
(1)
value = "dataset/with-now-expression-dataset.xml",
(2)
executeStatementsBefore = {
"ALTER TABLE \"order\" DROP CONSTRAINT IF EXISTS order_fk_account",
"ALTER TABLE \"order\" DROP CONSTRAINT IF EXISTS order_fk_product"
})
(3)
@ExpectedDataSet("dataset/with-now-expression-dataset.xml")
void Should_set_and_compare_now_correctly() throws SQLException {
try (Connection connection = getJDBCConnection()) {
try (Statement st = connection.createStatement()) {
try (ResultSet rs = st.executeQuery("SELECT created FROM \"order\" WHERE id=1")) {
if (rs.next()) {
(4)
final Instant actual =
rs.getTimestamp(1, GREGORIAN_CALENDAR_WITH_UTC_TIME_ZONE).toInstant();
(5)
assertInstantEquals(Instant.now(), actual);
} else {
fail("Test database does not contain order with id=1");
}
}
}
}
}| 1 | The dataset with ${now} expression. |
| 2 | The test database contains foreign keys.
To demonstrate how ${now} expression is worked it is necessary to drop these foreign keys. |
| 3 | The expected dataset must contain current instant value too. |
| 4 | The actual row contains current instant value. |
| 5 | To compare current instant value it is necessary to use ExAssertions.assertInstantEquals method.
This method verifies that instants are equal within the default delta configured via GlobalTestConfig config class. |
The ${now} expression can be used to verify that unit test creates java.time.Instant.now() value:
@Test
@InitialDataSet(
(1)
value = "dataset/empty-database.xml",
(2)
executeStatementsBefore = {
"ALTER TABLE \"order\" DROP CONSTRAINT IF EXISTS order_fk_account",
"ALTER TABLE \"order\" DROP CONSTRAINT IF EXISTS order_fk_product"
})
(4)
@ExpectedDataSet("dataset/with-now-expression-dataset.xml")
void Should_compare_now_correctly() throws SQLException {
final String sql = "INSERT INTO \"order\" VALUES(?,?,?,?,?)";
try (Connection connection = getJDBCConnection()) {
try (PreparedStatement st = connection.prepareStatement(sql)) {
st.setInt(1, 1);
st.setInt(2, 1);
st.setInt(3, 1);
st.setInt(4, 10);
final Timestamp now = Timestamp.from(Instant.now()); (3)
st.setTimestamp(5, now, GREGORIAN_CALENDAR_WITH_UTC_TIME_ZONE);
st.executeUpdate();
}
}
}| 1 | The empty dataset. |
| 2 | The test database contains foreign keys.
To demonstrate how ${now} expression is worked it is necessary to drop these foreign keys. |
| 3 | The java.time.Instant.now() value is stored to test database. |
| 4 | After test execution the test database must contain java.time.Instant.now() value. |
The dataset/with-now-expression-dataset.xml classpath resource contains the following content:
<?xml version='1.0' encoding='UTF-8'?>
<!DOCTYPE dataset SYSTEM "rxmicro-test-dataset.dtd">
<dataset>
<order id="1"
id_account="1"
id_product="1"
count="10"
created="${now}"/> (1)
</dataset>| 1 | The created column must contain java.time.Instant.now() value. |
|
The project source code used in the current subsection is available at the following link: |
14.9.7.3. ${instant:interval} Expression
The ${instant:interval} expression allows comparing this expression with java.time.Instant and java.sql.Timestamp instances correctly.
This expression is useful if Your business logic generates random instant value within predefined boundaries:
@Test
@InitialDataSet(
(1)
value = "dataset/empty-database.xml",
(2)
executeStatementsBefore = {
"ALTER TABLE \"order\" DROP CONSTRAINT IF EXISTS order_fk_account",
"ALTER TABLE \"order\" DROP CONSTRAINT IF EXISTS order_fk_product"
})
(4)
@ExpectedDataSet("dataset/with-instant-interval-expression-dataset.xml")
void Should_compare_instant_interval_correctly() throws SQLException {
final String sql = "INSERT INTO \"order\" VALUES(?,?,?,?,?)";
try (Connection connection = getJDBCConnection()) {
try (PreparedStatement st = connection.prepareStatement(sql)) {
st.setInt(1, 1);
st.setInt(2, 1);
st.setInt(3, 1);
st.setInt(4, 10);
final Duration duration = Duration.ofSeconds(new Random().nextInt(10) + 1);
final Timestamp now = Timestamp.from(Instant.now().plus(duration)); (3)
st.setTimestamp(5, now, GREGORIAN_CALENDAR_WITH_UTC_TIME_ZONE);
st.executeUpdate();
}
}
}| 1 | The empty dataset. |
| 2 | The test database contains foreign keys.
To demonstrate how ${now} expression is worked it is necessary to drop these foreign keys. |
| 3 | The java.time.Instant.now() + [1 SECOND - 10 SECOND] value is stored to test database. |
| 4 | After test execution the test database must contain java.time.Instant.now() + [1 SECOND - 10 SECOND] value. |
The dataset/with-now-expression-dataset.xml classpath resource contains the following content:
<?xml version='1.0' encoding='UTF-8'?>
<!DOCTYPE dataset SYSTEM "rxmicro-test-dataset.dtd">
<dataset>
<order id="1"
id_account="1"
id_product="1"
count="10"
created="${interval:now:PT1S:PT12S}"/> (1)
</dataset>| 1 | The created column must contain java.time.Instant.now() + [1 SECOND - 12 SECOND] value.
12 instead of 10 is used because 2 second is compare delta! |
|
The project source code used in the current subsection is available at the following link: |
14.9.7.4. ${int:interval} Expression
The ${int:interval} expression allows comparing this expression with java.lang.Short, java.lang.Integer and java.lang.Long instances correctly.
This expression is useful if Your business logic generates random integer number value within predefined boundaries:
@Test
@InitialDataSet("dataset/empty-database.xml")
(2)
@ExpectedDataSet("dataset/with-int-interval-expression-dataset.xml")
void Should_compare_int_interval_correctly() throws SQLException {
final String sql = "INSERT INTO product VALUES(?,?,?,?)";
try (Connection connection = getJDBCConnection()) {
try (PreparedStatement st = connection.prepareStatement(sql)) {
st.setInt(1, 1);
st.setString(2, "name");
st.setBigDecimal(3, new BigDecimal("6200.00"));
st.setInt(4, new Random().nextInt(10)); (1)
st.executeUpdate();
}
}
}| 1 | The actual product count is random value from 0 to 9.
To compare the actual dataset it is necessary to use ${int:interval} expression. |
| 2 | After test execution the test database must contain random integer number value from 0 to 9. |
The expected dataset with the integer number interval from 0 to 9:
<?xml version='1.0' encoding='UTF-8'?>
<!DOCTYPE dataset SYSTEM "rxmicro-test-dataset.dtd">
<dataset>
<product id="1"
name="name"
price="6200.00"
count="${int:interval:0:9}"/> (1)
</dataset>| 1 | Set integer number interval from 0 to 9. |
|
The project source code used in the current subsection is available at the following link: |
15. Appendices
15.1. Appendix A: FAQ
This section covers a list of possible questions that You can ask yourself when You use the RxMicro framework.
15.1.1. Does the RxMicro framework modify my byte code?
No. Your classes are Your classes. The RxMicro framework does not transform classes or modify the Java byte code You write. The RxMicro framework produces additional classes only.
15.1.2. Can the RxMicro framework be used for purposes other than microservices?
Yes. The RxMicro framework is very modular and You can choose to use any module You need.
15.1.3. Why I receive class not found error?
When You use the RxMicro framework You can receive one of the following errors:
-
Class rxmicro.$$RestControllerAggregatorImpl not found; -
Class rxmicro.$$RestClientFactoryImpl not found; -
Class rxmicro.$$RepositoryFactoryImpl not found; -
Class rxmicro.$$BeanFactoryImpl not found;
These errors mean that the RxMicro Annotation Processor does not generate the required additional classes.
To fix it, please verify that:
-
pom.xmlfor Your project contains the valid settings formaven-compiler-pluginand -
You executed command:
mvn clean compile!
15.1.4. Why I receive The Kotlin standard library is not found in the module graph error?
Sometimes this issue occurs during the work with java code using IntelliJ IDEA.
To fix this issue it is necessary to rebuild Your project: Build → Rebuild project.
15.1.5. Why I receive java.lang.NullPointerException: autoRelease couldn’t be null error during unit testing?
If You declare an alternative of the HttpClientFactory mock and don’t configure it this error can happen.
To fix this issue it is necessary to configure the @Mock annotation:
@Alternative
@Mock(answer = Answers.RETURNS_DEEP_STUBS) (1)
private HttpClientFactory httpClientFactory;| 1 | Set Answers.RETURNS_DEEP_STUBS as answer value. |
15.1.6. Why I receive java.lang.reflect.InaccessibleObjectException: Unable to make MicroServiceTest() accessible: module module.name does not "opens test.package" to unnamed module error during unit testing?
If test.package name matches to the production.package name, then You need just to add io.rxmicro.annotation.processor.RxMicroTestsAnnotationProcessor annotation processor.
(Read more at Section 14.1.3, “Configuring the maven-compiler-plugin:”).
If test.package name does not match to the production.package name, then You need configure the maven-surefire-plugin manually:
<plugin>
<artifactId>maven-surefire-plugin</artifactId>
<version>${maven-surefire-plugin.version}</version>
<configuration>
<argLine>
@{argLine}
--add-opens module.name/test.package=ALL-UNNAMED (1)
</argLine>
</configuration>
</plugin>| 1 | Opens all classes from test.package package defined at the module.name module to all unnamed modules! |