© 2019-2022 rxmicro.io.
Free use of this software is granted under the terms of the Apache License 2.0.
|
Copies of this entity may be made for Your own use and for distribution to others, provided that You do not charge any fee for such copies and further provided that each copy contains this Copyright Notice, whether distributed in print or electronically. If You find errors or omissions in this entity, please don’t hesitate to submit an issue or open a pull request with a fix. |
This section will describe the basic working concepts of the RxMicro framework.
1. How It Works?
The RxMicro framework uses the
Java annotation processor, which generates standard code using RxMicro Annotations.
Thus, the RxMicro framework is a framework of declarative programming.
Using the RxMicro framework, the developer focuses on writing the business logic of a microservice.
Then he configures the desired standard behavior with RxMicro Annotations.
When compiling a project, the RxMicro Annotation Processor generates additional classes.
Generated classes contain a standard logic that ensures the functionality of the created microservice.
1.1. A Common Work Schema
The common work schema can be presented as follows:
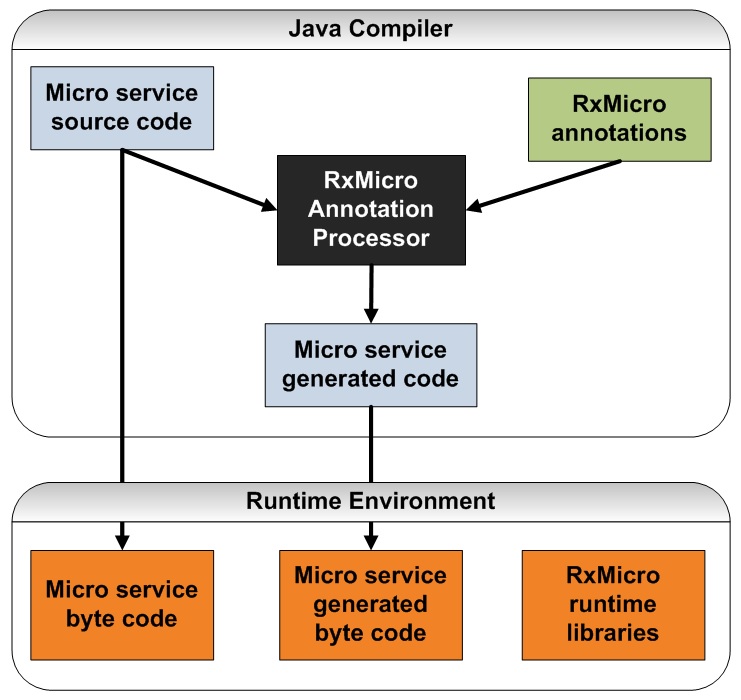
While solving a business task, the developer writes Micro service source code.
Then the developer configures the desired standard microservice behavior via RxMicro Annotations.
After that, the developer compiles the project.
Since the RxMicro Annotation Processor is configured in maven, when compiling a project this processor handles the source code of the microservice and generates the additional classes: Micro service generated code.
After that, the compiler compiles the source and generated microservice codes: Micro service byte code and Micro service generated byte code.
The compiled source and generated codes along with the RxMicro runtime libraries perform useful work.
1.2. Generating of Additional Classes.
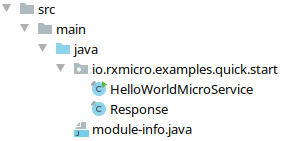
Let’s have a look at the RxMicro framework common work schema, by the example of the REST-based microservice project, which displays the "Hello World!" message in JSON format.
(This project was considered in the quick-start.html section.)
While implementing a business task (in this example, it’s a task of displaying the "Hello World!" message in JSON format) the developer wrote the following Micro service source code:
In order to inform the RxMicro framework about the need to generate additional classes by which a written Micro service source code can be built into an HTTP server to handle the desired HTTP requests, the developer added the following RxMicro Annotation:
@GET("/")Since the RxMicro Annotation Processor is configured in maven:
<configuration>
<annotationProcessors>
<annotationProcessor>
io.rxmicro.annotation.processor.RxMicroAnnotationProcessor
</annotationProcessor>
</annotationProcessors>
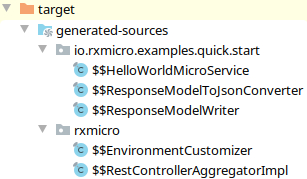
</configuration>then when compiling a project this processor handles the source code of the REST-based microservice and generates the Micro service generated code additional classes:
After the source code of additional classes was successfully generated by the RxMicro Annotation Processor, the compiler compiles:
-
REST-based microservice source code in
Micro service byte code:
-
Generated code of additional classes in
Micro service byte code:
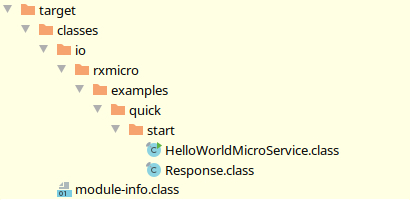
As a result of the compiler’s work, the REST-based microservice byte code and the byte code of the generated additional classes will be stored jointly in the same jar archive:
For successful start of the compiled classes, the RxMicro runtime libraries are required:
The Micro service byte code, Micro service byte code and RxMicro runtime libraries are the program components of microservice, which perform useful work.
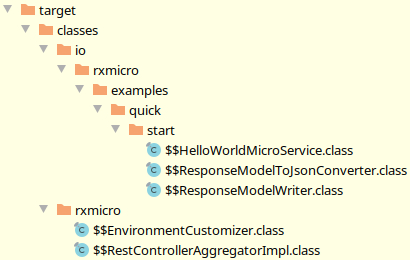
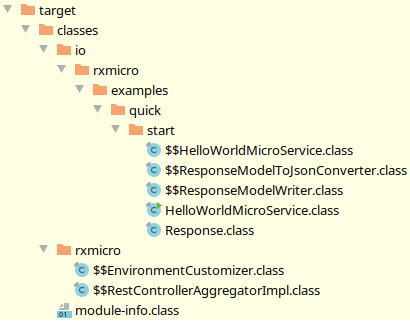
Below we will look closely at each generated additional class and what functions it performs.
|
The names of all classes generated by the RxMicro framework start with the |
1.2.1. An Additional Class for the REST Controller.
Any REST-based microservice, contains at least one REST controller. For the simplest project, REST-based microservice and REST controller are the same class.
Therefore, when analyzing such projects, such terms as REST controller, REST-based microservice and microservice are synonymous, because physically they are the same class.
The considered REST-based microservice, which displays the "Hello World!" message, is the simplest project, therefore the HelloWorldMicroService class is a REST controller.
|
For more information on the differences between REST controller, REST-based microservice and microservice, refer to the microservice.html section. |
For each REST controller class the RxMicro framework generates an additional class that performs the following functions:
-
Creates a REST controller object.
(In case ofrxmicro.cdimodule activation, after creation it also injects the required dependencies.) -
Creates
ModelReaderobjects that convert HTTP request parameters, headers and body to Java model. -
Creates
ModelWriterobjects that convert the Java response model to HTTP response headers and body; -
Registers all HTTP request handlers of current REST controller in the router.
-
When receiving an HTTP request via the
ModelReaderobject, converts the HTTP request to the Java request model and invokes the corresponding REST controller handler. -
After receiving the resulting Java response model via the
ModelWriterobject, converts the Java model into an HTTP response and sends the response to the client.
Such an additional class for the HelloWorldMicroService class is the $$HelloWorldMicroService class:
public final class $$HelloWorldMicroService extends AbstractRestController {

    private HelloWorldMicroService restController;

    private $$ResponseModelWriter responseModelWriter;

    @Override
    protected void postConstruct() {
        restController = new HelloWorldMicroService(); (1)
        responseModelWriter =
                new $$ResponseModelWriter(restServerConfig.isHumanReadableOutput()); (2)
    }

    @Override
    public void register(final RestControllerRegistrar registrar) { (3)
        registrar.register(
                this,
                new Registration(
                        "",
                        "sayHelloWorld()",
                        this::sayHelloWorld, (4)
                        false,
                        new ExactUrlRequestMappingRule( (5)
                                "GET",
                                "/",
                                false
                        )
                )
        );
    }

    private CompletionStage<HttpResponse> sayHelloWorld(final PathVariableMapping mapping,
                                                        final HttpRequest request) {
        final HttpHeaders headers = HttpHeaders.of();
        return restController.sayHelloWorld() (6)
                .thenApply(response -> buildResponse(response, 200, headers)); (7)
    }

    private HttpResponse buildResponse(final Response model,
                                       final int statusCode,
                                       final HttpHeaders headers) {
        final HttpResponse response = httpResponseBuilder.build();
        response.setStatus(statusCode);
        response.setOrAddHeaders(headers);
        responseModelWriter.write(model, response); (8)
        return response;
    }

}| 1 | The $$HelloWorldMicroService component creates an instance of the REST controller class. |
| 2 | The $$HelloWorldMicroService component creates an instance of the ModelWriter that converts the Java response model to the HTTP response headers and body. |
| 3 | The $$HelloWorldMicroService component registers all HTTP request handlers of the current REST controller. |
| 4 | The registration object contains a reference to the HTTP request handler of the current REST controller. |
| 5 | The registration object contains a rule, according to which the router determines whether to invoke this HTTP request handler. |
| 6 | When receiving HTTP request, the $$HelloWorldMicroService invokes REST controller method. |
| 7 | After invoking the REST controller method, an asynchronous result handler is added. (When using the reactive approach, the current thread cannot be blocked, so the thenApply method is used for delayed result handling.) |
| 8 | After receiving the Java response model object, the result handler creates an HTTP response based on the data received from the model, which is subsequently sent to the client. |
1.2.2. An ModelWriter Class.
To convert a Java model to an HTTP response, You will need a separate component that performs the following functions:
-
Defines in what format to return an HTTP response depending on the project settings.
-
Creates converter objects that support the specified messaging format.
-
When converting a Java model to an HTTP response, manages the conversion process by delegating invocations to the appropriate components.
Such a separate component for the Response model class is the $$ResponseModelWriter class:
|
The code of the Since the format of message exchange with the client is set in Therefore, if several handlers from different REST controllers will return the |
public final class $$ResponseModelWriter extends ModelWriter<Response> {

    private final $$ResponseModelToJsonConverter responseModelToJsonConverter; (1)

    private final ExchangeDataFormatConverter<Object> exchangeDataFormatConverter; (2)

    private final String outputMimeType;

    public $$ResponseModelWriter(final boolean humanReadableOutput) {
        exchangeDataFormatConverter =
            new JsonExchangeDataFormatConverter(humanReadableOutput); (3)
        responseModelToJsonConverter = new $$ResponseModelToJsonConverter();
        outputMimeType = exchangeDataFormatConverter.getMimeType();
    }

    @Override
    public void write(final Response model,
                      final HttpResponse response) {
        response.setHeader(HttpHeaders.CONTENT_TYPE, outputMimeType); (4)
        final Map<String, Object> json = responseModelToJsonConverter.toJsonObject(model); (5)
        response.setContent(exchangeDataFormatConverter.toBytes(json)); (6)
    }

}| 1 | Since the JSON message exchange format is specified in the settings, a component that can convert the Java response model to a JSON response model is required.
(This task is specific for each response model, so to avoid using reflection, You need to generate a separate converter component.) |
| 2 | To convert any low-level model (in this example, it’s a JSON response model) into a byte array, You also need a separate converter component. |
| 3 | Since the JSON messaging format is specified in the settings, it is assumed that the JSON model will be converted to an byte array, which will be created from the Java response model. |
| 4 | Since the JSON message exchange format is specified in the settings, it is necessary to set the HTTP header: Content-Type = application/json. |
| 5 | When the HTTP response is formed, it is necessary to convert Java response model to JSON model. |
| 6 | The last step is to convert the JSON model to a byte array, that will be written to the HTTP response body. |
1.2.3. A Java Model Converter.
To avoid using reflection, You need a component that can convert Java model to JSON model.
This component must support the following functions:
-
Convert Java model to JSON model of any complexity.
-
Support all possible class field access models to be an all-purpose tool.
(Supported class field access models are described in details in the Section 7, “Encapsulation”.)
Such a separate component for the Response model class is the $$ResponseModelToJsonConverter class:
public final class $$ResponseModelToJsonConverter extends ModelToJsonConverter<Response> {

    @Override
    (1)
    public Map<String, Object> toJsonObject(final Response model) {
        final JsonObjectBuilder builder = new JsonObjectBuilder();
        putValuesToBuilder(model, builder);
        return builder.build();
    }

    public void putValuesToBuilder(final Response model,
                                   final JsonObjectBuilder builder) {
        builder.put("message", model.message); (2)
    }
}| 1 | JSON object is presented as Map<String, Object>.(More information about JSON format support by the RxMicro framework can be found in the Section 10, “JSON”.) |
| 2 | The value of the message field is read from the Java model by direct reference to the field.(Supported class field access models are described in details in the Section 7, “Encapsulation”.) |
1.2.4. An Aggregator of the REST Controllers.
To integrate developer code into the RxMicro framework infrastructure, You need aggregators.
The aggregators perform the following functions:
-
Register all generated additional classes for REST controllers;
-
Customize the runtime environment;
The aggregators are invoked by the RxMicro framework using reflection.
(That' s why aggregators have a permanent and predefined names and are located in the special package: rxmicro.)
An Aggregator of the REST Controllers for any project is always the rxmicro.MODULE_NAME.$$RestControllerAggregatorImpl class:
package rxmicro.MODULE_NAME; (1)

public final class $$RestControllerAggregatorImpl extends RestControllerAggregator { (2)

    static {
        $$EnvironmentCustomizer.customize(); (3)
    }

    protected List<AbstractMicroService> listAllRestControllers() {
        return List.of(
                new io.rxmicro.examples.quick.start.$$HelloWorldMicroService() (4)
        );
    }

}| 1 | All aggregators are always generated in the special package: rxmicro.MODULE_NAME, where MODULE_NAME is the module name or unnamed constant if the current project does not declare the module-info.java descriptor (Read more: Unnamed Modules Support). |
| 2 | The predefined name of the REST controller aggregator class is always $$RestControllerAggregatorImpl. |
| 3 | When the aggregator class is loaded by the RxMicro framework, the component of the current environment customization is invoked. |
| 4 | The aggregator registers all generated additional classes for REST controllers; |
1.2.5. An Environment Customizer.
Java 9 has introduced the JPMS.
This system requires that a developer configures access to classes in the module-info.java file of the microservice project.
To enable the RxMicro framework to load aggregator classes, You must export the rxmicro.MODULE_NAME package to the rxmicro.reflection module:
module examples.quick.start {
    requires rxmicro.rest.server.netty;
    requires rxmicro.rest.server.exchange.json;

    exports rxmicro.MODULE_NAME to rxmicro.reflection; (1)
}| 1 | Allow access of reflection util classes from the rxmicro.reflection module to all classes from the rxmicro.MODULE_NAME package. |
But the rxmicro.MODULE_NAME package is created automatically and after deleting all the generated files, it won’t be possible to compile the module-info.java because of the following error:
package is empty or does not exist: rxmicro.MODULE_NAME.
To solve this problem, the RxMicro framework generates the rxmicro.MODULE_NAME.$$EnvironmentCustomizer class:
package rxmicro.MODULE_NAME; (1)

final class $$EnvironmentCustomizer {

    static {
        exportTheRxmicroPackageToReflectionModule(); (2)
        invokeAllStaticSections($$EnvironmentCustomizer.class.getModule(), "$$EnvironmentCustomizer"); (3)
        // All required customization must be here
    }

    public static void customize() {
        //do nothing. All customization is done at the static section
    }

    private static void exportTheRxmicroPackageToReflectionModule() {
        final Module currentModule = $$EnvironmentCustomizer.class.getModule();
        currentModule.addExports("rxmicro.MODULE_NAME", RX_MICRO_REFLECTION_MODULE); (4)
    }

    private $$EnvironmentCustomizer() {
    }
}| 1 | All customizers are always generated in the special package: rxmicro.MODULE_NAME, where MODULE_NAME is the module name or unnamed constant if the current project does not declare the module-info.java descriptor (Read more: Unnamed Modules Support). |
| 2 | When the class is loaded, the exportTheRxmicroPackageToReflectionModule() static method is invoked. |
| 3 | Finds all $$EnvironmentCustomizer classes that are defined in other modules in the current module path and invokes static sections. |
| 4 | In this method body, the export of the rxmicro.MODULE_NAME package to the rxmicro.reflection module is performed dynamically using the capabilities of the java.lang.Module class. |
Due to this additional class, all necessary settings for the JPMS are created automatically.
|
If the RxMicro framework needs additional automatic settings for its correct work, these settings will be automatically added by the |
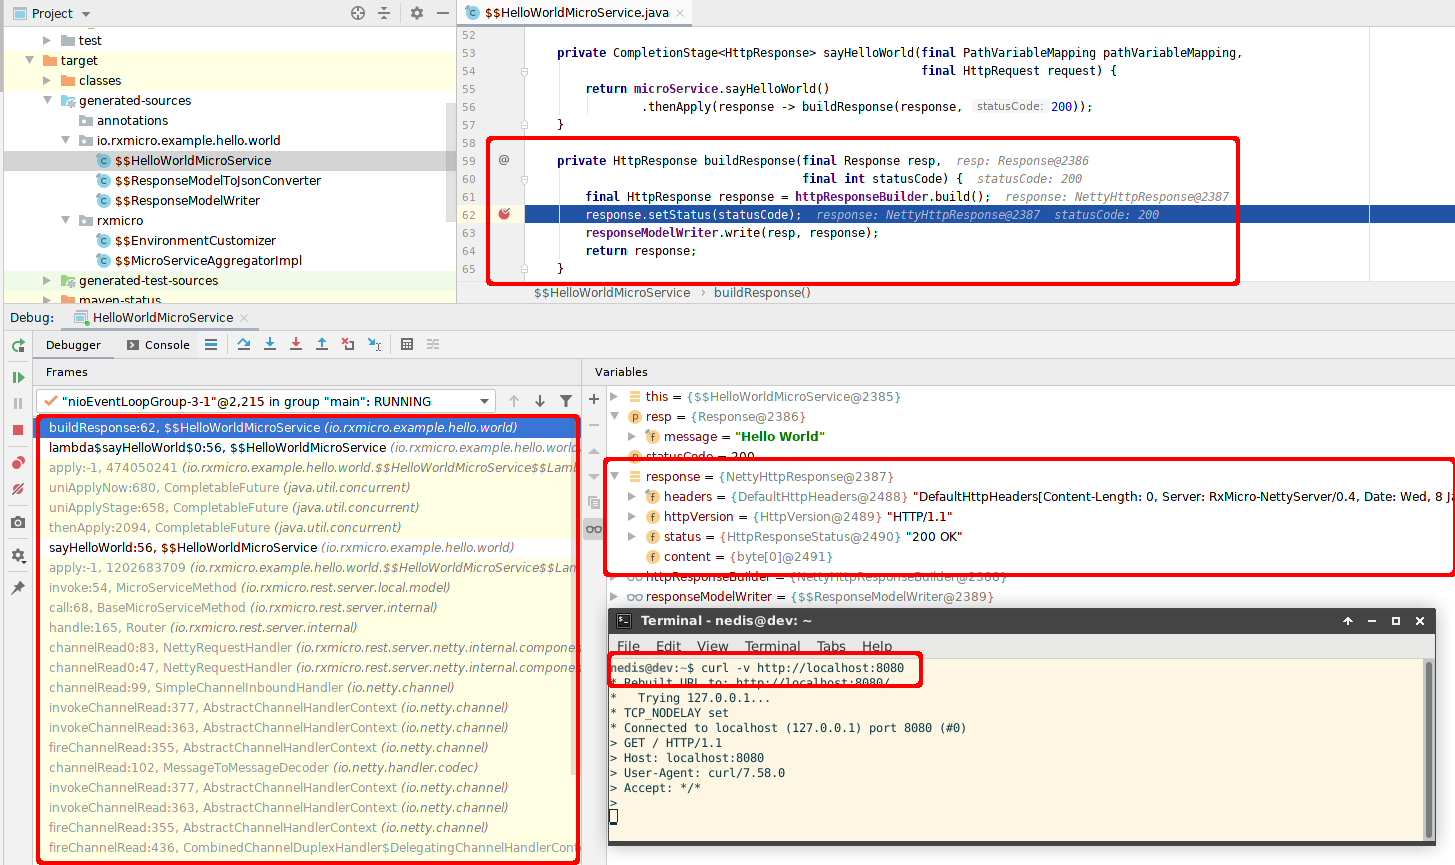
1.3. Using the Debug Mode
To get a better idea of how the RxMicro framework works, You can use the debug mode.
To do this, set breakpoints and start the microservice in debug mode.
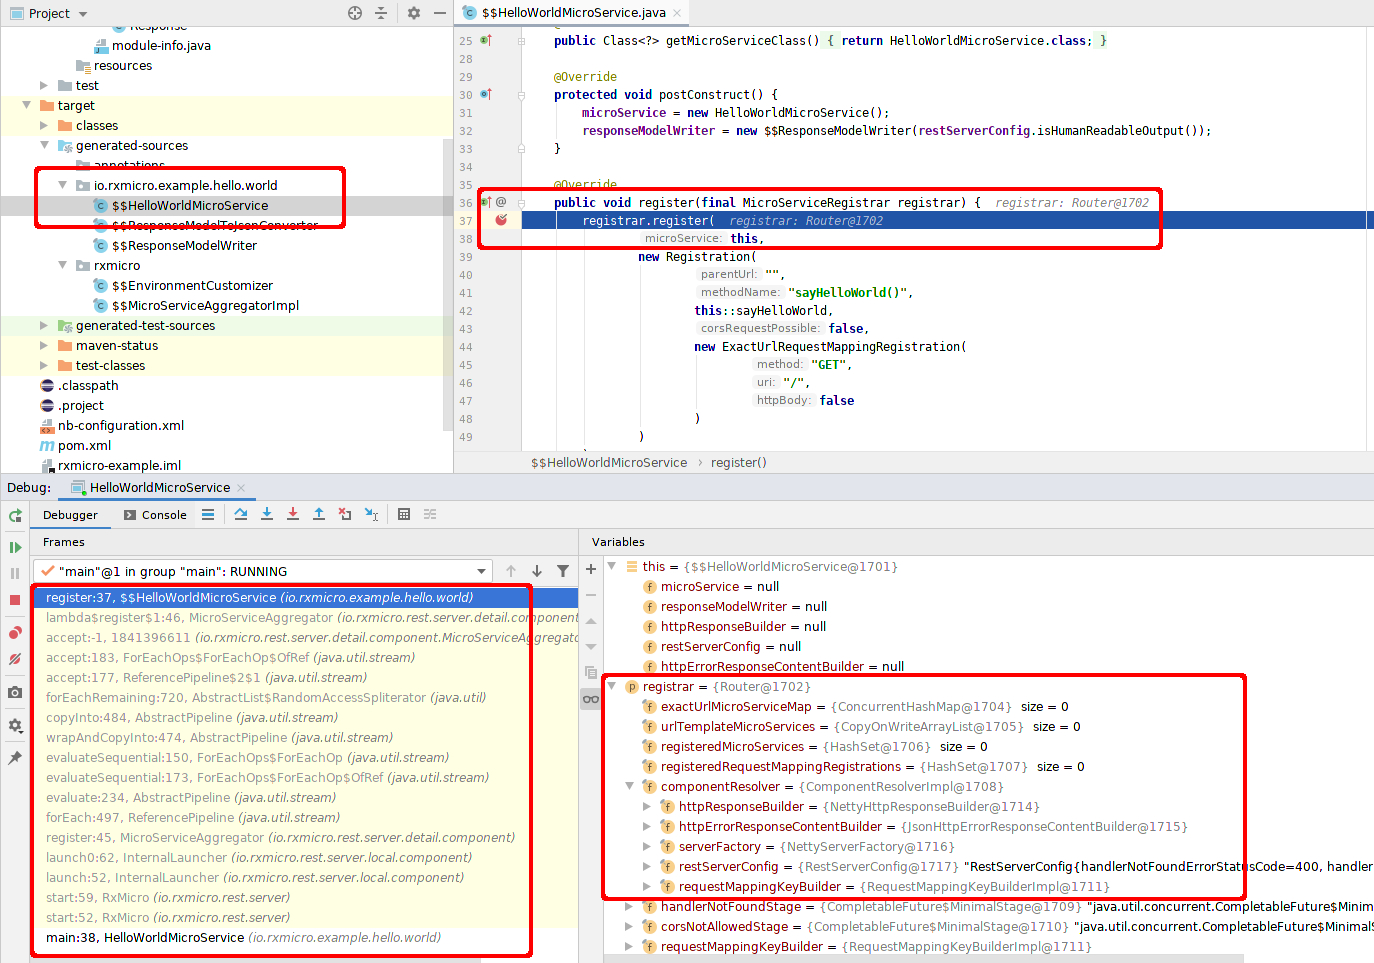
|
The code generated by the |
2. RxMicro Annotation Processor Options
The RxMicro Annotation Processor supports the following options:
| Option | Description | Type | Default value |
|---|---|---|---|
|
maximum stack size for recursive invocations when analyzing models containing JSON nested objects. |
|
|
|
|
Enum { |
|
|
the resulting directory for generated documentation. |
|
Asciidoc: |
|
the |
|
|
|
this option allows analyzing parent |
|
|
|
activates additional validation rules during compilation process. The RxMicro team strong recommends enabling the strict mode for your production code. |
|
|
These options are set using the compiler arguments in maven-compiler-plugin:
<plugin>
    <artifactId>maven-compiler-plugin</artifactId>
    <version>${maven-compiler-plugin.version}</version>
    <configuration>
        <release>11</release>
        <compilerArgs>
            <arg>-ARX_MICRO_MAX_JSON_NESTED_DEPTH=20</arg>
            <arg>-ARX_MICRO_LOG_LEVEL=INFO</arg>
            <arg>-ARX_MICRO_DOC_DESTINATION_DIR=./src/main/asciidoc</arg>
            <arg>-ARX_MICRO_BUILD_UNNAMED_MODULE=false</arg>
            <arg>-ARX_MICRO_DOC_ANALYZE_PARENT_POM=true</arg>
            <arg>-ARX_MICRO_STRICT_MODE=false</arg>
        </compilerArgs>
    </configuration>
</plugin>|
Note that it is necessary to add the The common format is as follows: |
3. Don’t Block Current Thread!
In modern computer architecture, IO operations are the slowest ones. As a result, when using multithreading programming model, the use of CPU and RAM is extremely inefficient. For a single-user monolithic application such inefficiency is imperceptible. But for a multi-user distributed application with a much higher number of IO operations, this problem generates huge financial costs for additional hardware and coordination between client data streams (Read more: C10k problem).
Therefore, the Event-driven architecture (EDA) is used for efficient use of the hardware resources of a multi-user distributed application.
The most popular Java framework that uses Event-driven architecture for IO operations is Netty. To write efficient programs using Netty, it is necessary to comply with certain rules and restrictions. The most important of these is the following requirement: Don’t block current thread!
The RxMicro framework is a framework that runs on Netty. Therefore, all requirements for applications that utilize Netty also cover the RxMicro framework.
3.1. Prohibited Operations
Consequently, when writing microservice applications based on the RxMicro framework, the following operations are prohibited:
-
Data reading from a socket or file in a blocking style using
java.io.InputStreamand child classes. -
Data writing to a socket or file in a blocking style using
java.io.OutputStreamand child classes. -
Interaction with a database using of the blocking driver (all
JDBCdrivers). -
Waiting on a lock or a monitor (
java.util.concurrent.locks.Lock,Object.wait). -
Putting the thread into sleep mode (
Thread.sleep,TimeUnit.sleep). -
Any other blocking operations.
3.2. Recommended Approach
The absence of blocking operations in the microservice allows handling many concurrent connections, using a small number of threads and, as a result, to effectively use hardware resources of the computer.
Therefore, when designing microservices via the RxMicro framework, You must follow by the following rule:
When implementing a microservice, if the result can be obtained immediately, it must be returned immediately.
Otherwise, You must return Publisher or CompletableFuture, which will generate the result later.
4. Reactive Libraries Support
The RxMicro framework supports the following reactive programming libraries:
4.1. Expected Business Process Results
When writing reactive programs, the following 4 expected results of any business process are possible:
-
It is important to complete the business process, but the result is missing or unimportant.
-
The business process returns the result in a single instance or nothing.
-
The business process returns the required result in a single instance.
-
The business process returns the result as
(0 .. n)object stream.
When writing a business service using reactive libraries, it is recommended to comply with the following agreements:
| Reactive Library | java.util.concurrent | Project Reactor | RxJava3 |
|---|---|---|---|
Without result |
CompletableFuture<Void> CompletionStage<Void> |
Mono<Void> |
Completable |
Optional result |
CompletableFuture<Optional<MODEL>> CompletionStage<Optional<MODEL>> |
Mono<MODEL> |
Maybe<MODEL> |
Required result |
CompletableFuture<MODEL> CompletionStage<MODEL> |
Mono<MODEL> |
Single<MODEL> |
Stream result |
CompletableFuture<List<MODEL>> CompletionStage<List<MODEL>> |
Flux<MODEL>, Mono<List<MODEL>> |
Flowable<MODEL>, Single<List<MODEL>> |
|
The following types of results For the Whereas for |
4.2. Recommendations for Choosing a Library
General recommendation for choosing a reactive programming library when using the RxMicro framework:
-
If Your microservice contains simple logic, You can use the lightweight and Java-provided java.util.concurrent library, represented by the
CompletableFutureclass and theCompletionStageinterface. -
If Your microservice contains more complex logic, to describe which You need to use complex operators, it is recommended to choose Project Reactor or RxJava.
-
When choosing between the Project Reactor and RxJava follow the recommendations:
-
If You are more familiar with the Project Reactor, then use it, otherwise use RxJava.
-
If You need
r2dbcbased reactive SQL repositories (rxmicro.data.sql.r2dbcmodule), then use the Project Reactor.
(Sincer2dbcdrivers already use the Project Reactor.)
-
Thus, when writing microservices via the RxMicro framework, You can use any Java reactive programming library that You prefer!
|
FYI All libraries support a blocking getting of the result: |
5. Base Model
Java applications use java.lang.Object.toString() method very often for debug purposes.
Thus a developer must override this method for all model classes in his(her) project.
To help with overriding of this method for all model classes the RxMicro framework introduces the BaseModel class.
This class uses the reflection to generate string representation of the model class on fly.
public class CustomModel extends BaseModel {

    String string;

    Integer integer;

    //...

    //toString method not necessary!
}|
The |
|
According to where But the |
6. Strings Formatting
While developing a software product it is necessary to format strings.
For this purpose, Java provides different approaches:
Mono<? extends Result> executeQuery(final Connection connection,
                                    final Long id) {
    final String sql = "SELECT * FROM account WHERE id = $1"; (1)
    SLF4J_LOGGER.info("SQL: {}", sql); (2)
    return Mono.from(connection.createStatement(sql)
            .bind(0, id)
            .execute())
            .onErrorResume(e -> Mono.error(
                    new IllegalArgumentException(
                            String.format(
                                    "SQL '%s' contains syntax error: %s", sql, e.getMessage() (3)
                            ))
                    )
            );
}| 1 | To generate an SQL query, You need to use $1 placeholder.(This placeholder depends on the used R2DBC driver. For postgresql, it’s a $1 symbol.) |
| 2 | To generate a logging message, You need to use {} placeholder.(This placeholder depends on the logging library used. For SLF4J, it’s a {} symbol.) |
| 3 | To generate an error message, You need to use %s placeholder from a separate utility class, for example
String.format. |
While writing the code, a developer can easily confuse the required placeholder.
To avoid such a problem, the RxMicro framework recommends using the universal ? placeholder
Mono<? extends Result> executeQuery(final Connection connection,
                                    final Long id) {
    final String sql = "SELECT * FROM account WHERE id = ?"; (1)
    RX_MICRO_LOGGER.info("SQL: ?", sql); (2)
    return Mono.from(connection.createStatement(sql)
            .bind(0, id)
            .execute())
            .onErrorResume(e -> Mono.error(
                    new InvalidStateException(
                            "SQL '?' contains syntax error: ?", sql, e.getMessage()) (3)
                    )
            );
}| 1 | To generate an SQL query, You need to use ? placeholder. |
| 2 | To generate a logging message, You need to use ? placeholder. |
| 3 | To generate an error message, You need to use ? placeholder. |
7. Encapsulation
When designing Java request and response models, there is a need to protect data from unauthorized modification.
7.1. A private Modifier Usage
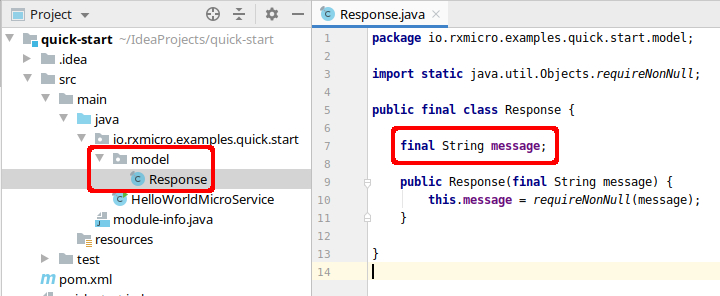
The standard solution to this problem in Java is using the private modifier:
final class Response {

    private final String message; (1)

    Response(final String message) {
        this.message = requireNonNull(message);
    }
}| 1 | By declaring the message field as private, the developer allows access to this field only from inside the class. |
To violate encapsulation principles when necessary, Java provides powerful reflection mechanism.
The RxMicro framework is aware of this mechanism, so when generating a converter, the framework uses it:
import static rxmicro.$$Reflections.getFieldValue; (1)

public final class $$ResponseModelToJsonConverter extends ModelToJsonConverter<Response> {

    @Override
    public Map<String, Object> toJsonObject(final Response model) {
        final JsonObjectBuilder builder = new JsonObjectBuilder();
        putValuesToBuilder(model, builder);
        return builder.build();
    }

    public void putValuesToBuilder(final Response model,
                                   final JsonObjectBuilder builder) {
        builder.put("message", getFieldValue(model, "message")); (2)
    }
}| 1 | Static import of method that allows reading field value with reflection. |
| 2 | Reading the value of the message field from the response model. |
Using reflection when converting from Java model to JSON model while processing each request can reduce microservice performance, where this problem can be avoided.
Therefore, when compiling this class, the RxMicro Annotation Processor generates a warning message:
[WARNING] Response.java:[27,26] PERFORMANCE WARNING: To read a value from io.rxmicro.example.hello.world.Response.message rxmicro will use the reflection.
It is recommended to add a getter or change the field modifier: from private to default, protected or public.|
If the By default the reflection usage for model classes is not allowed for strict mode! |
7.2. A Separate Package Usage
The best and recommended solution to this problem is to create a separate package (e.g. model) and declare all fields of the model classes without any access modifier (i.e. default/package).
Under this approach, fields can be accessed only from classes of the same package.
And the package contains only classes of models without any business logic:
Using model class fields without any access modifier (i.e. default/package) allows You to generate a converter that can read or write a value using direct access to the field by . operator.
7.3. A getters Usage
If the simplest logic is required when reading a value from a model field, You can use getter.
To do this, declare the field as private and add getter:
public final class Response {

    private final String message;

    public Response(final String message) {
        this.message = requireNonNull(message);
    }

    public String getMessage() {
        if (message.isEmpty()) {
            return "<Empty>";
        } else {
            return message;
        }
    }
}
In this case, getter will be used in the generated converter to get the result:
public final class $$ResponseModelToJsonConverter extends ModelToJsonConverter<Response> {

    @Override
    public Map<String, Object> toJsonObject(final Response model) {
        final JsonObjectBuilder builder = new JsonObjectBuilder();
        putValuesToBuilder(model, builder);
        return builder.build();
    }

    public void putValuesToBuilder(final Response model,
                                   final JsonObjectBuilder builder) {
        builder.put("message", model.getMessage()); (1)
    }
}| 1 | getter invoking to get the value of the response model field. |
7.4. Performance Comparison
Performance test source code:
@Warmup(iterations = 5)
@Measurement(iterations = 5)
@Fork(value = 2, jvmArgsAppend = "-server")
@BenchmarkMode({
        Mode.Throughput,
        Mode.AverageTime,
        Mode.SingleShotTime
})
@State(Scope.Benchmark)
@OutputTimeUnit(MILLISECONDS)
@Threads(1)
public class ReadWriteFieldBenchmark {

    private final CustomClass customClass = new CustomClass("text");

    private final Map<Class<?>, Map<String, Field>> cache = new HashMap<>();

    public ReadWriteFieldBenchmark() {
        try {
            final Field field = CustomClass.class.getDeclaredField("value");
            if (!field.canAccess(customClass)) {
                field.setAccessible(true);
            }
            cache.put(CustomClass.class, new HashMap<>(Map.of("value", field)));
        } catch (final NoSuchFieldException e) {
            throw new RuntimeException(e);
        }
    }

    @Benchmark
    public void readDirectField() {
        var v = customClass.value;
    }

    @Benchmark
    public void writeDirectField() {
        customClass.value = "string";
    }

    @Benchmark
    public void readUsingGetter() {
        var v = customClass.getValue();
    }

    @Benchmark
    public void writeUsingSetter() {
        customClass.setValue("string");
    }

    @Benchmark // read field value using reflection with field search at the cache
    public void readUsingReflection() throws IllegalAccessException {
        var v = cache.get(CustomClass.class).get("value").get(customClass);
    }

    @Benchmark // write field value using reflection with field search at the cache
    public void writeUsingReflection() throws IllegalAccessException {
        cache.get(CustomClass.class).get("value").set(customClass, "string");
    }
}
Performance test results:
Benchmark                                       Mode  Cnt       Score       Error   Units
ReadWriteFieldBenchmark.readDirectField         thrpt   10  753348.188 ± 90286.947  ops/ms
ReadWriteFieldBenchmark.readUsingGetter         thrpt   10  764112.155 ± 94525.371  ops/ms
ReadWriteFieldBenchmark.readUsingReflection     thrpt   10   26241.478 ±  3838.172  ops/ms
ReadWriteFieldBenchmark.writeDirectField        thrpt   10  344623.904 ± 18961.759  ops/ms
ReadWriteFieldBenchmark.writeUsingReflection    thrpt   10   19430.735 ±  2135.813  ops/ms
ReadWriteFieldBenchmark.writeUsingSetter        thrpt   10  323596.205 ± 28416.707  ops/ms
ReadWriteFieldBenchmark.readDirectField          avgt   10      ≈ 10⁻⁶               ms/op
ReadWriteFieldBenchmark.readUsingGetter          avgt   10      ≈ 10⁻⁶               ms/op
ReadWriteFieldBenchmark.readUsingReflection      avgt   10      ≈ 10⁻⁴               ms/op
ReadWriteFieldBenchmark.writeDirectField         avgt   10      ≈ 10⁻⁶               ms/op
ReadWriteFieldBenchmark.writeUsingReflection     avgt   10      ≈ 10⁻⁴               ms/op
ReadWriteFieldBenchmark.writeUsingSetter         avgt   10      ≈ 10⁻⁶               ms/op
ReadWriteFieldBenchmark.readDirectField            ss   10       0.001 ±     0.001   ms/op
ReadWriteFieldBenchmark.readUsingGetter            ss   10       0.001 ±     0.001   ms/op
ReadWriteFieldBenchmark.readUsingReflection        ss   10       0.008 ±     0.005   ms/op
ReadWriteFieldBenchmark.writeDirectField           ss   10       0.002 ±     0.001   ms/op
ReadWriteFieldBenchmark.writeUsingReflection       ss   10       0.011 ±     0.008   ms/op
ReadWriteFieldBenchmark.writeUsingSetter ss 10 0.001 ± 0.001 ms/op|
Test results show that reading/writing by a direct reference or via |
7.5. Approach Selection Recommendations
|
Thus, the RxMicro framework uses the following algorithm to read (write) from the fields of the Java model:
|
To benefit from the encapsulation advantages when designing microservices via the RxMicro framework, follow the recommendations:
When creating request and response models, use a separate package and default/package access modifier!
If the simplest logic of reading (writing) the value of the model field is required, use getter (setter) and
private field access modifier.
Do not use the private modifier to access the model field without getter (setter)!
This approach offers no benefits!
|
If the By default the reflection usage for model classes is not allowed for strict mode! |
8. Configuration
The RxMicro framework provides the rxmicro.config module for flexible configuration of microservices to any environment.
This module provides the following features:
-
Support for different types of configuration sources: files, classpath resources, environment variables, command line arguments, etc.;
-
Inheritance and redefinition of settings from different configuration sources;
-
Changing the order in which the configuration sources are read;
-
Configuration using annotations and Java classes.
8.1. Basic Structure of the Config Module
Each class that extends the
Config
abstract class is a configuration class.
Each configuration class defines its own namespace. Each namespace clearly defines the corresponding configuration class. The namespace is necessary to set the settings of the configuration class fields in text form. (Further details will be described below.)
To work with configurations, the RxMicro framework provides the
Configs configuration manager.
To read the current settings, You must use the
Configs.getConfig(Class<T>) method:
public final class ReadConfigMicroService {

    @GET("/")
    void readHttpServerPort() {
        final HttpServerConfig config = getConfig(HttpServerConfig.class); (1)
        System.out.println("HTTP server port: " + config.getPort());
    }

    public static void main(final String[] args) {
        startRestServer(ReadConfigMicroService.class);
    }
}| 1 | Getting the current HTTP server configuration using the Configs.getConfig static method. |
To change the standard configuration settings, You must use the
Configs.Builder class:
public final class CustomizeConfigMicroService {

    @GET("/")
    void test() {
        // do something
    }

    public static void main(final String[] args) {
        new Configs.Builder()
                .withConfigs(new HttpServerConfig()
                        .setPort(9090)) (1)
                .build(); (2)
        startRestServer(CustomizeConfigMicroService.class); (3)
    }
}| 1 | Setting the HTTP server custom port. |
| 2 | Creating the configuration manager object. |
| 3 | REST-based microservice should be started after configuration manager settings, otherwise changes will not take effect. |
|
Each subsequent invocation of the It means that if the developer creates several |
|
The project source code used in the current subsection is available at the following link: |
|
When compiling, the RxMicro framework searches for When changing the |
|
Settings customization via the |
8.2. Configuration Types
The RxMicro framework supports the following configuration types:
-
Configuration using
classpathresources. -
Configuration using
propertiesfiles. -
Configuration using environment variables.
-
Configuration using Java system properties.
-
Configuration using Java classes.
-
Configuration using Java annotations.
-
Configuration using command line arguments.
8.2.1. Configuration Using classpath Resources.
The RxMicro framework supports shared and separate classpath resources for the external configuration in relation to the microservice source code.
The only supported classpath resource format is the properties file format.
8.2.1.1. Configuration Using Separate classpath Resource.
If the classpath of the current project contains the http-server.properties resource with the following content:
port=9090 (1)| 1 | Custom port for HTTP server. |
then the RxMicro framework when reading the HttpServerConfig class configuration will read this resource:
2020-01-11 12:44:27.518 [INFO] io.rxmicro.rest.server.netty.internal.component.NettyServer :
Server started at 0.0.0.0:9090 using NETTY transport in 500 millis. (1)| 1 | The HTTP server has started at the 9090 port instead of the standard 8080 port. |
|
The The default namespace for the configuration class is calculated using the
|
8.2.1.2. Configuration Using Shared classpath Resource.
If the classpath of the current project contains the rxmicro.properties resource with the following content:
http-server.port=9090 (1)| 1 | Custom port for HTTP server. |
then the RxMicro framework when reading the HttpServerConfig class configuration will read this resource:
2020-01-11 12:44:27.518 [INFO] io.rxmicro.rest.server.netty.internal.component.NettyServer :
Server started at 0.0.0.0:9090 using NETTY transport in 500 millis. (1)| 1 | The HTTP server has started at the 9090 port instead of the standard 8080 port. |
|
The The |
Since the rxmicro.properties resource is a shared resource for any configuration, You must specify a namespace when specifying the settings.
|
That’s why when specifying the HTTP server port, You should specify the That means instead of |
8.2.2. Configuration Using properties Files.
Similar to classpath resources, the RxMicro framework also supports shared and separate properties files for the external configuration in relation to the microservice source code.
Configuration files can be located:
-
in the current directory in relation to the microservice;
-
in the
$HOMEdirectory:-
for Linux platform the
$HOMEdirectory is/home/$USERNAME; -
for MacOS platform the
$HOMEdirectory is/Users/$USERNAME; -
for Windows platform the
$HOMEdirectory isC:\Documents and Settings\%USERNAME%orC:\Users\%USERNAME%.
-
-
in the default rxmicro config directory:
$HOME/.rxmicro/(predefined name and location).
(Using$HOME/.rxmicro/directory instead of$HOMEone allows configuring this directory as docker or kubernetes volume.)
|
To find out the location of the |
By default, the function of searching and reading configuration files is disabled in the RxMicro framework!
To activate this function, You must use the Configs.Builder class:
new Configs.Builder()
        .withAllConfigSources() (1)
.build();| 1 | Activation of all available configuration sources for the current microservice. |
|
Besides activating all available sources, it is possible to activate only configuration files in a given location. For details on how to do this, go to the Section 8.3.2, “Custom Reading Order of Config Sources.”. |
8.2.2.1. Configuration Using Separate properties File.
If the current directory (or $HOME, or $HOME/.rxmicro/) directory contains the http-server.properties file with the following content
port=9090 (1)| 1 | Custom port for HTTP server. |
then the RxMicro framework when reading the HttpServerConfig class configuration will read this file:
2020-01-11 12:44:27.518 [INFO] io.rxmicro.rest.server.netty.internal.component.NettyServer :
Server started at 0.0.0.0:9090 using NETTY transport in 500 millis. (1)| 1 | The HTTP server has started at the 9090 port instead of the standard 8080 port. |
|
The The default namespace for the configuration class is calculated using the
|
8.2.2.2. Configuration Using Shared properties File.
If the current directory (or $HOME, or $HOME/.rxmicro/) directory contains the rxmicro.properties file with the following content
http-server.port=9090 (1)| 1 | Custom port for HTTP server. |
then the RxMicro framework when reading the HttpServerConfig class configuration will read this resource:
2020-01-11 12:44:27.518 [INFO] io.rxmicro.rest.server.netty.internal.component.NettyServer :
Server started at 0.0.0.0:9090 using NETTY transport in 500 millis. (1)| 1 | The HTTP server has started at the 9090 port instead of the standard 8080 port. |
|
The The |
Since the rxmicro.properties file is a shared file for any configuration, You must specify a namespace when specifying the settings.
|
That’s why when specifying the HTTP server port, You should specify the That means instead of |
8.2.3. Configuration Using Environment Variables.
When using environment variables, the format of configurations matches the following format:
export ${name-space}.${property-name} = ${value}:
export http-server.port=9090 (1)

java -p ./classes:lib -m examples.quick.start/io.rxmicro.examples.quick.start.HelloWorldMicroService
2020-01-02 18:49:58.372 [INFO] io.rxmicro.rest.server.netty.internal.component.NettyServer :
Server started at 0.0.0.0:9090 using NETTY transport in 500 millis. (2)| 1 | Setting the http-server.port environment variable = 9090 (custom port for HTTP server). |
| 2 | The HTTP server has started at the 9090 port instead of the standard 8080 port. |
|
Thus, the format of configurations using environment variables corresponds to the format of |
|
Allowed characters in environment variable names! From The Open Group: These strings have the form name=value; names shall not contain the character '='. For values to be portable across systems conforming to IEEE Std 1003.1-2001, the value shall be composed of characters from the portable character set (except NUL and as indicated below). So names may contain any character except Environment variable names used by the utilities in the Shell and Utilities volume of IEEE Std 1003.1-2001 consist solely of uppercase letters, digits, and the '' (underscore) from the characters defined in Portable Character Set and do not begin with a digit. Other characters may be permitted by an implementation; applications shall tolerate the presence of such names._ So for such restricted environment the RxMicro framework supports the following format for environment variable mapping as well:
|
Configuring with environment variables is very convenient when using docker containers!
|
To protect Your secret data, use configuration via properties files instead of environment variables.
The config directory with secret config files (for example |
If it is necessary to separate environment variables used for the configuration of the RxMicro environment from other environment variables,
You must define the standard environment variable with name RX_MICRO_CONFIG_ENVIRONMENT_VARIABLE_PREFIX!
For example if You runtime contains the following environment variable RX_MICRO_CONFIG_ENVIRONMENT_VARIABLE_PREFIX=MY_RUNTIME_
than it is necessary to use
export MY_RUNTIME_HTTP_SERVER_PORT=9090instead of
export HTTP_SERVER_PORT=9090setting for configuring a port for the HTTP server!
8.2.4. Configuration Using Java System Properties
When using the Java System Properties, the format of configurations matches the following format:
${name-space}.${property-name} = ${value}:
java -p ./classes:lib \
    -Dhttp-server.port=9090 \ (1)
    -m examples.quick.start/io.rxmicro.examples.quick.start.HelloWorldMicroService

2020-01-02 18:49:58.372 [INFO] io.rxmicro.rest.server.netty.internal.component.NettyServer :
Server started at 0.0.0.0:9090 using NETTY transport in 500 millis. (2)| 1 | Setting the http-server.port Java system variable = 9090 (custom port for HTTP server). |
| 2 | The HTTP server has started at the 9090 port instead of the standard 8080 port. |
|
Thus, the format of configurations using Java system variables corresponds to the format of configuration using environment variables, and also to the format of |
8.2.5. Configuration Using Java Classes.
Configuring with Java classes is the easiest and most explicit configuration method:
public static void main(final String[] args) {
    new Configs.Builder()
            .withConfigs(new HttpServerConfig()
                    .setPort(9090)) (1)
            .build();
    startRestServer(MicroService.class);
}| 1 | Changing the HTTP server port. |
2020-01-02 18:49:58.372 [INFO] io.rxmicro.rest.server.netty.internal.component.NettyServer :
Server started at 0.0.0.0:9090 using NETTY transport in 500 millis. (1)| 1 | The HTTP server has started at the 9090 port instead of the standard 8080 port. |
|
The main difference between this type of configuration and the others is that when using Java classes, other configuration sources are always ignored! |
Therefore this type is recommended to be used ONLY for test purposes!
(It does not have enough flexibility for the production environment!)
For the production environment, use the configuration with annotations instead of the configuration with Java classes!
8.2.6. Configuration Using Java Annotations.
To override the default value, the RxMicro framework provides the
@DefaultConfigValue annotation.
@DefaultConfigValue(
        configClass = HttpServerConfig.class,   (1)
        name = "port",                          (2)
        value = "9090"
)
@DefaultConfigValue(
        name = "http-server.host",  (3)
        value = "localhost"
)
module examples.config.annotations { (4)
    requires rxmicro.rest.server.netty;
    requires rxmicro.rest.server.exchange.json;
}| 1 | When overriding the configuration value, You must specify the configuration class. |
| 2 | If the configuration class is specified, the namespace may not be specified. (It means the field of the specified configuration class.) |
| 3 | If no configuration class is specified, the name must contain a namespace. (The namespace allows You to clearly define to which configuration class the specified setting belongs.) |
| 4 | When configuring a microservice project, the annotation must be specified on the module-info.java descriptor.(A microservice project may contain several classes of REST controllers, so the common settings are configured using the module-info.java descriptor rather than the REST controller class.) |
|
Please, pay attention when overriding the default value with the annotations! If You make a mistake when specifying a setting name (this refers to the namespace and field name), no error will occur upon starting! The overridden value will be simply ignored! |
By overriding the default values using the module-info.java descriptor, You can start the microservice.
While reading the configuration of the HttpServerConfig class, the RxMicro framework reads the default values set with annotations:
2020-01-13 13:09:44.236 [INFO] io.rxmicro.rest.server.netty.internal.component.NettyServer :
Server started at localhost:9090 using NETTY transport in 500 millis. (1)| 1 | HTTP server started on localhost:9090 |
|
The project source code used in the current subsection is available at the following link: |
|
The main difference between configuring with annotations and configuring with Java classes is support of the settings inheritance and overriding. In other words, when using configuration via annotations, the RxMicro framework can also read other configuration sources. When using configuration via Java classes, other configuration sources are always ignored. |
|
For the test environment only, the RxMicro framework provides special The source code of the project using the |
@DefaultConfigValue
annotation can be applied to override primitive values only:
-
strings, -
booleans, -
numbers, -
dates, -
times, -
enums.
If You need to override a complex value, it is necessary to use
@DefaultConfigValueSupplier
annotation instead.
|
The source code of the project using the
|
|
When compiling, the RxMicro framework searches for When changing the |
8.2.7. Configuration Using Command Line Arguments.
To override configs You can use command line arguments.
This type of configuration has the highest priority and overrides all other types. (Except of configuration using Java classes.)
Configuration using command line arguments is disabled by default.
To enable it is necessary to configure the
Configs configuration manager:
public static void main(final String[] args) {
    new Configs.Builder()
            .withCommandLineArguments(args) (1)
            .build();
    startRestServer(MicroService.class);
}| 1 | Use withCommandLineArguments(args) method to enable the configuration using command line arguments. |
For example, If You want to start HTTP server at 9191 port, You can pass the following command line argument:
java -p ./classes:lib -m examples.quick.start/io.rxmicro.examples.quick.start.HelloWorldMicroService http-server.port=9191Result:
2020-01-02 18:49:58.372 [INFO] io.rxmicro.rest.server.netty.internal.component.NettyServer :
Server started at 0.0.0.0: 9191 using NETTY transport in 500 millis.
8.3. Config Sources Setting
The RxMicro framework allows You to customize the order in which the configuration sources are read.
With this feature, the RxMicro framework automatically supports inheritance and redefinition of launch configurations.
8.3.1. Default Reading Order of Config Sources.
By default, the RxMicro framework reads configuration sources in the following order:
-
Configuration using
@DefaultConfigValueannotations; -
Configuration using the
rxmicro.propertiesclasspath resource; -
Configuration using the separate (
${name-space}.properties) classpath resource; -
Configuration using environment variables;
-
Configuration using Java system variables;
Thus, if there are two classpath resources for a microservice:
The rxmicro.properties resource with the following content:
http-server.port=9090
http-server.host=localhost
and the http-server.properties resource with the following content:
port=9876then the result will be as follows:
2020-01-11 16:52:26.797 [INFO] io.rxmicro.rest.server.netty.internal.component.NettyServer :
Server started at localhost:9876 using NETTY transport in 500 millis. (1)| 1 | HTTP server has started at localhost:9876. |
The configuration reading algorithm for the above example is as follows:
-
By default, the HTTP server should start at
0.0.0.0:8080. -
But in the
rxmicro.propertiesclasspath resource there is a different IP address and port:localhost:9090. -
If the
http-server.propertiesclasspath resource had not existed, the HTTP server would have run atlocalhost:9090. -
But in the
http-server.propertiesclasspath resource it is specified the9876port. -
Therefore, when starting, the IP address is inherited from the
rxmicro.propertiesresource and the overridden port value is read from thehttp-server.propertiesresource.
(This behavior corresponds to the order of reading the default configurations.)
8.3.2. Custom Reading Order of Config Sources.
To change the order of the configuration reading it is necessary to use the
Configs.Builder.withOrderedConfigSources(ConfigSource…) method:
public static void main(final String[] args) {
    new Configs.Builder()
            .withOrderedConfigSources(
                    SEPARATE_CLASS_PATH_RESOURCE, (1)
                    RXMICRO_CLASS_PATH_RESOURCE   (2)
            )
            .build();
    startRestServer(MicroService.class);
}| 1 | First, it is necessary to read the configuration from the ${name-space}.properties classpath resource (In our case, it’s a http-server.properties) |
| 2 | and then from the rxmicro.properties classpath resource. |
Thus, the order of the configuration reading from classpath resources has been changed in comparison with the default order.
When starting the microservice, the settings from the http-server.properties classpath resource will be overwritten by the settings from the rxmicro.properties classpath resource:
2020-01-11 16:52:26.797 [INFO] io.rxmicro.rest.server.netty.internal.component.NettyServer :
Server started at localhost:9090 using NETTY transport in 500 millis. (1)| 1 | HTTP server has started at localhost:9090. |
|
The
In the above example, the RxMicro framework will ignore any configuration sources except classpath resources! |
The
Configs.Builder.withOrderedConfigSources(ConfigSource…)
method is universal.
The RxMicro framework also provides other additional methods:
-
Configs.Builder.withAllConfigSources()- activation of all configuration types in the order given by the list:ConfigSource -
Configs.Builder.withContainerConfigSources()- this combination is recommended for microservices operating in docker or kubernetes.
|
The
If You plan to use only
The order of reading is set by the argument order of the
|
|
If You know exactly which configuration sources should be used by the microservice, ALWAYS specify them explicitly! With this approach, at the microservice starting, the RxMicro framework won’t try to search for non-existent sources, spending precious microseconds! |
8.3.3. Logging the Config Reading Process
To debug the configuration reading process You can activate the logger:
.level=INFO
io.rxmicro.config.level=DEBUG (1)| 1 | For all classes and subpackages of the io.rxmicro.config package activate the DEBUG(FINE) logging level. |
After activating the logger, the start of the microservice with default settings will be as follows:
[DEBUG] Discovering properties for 'rest-server' namespace from sources: [DEFAULT_CONFIG_VALUES, RXMICRO_CLASS_PATH_RESOURCE, SEPARATE_CLASS_PATH_RESOURCE, ENVIRONMENT_VARIABLES, JAVA_SYSTEM_PROPERTIES]

[DEBUG] Classpath resource not found: rest-server.properties

[DEBUG] All properties discovered for 'rest-server' namespace (1)

[DEBUG] Discovering properties for 'http-server' namespace from sources: [DEFAULT_CONFIG_VALUES, RXMICRO_CLASS_PATH_RESOURCE, SEPARATE_CLASS_PATH_RESOURCE, ENVIRONMENT_VARIABLES, JAVA_SYSTEM_PROPERTIES]

[DEBUG] Discovered properties from 'rxmicro.properties' classpath resource: [http-server.port=9090, http-server.host=localhost] (2)

[DEBUG] Discovered properties from 'http-server.properties' classpath resource: [port=9876] (3)

[DEBUG] All properties discovered for 'http-server' namespace

[DEBUG] Discovering properties for 'netty-rest-server' namespace from sources: [DEFAULT_CONFIG_VALUES, RXMICRO_CLASS_PATH_RESOURCE, SEPARATE_CLASS_PATH_RESOURCE, ENVIRONMENT_VARIABLES, JAVA_SYSTEM_PROPERTIES]

[DEBUG] Classpath resource not found: netty-rest-server.properties

[DEBUG] All properties discovered for 'netty-rest-server' namespace (4)

[INFO] Server started at 0.0.0.0:9876 using NETTY transport in 500 millis. (5)| 1 | There is no configuration customization for the rest-server namespace, so the default configuration will be used. |
| 2 | Configuration reading for the http-server namespace from the rxmicro.properties classpath resource (Read values: http-server.port=9090, http-server.host=localhost). |
| 3 | Configuration reading for the http-server namespace from the http-server.properties classpath resource (Read value: port=9876). |
| 4 | There is no configuration customization for the netty-rest-server namespace, so the default configuration will be used. |
| 5 | HTTP server has started at localhost:9876. |
Additional debugging information will show the order of reading the configuration sources and overriding the configuration parameter values!
8.4. Dynamic Configuration
If Your runtime environment can contain dynamic properties You can use AsMapConfig configuration:
public final class DynamicAsMapConfig extends AsMapConfig {
}
If the rxmicro.properties classpath resource with the following content exists:
dynamic.bigDecimal=3.1423456676
dynamic.bigInteger=9999999999999999999999999999999999999999999999999
dynamic.boolean=true
dynamic.integer=34
dynamic.string=staging
then the following code will return configured dynamic parameters:
public static void main(final String[] args) {
    final DynamicAsMapConfig config = getConfig(DynamicAsMapConfig.class);

    System.out.println(config.getBigDecimal("bigDecimal"));
    System.out.println(config.getBigInteger("bigInteger"));
    System.out.println(config.getBoolean("boolean"));
    System.out.println(config.getInteger("integer"));
    System.out.println(config.getString("string"));
}
8.5. User Defined Configurations
The developer can use the configuration module for custom configurations.
To do this, it is necessary to create a separate class:
public final class BusinessServiceConfig extends Config {

    private boolean production = true;

    public boolean isProduction() {
        return production;
    }

    public BusinessServiceConfig setProduction(final boolean production) {
        this.production = production;
        return this;
    }
}|
The custom configuration class must meet the following requirements: |
Since this class will be created and initialized by the reflection util classes from rxmicro.reflection module automatically, it is necessary to export the package of the custom config class to this module in the module-info.java descriptor.
(These are the JPMS requirements.)
module examples.config.custom {
    requires rxmicro.rest.server.netty;
    requires rxmicro.rest.server.exchange.json;

    exports io.rxmicro.examples.config.custom to
            rxmicro.reflection;  (1)
}| 1 | Allow the access of reflection util classes from rxmicro.reflection module to config classes from the io.rxmicro.example.config.custom package. |
After these changes, a class of custom configurations is available for use:
final class MicroService {

    @GET("/")
    void test() {
        final BusinessServiceConfig config = getConfig(BusinessServiceConfig.class);
        System.out.println("Production: " + config.isProduction());
    }
}
The production flag can now be set using any type of configuration, for example using the classpath of the business-service.properties resource:
production=false|
The project source code used in the current subsection is available at the following link: |
|
When compiling, the RxMicro framework searches for When changing the |
8.6. Supported Parameter Types
The RxMicro framework supports the primitive, custom and container types, which can be config parameters for any configuration.
8.6.1. Supported Primitive Parameter Types
The RxMicro framework supports the following primitive Java types:
-
? extends Enum<?>; -
boolean; -
java.lang.Boolean; -
byte; -
java.lang.Byte; -
short; -
java.lang.Short; -
int; -
java.lang.Integer; -
long; -
java.lang.Long; -
java.math.BigInteger; -
float; -
java.lang.Float; -
double; -
java.lang.Double; -
java.math.BigDecimal; -
char; -
java.lang.Character; -
java.lang.CharSequence; -
java.lang.String; -
java.time.Instant; -
java.time.LocalDate; -
java.time.LocalDateTime; -
java.time.LocalTime; -
java.time.MonthDay; -
java.time.OffsetDateTime; -
java.time.OffsetTime; -
java.time.Year; -
java.time.YearMonth; -
java.time.ZonedDateTime; -
java.time.Duration; -
java.time.ZoneOffset; -
java.time.ZoneId; -
java.time.Period; -
java.nio.file.Path;
|
For temporal classes the RxMicro framework uses |
8.6.2. Supported Custom Parameter Types
The RxMicro framework supports a custom type as valid config parameter type.
For example if Your project contain the following custom type:
public interface CustomType {

    String getValue();
}
then Your custom config class can use this type as valid config parameter type:
public final class ExampleConfig extends Config {

    private CustomType type = () -> "DEFAULT_CONSTANT";

    public CustomType getType() {
        return type;
    }

    public void setType(final CustomType type) {
        this.type = type;
    }
}
Instances of the custom type can be created as:
-
Enum constant:
public enum CustomEnum implements CustomType {

    ENUM_CONSTANT;

    @Override
    public String getValue() {
        return "ENUM_CONSTANT";
    }
}-
Class
public static finalconstant:
public class CustomClass {

    public static final CustomType CLASS_CONSTANT = () -> "CLASS_CONSTANT";
}-
Interface constant:
public interface CustomInterface {

    CustomType INTERFACE_CONSTANT = () -> "INTERFACE_CONSTANT";
}-
Annotation constant:
public @interface CustomAnnotation {

    CustomType ANNOTATION_CONSTANT = () -> "ANNOTATION_CONSTANT";
}
To inform the RxMicro framework which instance must be created and injected to config parameter, it is necessary to use the following syntax:
@${FULL_CLASS_NAME}:${CONSTANT_FIELD_NAME}For example if Your environment contains the following Java system properties:
System.setProperty(
        "enum-constant.type",
        "@io.rxmicro.examples.config.custom.type._enum.CustomEnum:ENUM_CONSTANT"
);
System.setProperty(
        "class-constant.type",
        "@io.rxmicro.examples.config.custom.type._class.CustomClass:CLASS_CONSTANT"
);
System.setProperty(
        "interface-constant.type",
        "@io.rxmicro.examples.config.custom.type._interface.CustomInterface:INTERFACE_CONSTANT"
);
System.setProperty(
        "annotation-constant.type",
        "@io.rxmicro.examples.config.custom.type._annotation.CustomAnnotation:ANNOTATION_CONSTANT"
);
and Your application read configuration for all configured namespaces:
System.out.println(
        "Default constant: " +
                getConfig(ExampleConfig.class).getType().getValue()
);
System.out.println(
        "Enum constant: " +
                getConfig("enum-constant", ExampleConfig.class).getType().getValue()
);
System.out.println(
        "Class constant: " +
                getConfig("class-constant", ExampleConfig.class).getType().getValue()
);
System.out.println(
        "Interface constant: " +
                getConfig("interface-constant", ExampleConfig.class).getType().getValue()
);
System.out.println(
        "Annotation constant: " +
                getConfig("annotation-constant", ExampleConfig.class).getType().getValue()
);
Result will be the following:
Default constant: DEFAULT_CONSTANT
Enum constant: ENUM_CONSTANT
Class constant: CLASS_CONSTANT
Interface constant: INTERFACE_CONSTANT
Annotation constant: ANNOTATION_CONSTANT|
For class or interface or annotation constants the RxMicro framework uses the The RxMicro team recommends using an enum for custom type injection to config instances! |
8.6.3. Supported Container Parameter Types
The RxMicro framework supports the following container Java types:
-
java.util.List<V>; -
java.util.Set<V>; -
java.util.SortedSet<V>; -
java.util.Map<K, V>;
where K and V can be:
-
java.lang.Boolean; -
java.lang.Long; -
java.math.BigDecimal; -
java.lang.String; -
CUSTOM_TYPE.
|
The RxMicro framework uses |
The RxMicro framework uses reflection to initialize config instances.
But container parametrization types are not available for the reflection reading.
Thus the RxMicro framework tries to guess which type must be created using the following algorithm:
-
Try to convert to
java.lang.Booleantype. If failed then goto2step. -
Try to convert to
java.math.BigDecimaltype. If failed then goto3step. -
Try to convert to
java.lang.Longtype. If failed then goto4step. -
Try to convert to
CUSTOM_TYPE. If failed then goto5step. -
Return
java.lang.Stringinstance.
This means that if You provide a config list with different types, the RxMicro framework create a java.util.List with different types:
For example:
list=red,1.2,4,truethe result will be:
java.util.List.of(new String("red"), new BigDecimal("1.2"), Long.valueOf(4), Boolean.valueOf(true));and the ClassCastException will be thrown if Your config parameter is not of java.util.List<java.lang.Object> type.
To avoid the ClassCastException use the following recommendation:
-
For
booleanlists usejava.util.List<java.lang.Boolean>type. -
For
integer numberlists usejava.util.List<java.lang.Long>type. -
For
decimal numberlists usejava.util.List<java.math.BigDecimal>type. -
For
stringlists usejava.util.List<java.lang.String>type. -
For
custom typelists usejava.util.List<CUSTOM_TYPE>type.
|
DON’T USE ANY OTHER TYPES FOR COLLECTION PARAMETRIZATION! |
8.7. Configuration Verifiers
If Your runtime has complex configuration the RxMicro team strong recommends enabling runtime strict mode.
If the runtime strict mode activated the RxMicro runtime invokes additional checks to find unused or redundant configurations.
To enable the runtime strict mode set RX_MICRO_RUNTIME_STRICT_MODE environment variable to the true value!
(Instead of environment variable You can use Java System property as well.)
If runtime strict mode successful activated the following log message can be found:
[INFO] RxMicroRuntime !!! RxMicro Runtime Strict Mode is activated !!!9. Logger
Logger is an integral component of any software system.
The RxMicro framework provides the rxmicro.logger module for logging important events during the work of microservices.
Creation and usage of a logger in the source code is no different from other logging frameworks:
final class MicroService {

    private static final Logger LOGGER = LoggerFactory.getLogger(MicroService.class); (1)

    @GET("/")
    void test() {
        LOGGER.info("test message"); (2)
    }
}| 1 | Logger creation for the current microservice class. |
| 2 | Logging of a message with INFO level. |
The Logger interface is an abstraction over the real logger.
At the moment, there is only one implementation of this interface that delegates logging to the
java.logging module.
9.1. Logger Configuration
9.1.1. Using Configuration File
The main configuration file of the java.logging logger is the jul.properties classpath resource.
|
If classpath contains the This function allows configuring the logger for a test environment. |
The jul.properties classpath resource must contain a configuration in the standard format for the java.logging module.
Example of logger configuration:
.level=INFO
io.rxmicro.config.level=DEBUG|
The Therefore, in the This option makes it possible to use unsupported but widely used in other logging frameworks logging levels for the |
9.1.2. Default Reading Order of Config Sources.
By default, the rxmicro.logger module reads configuration sources in the following order (From the lowest to the highest priority):
-
Default config.
-
Configuration from the
jul.propertiesclasspath resource if the resource found. -
Configuration from the
jul.test.propertiesclasspath resource if the resource found.
9.1.3. Using Additional Config Sources for Logging Configuration
Besides jul.properties and jul.test.properties classpath resources the rxmicro.logger module supports the following configuration sources:
-
Configuration using environment variables;
-
Configuration using Java system properties;
-
Configuration using properties file that is located at the following paths:
-
./jul.properties; -
$HOME/jul.properties; -
$HOME/.rxmicro/jul.properties;
-
|
where
|
To enable the additional config sources use the
LoggerConfigSources class:
(1)
static {
    LoggerConfigSources.setLoggerConfigSources(
            LoggerConfigSource.DEFAULT,
            LoggerConfigSource.CLASS_PATH_RESOURCE,
            LoggerConfigSource.TEST_CLASS_PATH_RESOURCE,
            LoggerConfigSource.FILE_AT_THE_HOME_DIR,
            LoggerConfigSource.FILE_AT_THE_CURRENT_DIR,
            LoggerConfigSource.FILE_AT_THE_RXMICRO_CONFIG_DIR,
            LoggerConfigSource.ENVIRONMENT_VARIABLES,
            LoggerConfigSource.JAVA_SYSTEM_PROPERTIES
    );
}

private static final Logger LOGGER = LoggerFactory.getLogger(LoggerConfigSourceTest.class);

public static void main(final String[] args) {
    LOGGER.info("Hello World!");
}| 1 | - The logger config sources must be configured before the first usage of the
LoggerFactory,
otherwise these config settings will be ignored. |
|
If You know exactly which configuration sources should be used by the microservice, ALWAYS specify them explicitly! With this approach, at the microservice starting, the RxMicro framework won’t try to search for non-existent sources, spending precious microseconds! |
9.1.4. Using Environment Variables And Java System Properties
After activation of the configuration using environment variables and(or) Java system properties, the RxMicro framework parses environment variables and(or) Java system properties.
If Your runtime contains an environment variable and (or) java system property with name that starts with logger. phrase, the rxmicro.logger module interprets it as configuration.
For example to enable TRACE logger level for MicroServiceLauncher it is necessary to provide one of the following configurations:
-
Example of the configuration using environment variable:
export logger.io.rxmicro.rest.server.level=TRACE

java -p lib:. -m module/package.MicroServiceLauncher
or
-
Example of the configuration using Java system property:
java -p lib:. -Dlogger.io.rxmicro.rest.server.level=TRACE -m module/package.MicroServiceLauncher9.2. Logger Handler
By default the INFO logging level is activated for the all loggers.
All logger events are sent to the SystemConsoleHandler
appender, which outputs:
-
Logger events with
ERRORlevel intoSystem.err; -
Logger events with other levels into
System.out.
|
The If these functions are not enough You can use any other logging framework:
P.S. You can use also the |
If the SystemConsoleHandler
appender must output all logging information into System.out or System.err it is necessary to set stream parameter:
-
To enable
System.erroutput for the all log levels use the following configuration:
io.rxmicro.logger.jul.SystemConsoleHandler.stream=stderror
-
To enable
System.outoutput for the all log levels use the following configuration:
io.rxmicro.logger.jul.SystemConsoleHandler.stream=stdout
|
To get more information about the configuration of the
|
9.3. Pattern Formatter
The current version of the rxmicro.logger module is supported only one logger formatter:
PatternFormatter with the default configuration:
io.rxmicro.logger.jul.PatternFormatter.pattern=%d{yyyy-MM-dd HH:mm:ss.SSS} [%p] %c: %m%nThis class supports conversion specifiers that can be used as format control expressions.
Each conversion specifier starts with a percent sign % and is followed by optional format modifiers, a conversion word and optional parameters between braces.
The conversion word controls the data field to convert, e.g. logger name or date format.
The PatternFormatter supports the following conversion specifiers:
| Conversion specifiers | Description | |||||||||||||||
|---|---|---|---|---|---|---|---|---|---|---|---|---|---|---|---|---|
c |
Outputs the name of the logger at the origin of the logging event. The following table describes option usage results:
|
|||||||||||||||
C |
Outputs the fully-qualified class name of the caller issuing the logging request. The following table describes option usage results:
Generating the caller class information is not particularly fast. Thus, its use should be avoided unless execution speed is not an issue! |
|||||||||||||||
d |
Used to output the date of the logging event. The following table describes option usage results:
If pattern is missing (For example: |
|||||||||||||||
F |
Outputs the file name of the Java source file where the logging request was issued. Generating the file information is not particularly fast. Thus, its use should be avoided unless execution speed is not an issue! |
|||||||||||||||
L |
Outputs the line number from where the logging request was issued. Generating the file information is not particularly fast. Thus, its use should be avoided unless execution speed is not an issue! |
|||||||||||||||
m |
Outputs the application-supplied message associated with the logging event. |
|||||||||||||||
M |
Outputs the method name where the logging request was issued. Generating the method name is not particularly fast. Thus, its use should be avoided unless execution speed is not an issue. |
|||||||||||||||
n |
Outputs the platform dependent line separator character or characters. This conversion word offers practically the same performance as using non-portable line separator strings such as |
|||||||||||||||
p |
Outputs the level of the logging event. |
|||||||||||||||
r |
Outputs the number of milliseconds elapsed since the start of the application until the creation of the logging event. |
|||||||||||||||
t |
Outputs the name of the thread that generated the logging event. |
|||||||||||||||
id |
Outputs the request id if specified. This specifier displays the request id that retrieved from HTTP request if the request tracing is enabled. |
|
For request tracing feature usage Your code must use the overloaded logger methods with |
9.4. Custom Log Event
The RxMicro framework provides a factory method to build a custom logger event:
private static final Logger LOGGER = LoggerFactory.getLogger(LoggerEventBuilderTest.class);

public static void main(final String[] args) {
    final LoggerEventBuilder builder = LoggerFactory.newLoggerEventBuilder();
    builder.setMessage("Hello World!");
    LOGGER.info(builder.build());
}
A custom logger event can be useful if Your log message depends on some parameter.
For example, the following methods implement the same logic:
public void log1(final Throwable throwable,
                 final boolean withStackTrace) {
    final LoggerEventBuilder builder = LoggerFactory.newLoggerEventBuilder()
            .setMessage("Some error message: ?", throwable.getMessage());
    if (withStackTrace) {
        builder.setThrowable(throwable);
    }
    LOGGER.error(builder.build());
}

public void log2(final Throwable throwable,
                 final boolean withStackTrace) {
    if (withStackTrace) {
        LOGGER.error(throwable, "Some error message: ?", throwable.getMessage());
    } else {
        LOGGER.error("Some error message: ?", throwable.getMessage());
    }
}
Besides that a custom logger event allows customizing the following auto detect parameters:
-
Thread id;
-
Thread name;
-
Source class name;
-
Source method name;
-
Source file name;
-
Source line number.
LOGGER.info(
        LoggerFactory.newLoggerEventBuilder()
                .setMessage("Some error message")
                .setThreadName("Test-Thread-Name")
                .setThreadId(34L)
                .setStackFrame("package.Class", "method", "Test.java", 85)
                .setThrowable(throwable)
                .build()
);
9.5. Multiline Logs Issue For Docker Environment
By default the docker log driver does not support multiline log data.
It means that if Your microservice prints a stacktrace of any exception to the System.out or System.err each stack trace element will be processed as separate log event.
There are several standard solutions to this problem. The RxMicro framework adds the one of them.
9.5.1. Solution From RxMicro Framework
If Your logger configuration contains the following setting:
io.rxmicro.logger.jul.PatternFormatter.singleLine=truethan all multiline log events are processed by the RxMicro framework as single line ones:
i.e. the PatternFormatter
component replaces '\n' character by the "\\n" string before printing it to the System.out or System.err.
(For Windows platform the "\r\n"" character combination will be replaced by "\\r\\n" string!)
9.5.2. How To View Original Log Events?
To view original logs You can use the sed util:
docker logs microservice-container | sed -e 's/\\n/\n/g'or
kubectl logs microservice-pod | sed -e 's/\\n/\n/g'To view original logs on Your log aggregation tool if fluentd
open source data collector is used, it is necessary to add the following filter:
<filter exampleTag>
    @type record_transformer
    enable_ruby true
    <record>
        # --- Replace "\n" string by '\n' character ---
        log ${record["log"].gsub("\\n", "\n")}
    </record>
</filter>|
FYI: This filter requires that your log messages are parsed and converted to the json property with |
10. JSON
JSON is a widely used message exchange format for distributed applications.
The RxMicro framework provides the rxmicro.json module for low-level and efficient work with this format.
|
Unfortunately JSON format is defined in at least seven different documents: (Read more at Parsing JSON is a Minefield article). So the RxMicro framework implementation of JSON parser can be described using the following test suites: |
|
The RxMicro framework uses classes from the Therefore, a developer should not explicitly use this module! However, the common idea about the capabilities of this module is needed for correct test writing! |
10.1. A Mapping Between JSON and Java Types
Since this module is used automatically, it is optimized for machine operations. Therefore, this module doesn’t provide separate classes for JSON types. Instead, standard Java classes are used:
| JSON type | Java type |
|---|---|
|
|
|
|
|
|
|
|
|
|
|
| Java type | JSON type |
|---|---|
|
|
|
|
|
|
|
|
|
|
|
|
|
|
|
|
10.2. rxmicro.json Module Usage
To write tests correctly, it is necessary to have a common idea about the rxmicro.json module.
Let’s look at a microservice that returns the result in JSON object format:
final class MicroService {

    @GET("/")
    CompletionStage<Response> produce() {
        return completedStage(new Response());
    }
}
The Response class - Java model of HTTP response in JSON format:
public final class Response {

    final Child child = new Child(); (1)

    final List<Integer> values = List.of(25, 50, 75, 100); (2)

    final String string = "text"; (3)

    final Integer integer = 10; (4)

    final BigDecimal decimal = new BigDecimal("0.1234"); (5)

    final Boolean logical = true; (6)
}| 1 | Nested JSON object. |
| 2 | JSON numeric array. |
| 3 | String data type. |
| 4 | Integer numeric data type. |
| 5 | Floating-point numeric data type. |
| 6 | Logical data type. |
The Child class - Java model of the nested JSON object:
public final class Child {

    final Integer integer = 20;
}|
For simplicity, each response model field is immediately initialized with test data. |
As a result, the microservice returns the following JSON object:
{
  "child": {
    "integer": 20
  },
  "values": [
    25,
    50,
    75,
    100
  ],
  "string": "text",
  "integer": 10,
  "decimal": 0.1234,
  "logical": true
}
While writing REST-based microservice test or integration test, it is necessary to compare the expected JSON response with the one returned by REST-based microservice.
(The response returned by the microservice is available through the
ClientHttpResponse.getBody()method):
@RxMicroRestBasedMicroServiceTest(MicroService.class)
final class MicroServiceTest {
    //..
    @Test
    void Should_return_Response() {
        final ClientHttpResponse response = httpClient.get("/").join();
        final Object actualBody = response.getBody(); (1)
        // ...
    }
}| 1 | The ClientHttpResponse.getBody() method returns the HTTP response body.
Since the REST-based microservice returns a JSON object, this method returns the result as the java.util.Map<String, Object> object. |
Therefore, to compare JSON objects, You need to create the java.util.Map<String, Object> object containing the expected properties of the JSON object:
@RxMicroRestBasedMicroServiceTest(MicroService.class)
final class MicroServiceTest {
    //..
    @Test
    void Should_return_Response() {
        final ClientHttpResponse response = httpClient.get("/").join();
        final Object actualBody = response.getBody(); (1)
        final Object expectedBody = Stream.of(
                Map.entry("child", Map.of(
                        "integer", new io.rxmicro.json.JsonNumber("20")
                )),
                Map.entry("values", List.of(
                        new io.rxmicro.json.JsonNumber("25"),
                        new io.rxmicro.json.JsonNumber("50"),
                        new io.rxmicro.json.JsonNumber("75"),
                        new io.rxmicro.json.JsonNumber("100")
                )),
                Map.entry("string", "text"),
                Map.entry("integer", new io.rxmicro.json.JsonNumber("10")),
                Map.entry("decimal", new io.rxmicro.json.JsonNumber("0.1234")),
                Map.entry("logical", true)
        ).collect(Collectors.toMap(
                Map.Entry::getKey,
                Map.Entry::getValue,
                (u, v) -> u, LinkedHashMap::new
        )); (2)
        assertEquals(expectedBody, actualBody); (3)
    }
}| 1 | A JSON object returned by microservice. |
| 2 | Expected JSON object. |
| 3 | Comparison of JSON objects using the
java.lang.Object.equals() method. |
|
According to the JSON specification, the property order in JSON object is undefined. Thus, the following JSON objects: and are considered to be the same. The RxMicro framework always arranges JSON object properties! Thus, the order of JSON properties always corresponds to the order of fields in the Java model! This allows You to compare JSON objects in the form of |
|
If Your microservice returns the JSON object with unordered properties, use
|
For convenient creation of the expected JSON object, it is recommended to use the
JsonFactory utility class.
This class arranges JSON properties and automatically converts all
java.lang.Number types into the
io.rxmicro.json.JsonNumber type:
@RxMicroRestBasedMicroServiceTest(MicroService.class)
final class MicroServiceTest {

    private BlockingHttpClient blockingHttpClient;

    @Test
    void Should_return_Response() {
        final ClientHttpResponse response = blockingHttpClient.get("/");

        final Object actualBody = response.getBody(); (1)
        final Object expectedBody = jsonObject(
                "child", jsonObject("integer", 20), (4)
                "values", jsonArray(25, 50, 75, 100),   (5)
                "string", "text",
                "integer", 10,
                "decimal", new BigDecimal("0.1234"),
                "logical", true
        ); (2)
        assertEquals(expectedBody, actualBody); (3)
    }
}| 1 | A JSON object returned by microservice. |
| 2 | Expected JSON object. |
| 3 | Comparison of JSON objects using the
java.lang.Object.equals() method. |
| 4 | To create JSON object, it is recommended to use the
JsonFactory.jsonObject method. |
| 5 | To create JSON array, it is recommended to use the
JsonFactory.jsonArray method. |
|
The Therefore in the test You can compare JSON objects by comparing their string representation or using a third-party Java library that supports the JSON format.
(For example, Thus, the RxMicro framework recommends using the |
|
The project source code used in the current subsection is available at the following link: |
10.3. Json Wrappers
If you want to work with JSON format using usual Java style, the RxMicro framework provides wrapper classes for JSON object and array:
@RxMicroRestBasedMicroServiceTest(MicroService.class)
final class MicroServiceTestWithWrappers {

    private BlockingHttpClient blockingHttpClient;

    static Stream<Function<ClientHttpResponse, JsonObject>> toJsonObjectWrapperConverterProvider() {
        return Stream.of(
                (1)
                response -> JsonWrappers.toJsonObject(response.getBody()),
                (2)
                response -> JsonWrappers.readJsonObject(response.getBodyAsString(UTF_8))
        );
    }

    @ParameterizedTest
    @MethodSource("toJsonObjectWrapperConverterProvider")
    void Should_return_Response(final Function<ClientHttpResponse, JsonObject> converter) {
        final ClientHttpResponse response = blockingHttpClient.get("/");

        final JsonObject actualBody = converter.apply(response);

        assertEquals(
                new JsonObject()
                        .set("integer", 20),
                actualBody.getJsonObject("child")
        );
        assertEquals(
                new JsonArray()
                        .add(25).add(50).add(75).add(100),
                actualBody.getJsonArray("values")
        );
        assertEquals(
                "text",
                actualBody.getString("string")
        );
        assertEquals(
                10,
                actualBody.getNumber("integer").intValueExact()
        );
        assertEquals(
                new BigDecimal("0.1234"),
                actualBody.getNumber("decimal").bigDecimalValueExact()
        );
        assertTrue(
                actualBody.getBoolean("logical")
        );
    }
}| 1 | - To convert a internal view of JSON object to the JSON wrapper use JsonWrappers.toJsonObject method. |
| 2 | - To convert a string view of JSON object to the JSON wrapper use JsonWrappers.readJsonObject method. |
11. Native Transports
The RxMicro framework uses Netty to perform asynchronous non-blocking IO operations.
To increase productivity, Netty allows the use of native transports.
To enable native transports feature, add one of the following dependencies:
<dependency>
    <groupId>io.rxmicro</groupId>
    <artifactId>rxmicro-netty-native-linux</artifactId>
    <version>${rxmicro.version}</version>
</dependency>
<dependency>
<groupId>io.rxmicro</groupId>
<artifactId>rxmicro-netty-native-osx</artifactId>
<version>${rxmicro.version}</version>
</dependency><dependency>
<groupId>io.rxmicro</groupId>
<artifactId>rxmicro-netty-native</artifactId>
<version>${rxmicro.version}</version>
</dependency><dependency>
<groupId>io.rxmicro</groupId>
<artifactId>rxmicro-netty-native-all</artifactId>
<version>${rxmicro.version}</version>
</dependency>-
The
rxmicro-netty-native-linuxdependency adds thenetty-transport-native-epollartifact; -
The
rxmicro-netty-native-osxdependency adds thenetty-transport-native-kqueueartifact; -
The
rxmicro-netty-nativedependency activatesnative transportsfor the current platform:-
in case of the
Linuxcurrent platform, thenetty-transport-native-epollartifact is added; -
in case of the
MacOScurrent platform, thenetty-transport-native-kqueueartifact is added; -
otherwise
native transportsis not activated for the current platform;
-
-
the
rxmicro-netty-native-alldependency adds thenetty-transport-native-epollandnetty-transport-native-kqueueartifacts.
|
Adding a dependency to the microservice project: instead of allows using the Therefore, the |
If native transports has been successfully activated, the information message about the start of the HTTP server will display the corresponding type of transport.
2020-02-02 20:14:11.707 [INFO] io.rxmicro.rest.server.netty.internal.component.NettyServer :
Server started at 0.0.0.0:8080 using EPOLL transport in 500 millis. (1)| 1 | The using EPOLL transport message format means that Netty will use the netty-transport-native-epoll library. |
2020-02-02 20:14:11.707 [INFO] io.rxmicro.rest.server.netty.internal.component.NettyServer :
Server started at 0.0.0.0:8080 using KQUEUE transport in 500 millis. (1)| 1 | The using KQUEUE transport message format means that Netty will use the netty-transport-native-kqueue library. |