© 2019-2022 rxmicro.io.
Free use of this software is granted under the terms of the Apache License 2.0.
|
Copies of this entity may be made for Your own use and for distribution to others, provided that You do not charge any fee for such copies and further provided that each copy contains this Copyright Notice, whether distributed in print or electronically. If You find errors or omissions in this entity, please don’t hesitate to submit an issue or open a pull request with a fix. |
1. Unnamed Modules Support
On September 21, 2017, Java 9 has introduced JPMS.
|
There are four types of modules in the
|
Currently, the majority of existing frameworks and libraries are focused on JDK 8 and do not support JPMS.
To support compatibility with libraries that do not support JPMS, Java 9 provides the unnamed modules mechanism.
The feature of this mechanism is that the code written in Java 9 and higher does not use the module-info.java module descriptor, and uses class-path instead of module-path.
For integration with libraries that do not support JPMS, the RxMicro framework allows You to enable the unnamed module mode for the RxMicro Annotation Processor.
To enable this mode, You need to add the RX_MICRO_BUILD_UNNAMED_MODULE configuration parameter to the maven-compiler-plugin settings:
<plugin>
    <artifactId>maven-compiler-plugin</artifactId>
    <version>${maven-compiler-plugin.version}</version>
    <configuration>
        <release>11</release>
        <!-- ... -->
        <compilerArgs>
            <arg>-ARX_MICRO_BUILD_UNNAMED_MODULE=true</arg> (1)
        </compilerArgs>
    </configuration>
    <!-- ... -->
</plugin>| 1 | The RxMicro Annotation Processor will use the unnamed module mode for the current microservice project. |
1.1. Uber Jar
An uber JAR (also known as a fat JAR or JAR with dependencies) is a JAR file that contains not only a Java program, but embeds its dependencies as well. This means that the JAR functions as an "all-in-one" distribution of the software, without needing any other Java code.
(You still need a Java runtime, and an underlying operating system, of course.)
To build a microservice project in the form of uber.jar, You need to enable the unnamed module mode and configure the maven-shade-plugin.
1.1.1. Enable the unnamed module Mode
To enable the unnamed module mode, add the RX_MICRO_BUILD_UNNAMED_MODULE compiler option to maven-compiler-plugin:
<plugin>
    <artifactId>maven-compiler-plugin</artifactId>
    <version>${maven-compiler-plugin.version}</version>
    <configuration>
        <release>11</release>
        <!-- ... -->
        <compilerArgs>
            <arg>-ARX_MICRO_BUILD_UNNAMED_MODULE=true</arg> (1)
        </compilerArgs>
    </configuration>
    <!-- ... -->
</plugin>| 1 | The RxMicro Annotation Processor will use the unnamed module mode for the current microservice project. |
1.1.2. Configuration of maven-shade-plugin
<plugin>
    <groupId>org.apache.maven.plugins</groupId>
    <artifactId>maven-shade-plugin</artifactId>
    <version>${maven-shade-plugin.version}</version>
    <executions>
        <execution>
            <phase>package</phase>
            <goals>
                <goal>shade</goal>
            </goals>
            <configuration>
                <createDependencyReducedPom>false</createDependencyReducedPom>
                <transformers>
                    <transformer implementation=
                                         "org.apache.maven.plugins.shade.resource.ManifestResourceTransformer">
                        <manifestEntries>
                            <Main-Class>
                                io.rxmicro.examples.unnamed.module.uber.jar.HelloWorldMicroService (1)
                            </Main-Class>
                        </manifestEntries>
                    </transformer>
                </transformers>
                <filters>
                    <filter>
                        <artifact>*:*</artifact>
                        <excludes>
                            <exclude>ModuleInfo.*</exclude> (2)
                        </excludes>
                    </filter>
                </filters>
                <minimizeJar>true</minimizeJar> (3)
            </configuration>
        </execution>
    </executions>
</plugin>| 1 | It is necessary to specify a class with the main method, which will be used as an entry point into the microservice. |
| 2 | The resulting uber.jar must not contain the module virtual descriptor, as this descriptor is only needed at the compilation level.
(More information about the virtual descriptor can be found in Section 1.2, “Module Configuration”.) |
| 3 | The resulting uber.jar can be reduced by excluding unused classes and packages. |
|
The |
1.1.3. Rebuild Project
After pom.xml setting, it is necessary to rebuild the project:
mvn clean packageAs a result, the uber.jar with all the necessary dependencies will be created:
:$ ls -lh

-rw-rw-r-- 1 nedis nedis 1,4M Mar 28 11:03 unnamed-module-uber-jar-1.0-SNAPSHOT.jar          (1)
-rw-rw-r-- 1 nedis nedis 9,8K Mar 28 11:03 original-unnamed-module-uber-jar-1.0-SNAPSHOT.jar (2)| 1 | The uber.jar size is equal to 1,4 MB. |
| 2 | The size of the original jar file is equal to 9.8 KB. |
The uber.jar contains the source code of the microservice project, the code of the RxMicro and the Netty frameworks:
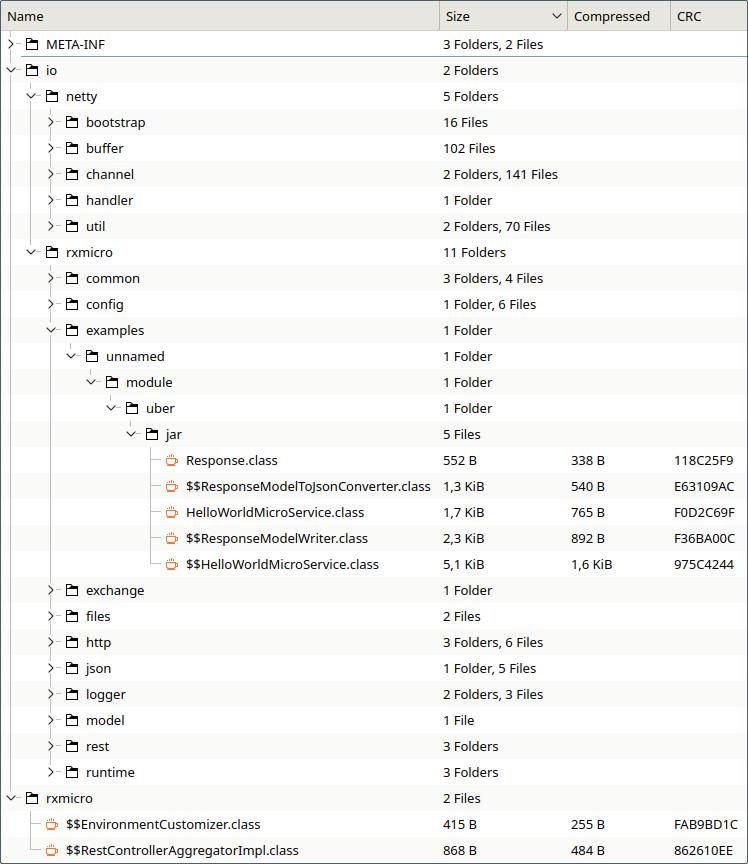
uber.jar content for a simple microservice project1.1.4. Run uber.jar
To run uber.jar it is necessary to provider jar file only:
> java -jar unnamed-module-uber-jar-1.0-SNAPSHOT.jar

2020-02-02 20:14:11.707 [INFO] io.rxmicro.rest.server.netty.internal.component.NettyServer :
Server started at 0.0.0.0:8080 using NETTY transport in 500 millis (1)| 1 | The Server started in … millis message format means that the RxMicro HTTP server has been successfully started. |
|
To run a modularized micro service project the java requires more arguments: |
|
The project source code used in the current subsection is available at the following link: |
|
When compiling, the RxMicro framework searches for When changing the |
1.2. Module Configuration
Some RxMicro modules allow You to set the common configuration with RxMicro Annotations, which annotate the module-info.java module descriptor.
But for the unnamed module, the module-info.java module descriptor does not exist!
In such cases a virtual descriptor must be created:
@Retention(CLASS)
@Target({})
public @interface ModuleInfo {
}
A virtual descriptor is a custom annotation that meets the following requirements:
-
The name of the virtual descriptor is fixed and equal to:
ModuleInfo. -
The annotation must be contained in the default package (
unnamed package). -
The annotation should be available only during the compilation process:
@Retention(CLASS). -
The annotation must contain an empty list of targets:
@Target({}).
|
Since the virtual descriptor is available only during the compilation process, then during the |
1.2.1. Configuration of the Code Generation Process for Rest Controller
The RxMicro framework provides the option to configure the code generation process for REST controllers.
For this purpose, the @RestServerGeneratorConfig annotation should be used to annotate the
module-info.java module descriptor.
For the unnamed module instead of the module-info.java module descriptor, use the ModuleInfo annotation:
@Retention(CLASS)
@Target({})
@RestServerGeneratorConfig(
        exchangeFormat = ServerExchangeFormatModule.JSON,
        generateRequestValidators = GenerateOption.DISABLED,
        generateResponseValidators = GenerateOption.AUTO_DETECT
)
public @interface ModuleInfo {
}|
The project source code used in the current subsection is available at the following link: |
|
When compiling, the RxMicro framework searches for When changing the |
1.2.2. Configuration of the Code Generation Process for Rest Client
The RxMicro framework provides the option to configure the code generation process for REST clients.
For this purpose, the @RestClientGeneratorConfig annotation should be used to annotate the
module-info.java module descriptor.
For the unnamed module instead of the module-info.java module descriptor, use the ModuleInfo annotation:
@Retention(CLASS)
@Target({})
@RestClientGeneratorConfig(
        exchangeFormat = ClientExchangeFormatModule.JSON,
        generateRequestValidators = GenerateOption.AUTO_DETECT,
        requestValidationMode = RestClientGeneratorConfig.RequestValidationMode.RETURN_ERROR_SIGNAL,
        generateResponseValidators = GenerateOption.DISABLED
)
public @interface ModuleInfo {
}|
The project source code used in the current subsection is available at the following link: |
|
When compiling, the RxMicro framework searches for When changing the |
1.2.3. REST-based Microservice Metadata Configuration
The RxMicro framework provides the option to configure the REST-based microservice documentation generation process, using the annotations.
These annotations annotate the module-info.java module descriptor.
For the unnamed module instead of the module-info.java module descriptor, use the ModuleInfo annotation:
@Retention(CLASS)
@Target({})
@Title("Metadata Annotations")
@Description("*Project* _Description_")
@Author(
        name = "Richard Hendricks",
        email = "richard.hendricks@piedpiper.com"
)
@Author(
        name = "Bertram Gilfoyle",
        email = "bertram.gilfoyle@piedpiper.com"
)
@Author(
        name = "Dinesh Chugtai",
        email = "dinesh.chugtai@piedpiper.com"
)
@BaseEndpoint("https://api.rxmicro.io")
@License(
        name = "Apache License 2.0",
        url = "https://github.com/rxmicro/rxmicro/blob/master/LICENSE"
)
@DocumentationDefinition(
        introduction = @IntroductionDefinition(
                sectionOrder = {
                        IntroductionDefinition.Section.BASE_ENDPOINT,
                        IntroductionDefinition.Section.LICENSES
                }
        ),
        resource = @ResourceDefinition(
                withInternalErrorResponse = false
        ),
        withGeneratedDate = false
)
public @interface ModuleInfo {
}|
The project source code used in the current subsection is available at the following link: |
|
When compiling, the RxMicro framework searches for When changing the |
2. Using GraalVM to Build a Native Image
GraalVM is a universal virtual machine for running applications written in different languages.
GraalVM contains a Native Image Tool, that allows You to ahead-of-time compile Java code to a standalone executable, called a native image.
The GraalVM Native Image Tool can be used to build a native image of any RxMicro microservice project. Before build a native image it is necessary to setup a GraalVM developer environment.
2.1. Setup a GraalVM
GraalVM is distributed as Community Edition and Enterprise Edition.
Current guide describes a use of the GraalVM Community Edition (GraalVM CE)!
Setup of the GraalVM CE contains a few simple steps:
-
Make a GraalVM Home Directory.
-
Select a GraalVM CE Distribution for Your Platform.
-
Download the GraalVM CE Distribution.
-
Unzip the GraalVM CE Distribution.
-
Set a
GRAALVM_HOMEEnvironment Variable. -
Install a Native Image Module.
-
Add the Native Image Tool to
PATH.
2.1.1. Make a GraalVM Home Directory
Make a directory, that will contain a GraalVM distribution:
mkdir ~/GraalVM2.1.2. Select a GraalVM CE Distribution for Your Platform
Visit the github release page
https://github.com/graalvm/graalvm-ce-builds/releases
and select a distribution for Your platform.
|
Please select a GraalVM CE based on Java 11! A GraalVM CE based on Java 8 is not supported by the RxMicro framework! |
2.1.3. Download the GraalVM CE Distribution
Download the selected GraalVM CE distribution onto the GraalVM home directory:
wget -P ~/GraalVM https://github.com/graalvm/graalvm-ce-builds/releases/download/vm-20.0.0/graalvm-ce-java11-linux-amd64-20.0.0.tar.gz2.1.4. Unzip the GraalVM CE Distribution
Unzip the GraalVM CE distribution onto the GraalVM home directory:
tar --strip-components=1 -vzxf ~/GraalVM/graalvm-ce-java11-linux-amd64-20.0.0.tar.gz -C ~/GraalVM
rm ~/GraalVM/graalvm-ce-java11-linux-amd64-20.0.0.tar.gz
2.1.5. Set a GRAALVM_HOME Environment Variable
Set a GRAALVM_HOME environment variable:
export GRAALVM_HOME=~/GraalVMand verify the installation:
$GRAALVM_HOME/bin/java -version

openjdk version "11.0.6" 2020-01-14
OpenJDK Runtime Environment GraalVM CE 20.0.0 (build 11.0.6+9-jvmci-20.0-b02)
OpenJDK 64-Bit Server VM GraalVM CE 20.0.0 (build 11.0.6+9-jvmci-20.0-b02, mixed mode, sharing)|
If You would use the GraalVM CE only, You can add the If You use any other version of JDK, add only the separate utils to |
2.1.6. Install a Native Image Module
Starting from GraalVM 19.0, Native Image was extracted from the base distribution. So the Native Image Tool must be installed to GraalVM using a GraalVM Updater utility:
$GRAALVM_HOME/bin/gu install native-image

Downloading: Component catalog from www.graalvm.org
Processing Component: Native Image
Downloading: Component native-image: Native Image  from github.com
Installing new component: Native Image (org.graalvm.native-image, version 20.0.0)
To verify the installation show a version of the native Native Image Tool:
$GRAALVM_HOME/bin/native-image --version

GraalVM Version 20.0.0 CE
2.1.7. Add the Native Image Tool to PATH
In order not to indicate the folder where the Native Image Tool was installed, add the Native Image Tool to the PATH variable:
ln -s $GRAALVM_HOME/bin/native-image ~/binAfter that logout and login to the system again. The Native Image Tool must be available at the terminal:
native-image --version

GraalVM Version 20.0.0 CE
2.2. RxMicro Project Configuration
The first release of GraalVM based on Java 11 is 19.3.0 (2019-11-19).
But unfortunately the GraalVM Native Image Tool does not support JPMS yet.
Thus we need to use the unnamed module mode for RxMicro project.
2.2.1. Setup pom.xml
2.2.1.1. Using RX_MICRO_BUILD_UNNAMED_MODULE Option
To enable the unnamed module mode, it is necessary to add RX_MICRO_BUILD_UNNAMED_MODULE option to the maven-compiler-plugin:
<plugin>
    <artifactId>maven-compiler-plugin</artifactId>
    <configuration>
        <!-- ... -->
        <compilerArgs>
            <arg>-ARX_MICRO_BUILD_UNNAMED_MODULE=true</arg>
        </compilerArgs>
    </configuration>
    <!-- ... -->
</plugin>
2.2.1.2. Maven-shade-plugin Configuration
To build a native image we need a uber jar.
For that it is necessary to add maven-shade-plugin:
<plugin>
    <groupId>org.apache.maven.plugins</groupId>
    <artifactId>maven-shade-plugin</artifactId>
    <version>${maven-shade-plugin.version}</version>
    <executions>
        <execution>
            <phase>package</phase>
            <goals>
                <goal>shade</goal>
            </goals>
            <configuration>
                <createDependencyReducedPom>false</createDependencyReducedPom>
                <transformers>
                    <transformer implementation=
                        "org.apache.maven.plugins.shade.resource.ManifestResourceTransformer">
                        <manifestEntries>
                            <Main-Class>
                        io.rxmicro.examples.graalvm.nativeimage.quick.start.HelloWorldMicroService
                            </Main-Class>
                        </manifestEntries>
                    </transformer>
                </transformers>
            </configuration>
        </execution>
    </executions>
</plugin>
2.2.1.3. Exec-maven-plugin Configuration
To build a native image from maven it is necessary to use exec-maven-plugin:
<plugin>
    <groupId>org.codehaus.mojo</groupId>
    <artifactId>exec-maven-plugin</artifactId>
    <version>${exec-maven-plugin.version}</version>
    <executions>
        <execution>
            <phase>package</phase>
            <goals>
                <goal>exec</goal>
            </goals>
            <configuration>
                <executable>native-image</executable> (1)
                <arguments>
                    <argument>--verbose</argument>
                    <argument>-jar</argument>
                    <argument>--install-exit-handlers</argument> (2)
                    <argument>${project.build.directory}/${project.build.finalName}.jar</argument>
                </arguments>
            </configuration>
        </execution>
    </executions>
</plugin>| 1 | An executable will be the native-image tool with specified arguments. |
| 2 | This option adds the exit handler for native image. |
|
The Native Image Tool ( |
2.2.2. Microservice Source Code
A microservice source code contains two classes only:
final class Response {

    final String message;

    Response(final String message) {
        this.message = requireNonNull(message);
    }
}
public final class HelloWorldMicroService {
@GET("/")
CompletableFuture<Response> sayHelloWorld() {
return CompletableFuture.supplyAsync(() ->
new Response("Hello World!"));
}
public static void main(final String[] args) {
new Configs.Builder()
.withContainerConfigSources() (1)
.build();
RxMicroRestServer.startRestServer(HelloWorldMicroService.class);
}
}| 1 | Docker based configuration activates the configuration via annotations and environment variables only. |
2.2.3. Classpath Resources
A RxMicro logger is configured using jul.properties classpath resource.
jul.properties contains the following content:
io.rxmicro.rest.server.level=TRACEA native image is configured using META-INF/native-image classpath directory with two files:
-
native-image.properties -
resource-config.json
(Read more about native image configuration: https://www.graalvm.org/docs/reference-manual/native-image/#native-image-configuration)
native-image.properties contains the following content:
Args = --no-fallback \
       --allow-incomplete-classpath \
       -H:ResourceConfigurationResources=${.}/resource-config.json
resource-config.json contains the following content:
{
  "resources":[
    {"pattern":"\\Qjul.properties\\E"}
  ],
  "bundles":[]
}
2.3. Creation of the Native Image
To build a native image run:
mvn clean packageThe built native image executable will be available at the project home directory:
ls -lh

drwxrwxr-x 5 nedis nedis 4,0K Mar 25 20:44 src
drwxrwxr-x 8 nedis nedis 4,0K Mar 28 21:30 target
-rw-rw-r-- 1 nedis nedis 8,8K Mar 28 21:02 pom.xml
-rwxrwxr-x 1 nedis nedis 17M Mar 28 21:32 HelloWorldMicroService (1)| 1 | The built native image executable |
2.4. Verification of the Native Image
To verify the built native image run:
./HelloWorldMicroService|
The project source code used in the current subsection is available at the following link: |
|
When compiling, the RxMicro framework searches for When changing the |