© 2019-2022 rxmicro.io.
Free use of this software is granted under the terms of the Apache License 2.0.
|
Copies of this entity may be made for Your own use and for distribution to others, provided that You do not charge any fee for such copies and further provided that each copy contains this Copyright Notice, whether distributed in print or electronically. If You find errors or omissions in this entity, please don’t hesitate to submit an issue or open a pull request with a fix. |
This section describes in detail the steps to be taken in order to create the REST-based microservice that returns the "Hello World!" message, using the RxMicro framework.
In order to successfully execute these instructions, You need to install JDK 11 LTS or higher on Your computer. For Your convenience it is also recommended to use a modern IDE, for example IntelliJ IDEA.
|
The features of the IntelliJ IDEA Community Edition version are enough for a complete and convenient work on a project that uses the RxMicro framework. |
The RxMicro framework consists of several dozens of modules, so for convenient handling it is recommended to install maven on Your computer.
|
Any modern IDE for Java ( To run |
1. Creating a Project
For creating a project, it is recommended to use a modern IDE, for example IntelliJ IDEA
1.1. Using the IntelliJ IDEA
To create a new project, proceed as follows: File → New → Project or Create a New Project.
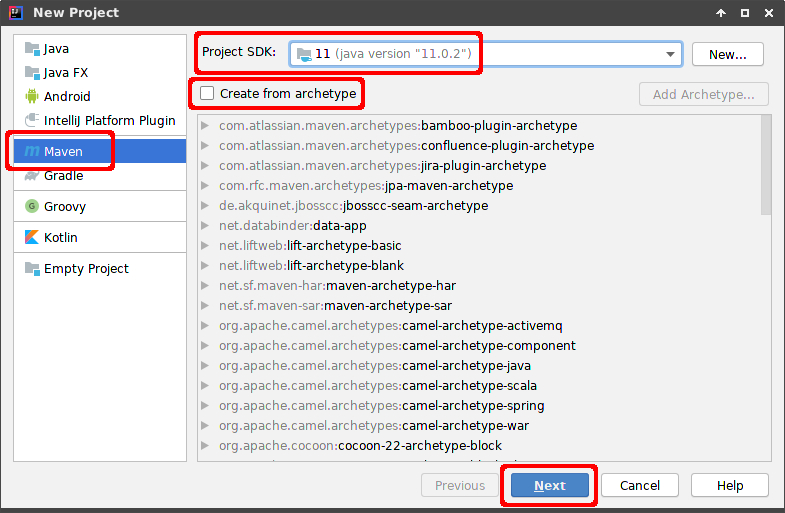
In the appeared dialog box select the Maven type, make sure that Project SDK version 11 or higher will be used, remove the Create from archetype checkbox and click Next.
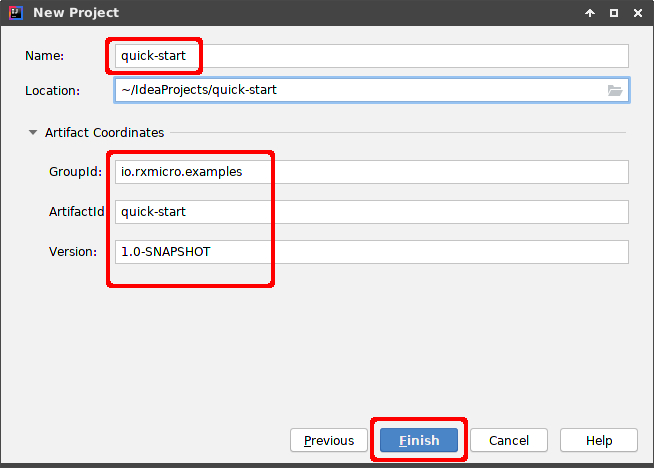
In the appeared dialog box type Name, Location (if the default value is wrong) and GroupId
(if the default value is wrong), and click Finish.
As a result, IntelliJ IDEA will generate the following project template using maven settings:
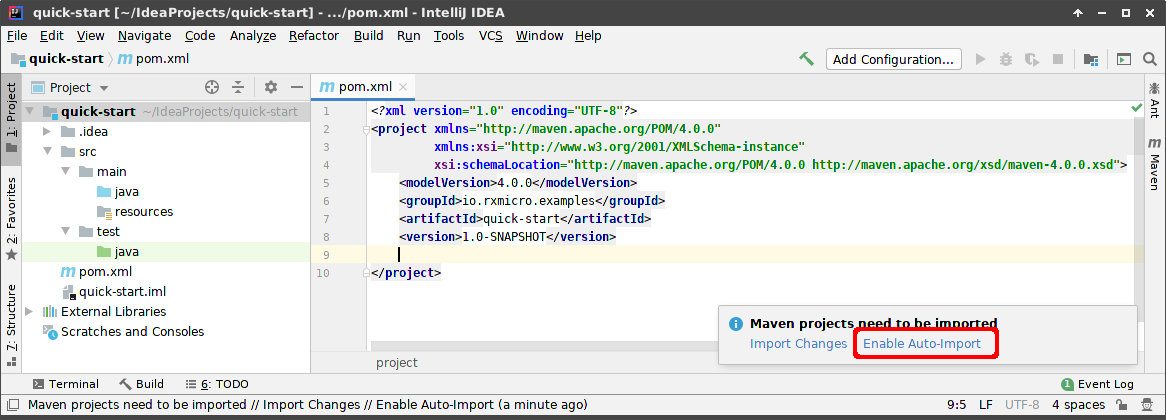
After creating the standard template, activate the Enable Auto-Import option.
|
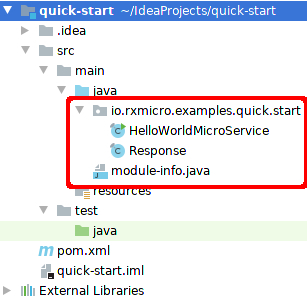
If for some reason the As a result, Your template should fully match the template: Figure 3, “Creating the simplest project in IntelliJ IDEA: Basic project template.”. |
1.2. Using the Terminal
It is possible to create a new maven project without using the IDE.
|
If You don’t intend to write the source code of a project in notepad, but rather use the IDE to do this, You should directly create a maven project using the IDE. |
To do this, open the terminal and run the following command:
mvn archetype:generate -DgroupId=io.rxmicro.examples -DartifactId=quick-start -DinteractiveMode=false|
In order to run
A detailed instruction on the |
As a result, the quick-start folder with the basic project template will be created in the current folder.
After that, the created project must be imported into the IDE.
|
By default, As a result, Your template should fully match the template: Figure 3, “Creating the simplest project in IntelliJ IDEA: Basic project template.”. |
1.3. Using Other IDE
Creating the simplest project with other IDEs does not differ much from creating it with IntelliJ IDEA. When creating, You should also specify maven archetype, groupId, artifactId and version.
The main thing is that after creation Your project template should fully match the template: Figure 3, “Creating the simplest project in IntelliJ IDEA: Basic project template.”.
2. Configuring the Project
Before writing the code of a REST-based microservice, You should configure pom.xml of Your project by performing the following steps:
-
Define the versions of used libraries.
-
Add the required dependencies to the
pom.xml. -
Configure the
maven-compiler-plugin.
2.1. Definition the Versions of the Used Libraries
To make further updating of library versions convenient, it is recommended to use maven properties:
<properties>
    <project.build.sourceEncoding>UTF-8</project.build.sourceEncoding>
    <rxmicro.version>0.11</rxmicro.version> (1)
    <maven-compiler-plugin.version>3.10.1</maven-compiler-plugin.version> (2)
</properties>2.2. Adding the Required Dependencies
Before using RxMicro modules, the following dependencies must be added to the project:
<dependencies>
    <dependency>
        <groupId>io.rxmicro</groupId>
        <artifactId>rxmicro-rest-server-netty</artifactId> (1)
        <version>${rxmicro.version}</version>
    </dependency>
    <dependency>
        <groupId>io.rxmicro</groupId>
        <artifactId>rxmicro-rest-server-exchange-json</artifactId> (2)
        <version>${rxmicro.version}</version>
    </dependency>
</dependencies>2.3. Configuring the maven-compiler-plugin
Since the RxMicro framework uses the Java annotation processors, You need to set up maven-compiler-plugin:
<plugin>
    <artifactId>maven-compiler-plugin</artifactId>
    <version>${maven-compiler-plugin.version}</version>
    <configuration>
        <release>11</release> (1)
        <annotationProcessorPaths>
            <annotationProcessorPath>
                <groupId>io.rxmicro</groupId>
                <artifactId>rxmicro-annotation-processor</artifactId> (2)
                <version>${rxmicro.version}</version>
            </annotationProcessorPath>
        </annotationProcessorPaths>
    </configuration>
    <executions>
        <execution>
            <id>source-compile</id>
            <goals>
                <goal>compile</goal>
            </goals>
            <configuration>
                <annotationProcessors>
                    <annotationProcessor>
                        io.rxmicro.annotation.processor.RxMicroAnnotationProcessor (3)
                    </annotationProcessor>
                </annotationProcessors>
                <generatedSourcesDirectory>
                    ${project.build.directory}/generated-sources/ (4)
                </generatedSourcesDirectory>
            </configuration>
        </execution>
    </executions>
</plugin>| 1 | The RxMicro framework requires a Java compiler of v11 or higher; |
| 2 | The annotation processor library, that will handle all RxMicro Annotations; |
| 3 | The annotation processor class, that handles the launch configuration; |
| 4 | Location of the generated Java classes by the RxMicro Annotation Processor; |
2.4. The Final Version of pom.xml File
After all the above changes, the final version of the pom.xml file should look like:
<?xml version="1.0" encoding="UTF-8"?>
<project xmlns="http://maven.apache.org/POM/4.0.0"
         xmlns:xsi="http://www.w3.org/2001/XMLSchema-instance"
         xsi:schemaLocation="http://maven.apache.org/POM/4.0.0
                             http://maven.apache.org/xsd/maven-4.0.0.xsd">
    <modelVersion>4.0.0</modelVersion>
    <groupId>io.rxmicro.examples</groupId>
    <artifactId>quick-start</artifactId>
    <version>1.0-SNAPSHOT</version>

    <properties>
        <project.build.sourceEncoding>UTF-8</project.build.sourceEncoding>
        <rxmicro.version>0.11</rxmicro.version>
        <maven-compiler-plugin.version>3.10.1</maven-compiler-plugin.version>
    </properties>

    <build>
        <pluginManagement>
            <plugins>
                <plugin>
                    <artifactId>maven-compiler-plugin</artifactId>
                    <version>${maven-compiler-plugin.version}</version>
                    <configuration>
                        <release>11</release>
                        <annotationProcessorPaths>
                            <annotationProcessorPath>
                                <groupId>io.rxmicro</groupId>
                                <artifactId>rxmicro-annotation-processor</artifactId>
                                <version>${rxmicro.version}</version>
                            </annotationProcessorPath>
                        </annotationProcessorPaths>
                    </configuration>
                    <executions>
                        <execution>
                            <id>source-compile</id>
                            <goals>
                                <goal>compile</goal>
                            </goals>
                            <configuration>
                                <annotationProcessors>
                                    <annotationProcessor>
                            io.rxmicro.annotation.processor.RxMicroAnnotationProcessor
                                    </annotationProcessor>
                                </annotationProcessors>
                                <generatedSourcesDirectory>
                                    ${project.build.directory}/generated-sources/
                                </generatedSourcesDirectory>
                            </configuration>
                        </execution>
                    </executions>
                </plugin>
            </plugins>
        </pluginManagement>
    </build>

    <dependencies>
        <dependency>
            <groupId>io.rxmicro</groupId>
            <artifactId>rxmicro-rest-server-netty</artifactId>
            <version>${rxmicro.version}</version>
        </dependency>
        <dependency>
            <groupId>io.rxmicro</groupId>
            <artifactId>rxmicro-rest-server-exchange-json</artifactId>
            <version>${rxmicro.version}</version>
        </dependency>
    </dependencies>
</project>
3. Creating the Source Code
The source code of the simplest REST-based microservice consists of one module, one package and two classes. The source code of each of these components is described below.
3.1. A module-info.java Descriptor
Java 9 has introduced the JPMS.
Therefore, the RxMicro framework, which requires the use of JDK 11 or higher, requires a module-info.java descriptor for any of Your microservice projects.
module examples.quick.start {
    requires rxmicro.rest.server.netty;         (1)
    requires rxmicro.rest.server.exchange.json; (2)
}| 1 | Module for building REST-based microservices based on HTTP server that uses Netty, with all required transitive dependencies. |
| 2 | Module for converting a Java model to JSON format and vice versa, with all required transitive dependencies. |
|
Usually Thanks to the transitive dependencies of the RxMicro framework, the number of modules required has been greatly reduced. Only basic RxMicro modules must be specified! |
3.2. An HTTP Response Model Class
package io.rxmicro.examples.quick.start;

import static java.util.Objects.requireNonNull;

@SuppressWarnings("SameParameterValue")
final class Response {

    final String message;

    Response(final String message) {
        this.message = requireNonNull(message);
    }
}|
According to the specification, JSON format supports the following data types: object, array and primitives: strings, logical type, numeric type and To simplify communication between REST-based microservices, the RxMicro framework supports only JSON object as a return type of any REST-based microservice. Thus, any REST-based microservice built via the RxMicro framework can return only JSON objects. In case You need to return a primitive or an array, You need to create a wrapper class. Therefore, to display the |
3.3. A REST-Based Microservice Class
package io.rxmicro.examples.quick.start;

import io.rxmicro.rest.method.GET;
import io.rxmicro.rest.server.RxMicroRestServer;

import java.util.concurrent.CompletableFuture;

public final class HelloWorldMicroService {

    @GET("/")
    CompletableFuture<Response> sayHelloWorld() {       (1)
        return CompletableFuture.supplyAsync(() ->
                new Response("Hello World!"));          (2)
    }

    public static void main(final String[] args) {              (3)
        RxMicroRestServer.startRestServer(HelloWorldMicroService.class);  (4)
    }
}| 1 | REST-based microservice contains a handler of HTTP GET method: sayHelloWorld, which doesn’t accept any parameters and returns a
CompletableFuture reactive type. |
| 2 | The CompletableFuture.supplyAsync()
static method is used to create an object of CompletableFuture class. |
| 3 | To launch a REST-based microservice the main method is used. |
| 4 | The launch is performed using the
RxMicroRestServer.startRestServer(Class<?>)
static method, which requires the REST-based microservice class as parameter. |
|
Note that the HTTP request handler method doesn’t need to be The |
3.4. A Structure of the Microservice Project
The above-mentioned components of the microservice project should be located in the project according to the following screenshot:
4. Compiling the Project
4.1. Using the maven
To compile a project using the maven, open the terminal in the project root folder and proceed with the following command:
mvn clean compile|
In order to run
A detailed instruction on the |
It is possible to compile the project with maven even without using the terminal.
Since any modern IDE for Java contains built-in maven, You can use this built-in maven tool.
To do this, open the maven panel and execute the specified commands with a mouse or touchpad manipulator.
For example, the maven panel in IntelliJ IDEA looks like:
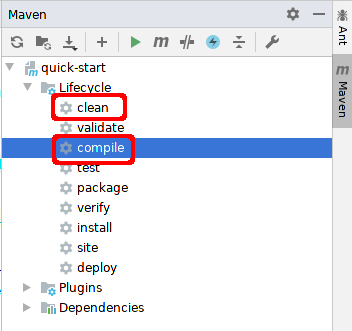
After successful compilation, the RxMicro Annotation Processor work results are displayed in the terminal:
[INFO] ------------------------------------------------------------------------
[INFO]  RX-MICRO ANNOTATIONS PROCESSING
[INFO] ------------------------------------------------------------------------
[INFO]
[INFO] Current environment context is:
  RxMicro version: 0.11
  Current module:
    examples.quick.start
  Available RxMicro modules:
    rxmicro.common;
    rxmicro.reflection;
    rxmicro.model;
    rxmicro.runtime;
    rxmicro.config;
    rxmicro.logger;
    rxmicro.files;
    rxmicro.http;
    rxmicro.rest;
    rxmicro.rest.server;
    rxmicro.rest.server.netty;
    rxmicro.json;
    rxmicro.exchange.json;
    rxmicro.rest.server.exchange.json;
  Include packages: <none>
  Exclude packages: <none>
[INFO] Found the following REST controllers:
  io.rxmicro.examples.quick.start.HelloWorldMicroService:
    'GET /' -> sayHelloWorld();
[INFO] Generating java classes...
[INFO] All java classes generated successful in 0.031 seconds. (1)
[INFO] ------------------------------------------------------------------------
[INFO] Annotations processing completed successful.
[INFO] ------------------------------------------------------------------------| 1 | The given information indicates that all files needed to run the microservice have been generated. |
|
In the To understand how the RxMicro framework works, please go to core.html section. |
4.2. Using the IntelliJ IDEA
The IntelliJ IDEA allows annotation processors to be launched automatically when building a project.
So if You want to compile a microservice project using IntelliJ IDEA rather than maven, You need to set up the Annotation Processors section in the IntelliJ IDEA.
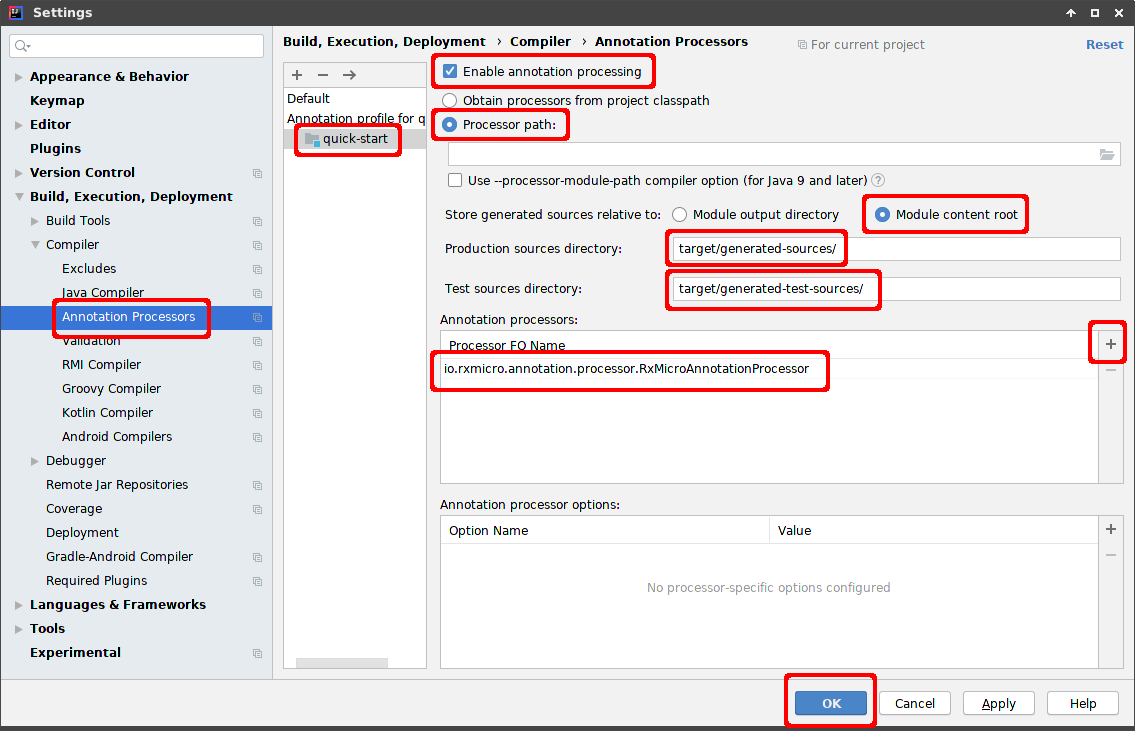
4.2.1. Enable Annotation Processing
To enable annotation processing while building a project with IntelliJ IDEA, You need to set up the Annotation Processors section.
To do so, open the menu: File → Settings and get to the tab:`Build, Execution, Deployment` → Compiler → Annotation Processors.
|
Make sure that all Your settings of the |
4.2.2. Rebuilding the Project
After setting up the Annotation Processors section, the project must be rebuilt.
To do so, run the following command from the main menu: Build → Rebuild project.
5. Starting the Microservice
5.1. Using the IDE:
You can run the REST-based microservice using the IntelliJ IDEA launch context menu
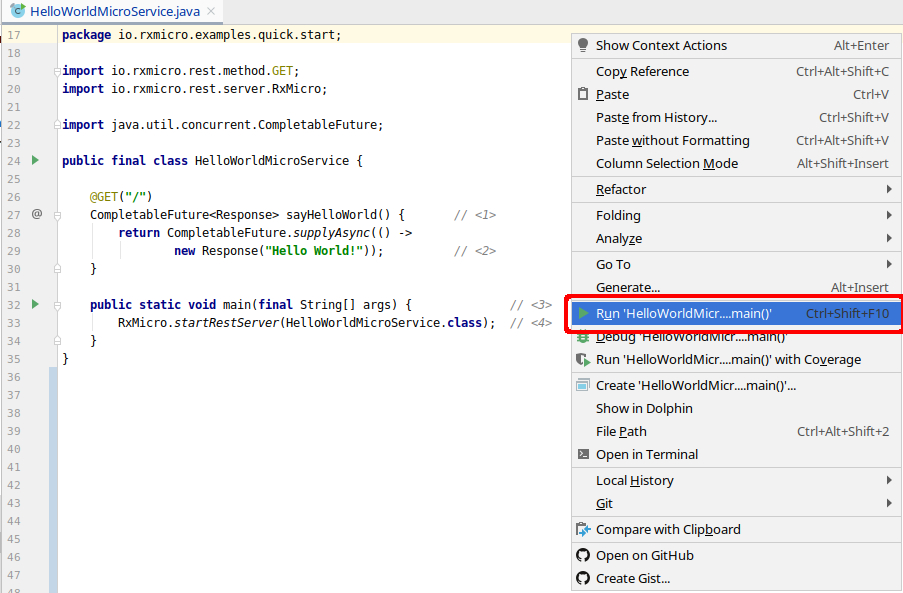
|
If You get the following error while starting the REST-based 
rebuild the project! (To do this, run the command Rebuild project from the main menu: |
After starting, the console will display the following information:
2020-02-02 20:14:11.707 [INFO] io.rxmicro.rest.server.netty.internal.component.NettyServer :
Server started at 0.0.0.0:8080 using NETTY transport in 500 millis (1)| 1 | The Server started in … millis message means that the RxMicro HTTP server has been successfully started. |
|
If an error occurs during the starting process, the console will display a stack trace of this error. |
5.2. Using the Terminal:
Go to the target folder of the microservice project, open the terminal in this folder and run the following command:
java -Dfile.encoding=UTF-8 -p ./classes:$M2_REPO/io/rxmicro/rxmicro-rest-server-netty/0.11/rxmicro-rest-server-netty-0.11.jar:$M2_REPO/io/rxmicro/rxmicro-rest-server/0.11/rxmicro-rest-server-0.11.jar:$M2_REPO/io/rxmicro/rxmicro-rest/0.11/rxmicro-rest-0.11.jar:$M2_REPO/io/rxmicro/rxmicro-model/0.11/rxmicro-model-0.11.jar:$M2_REPO/io/rxmicro/rxmicro-http/0.11/rxmicro-http-0.11.jar:$M2_REPO/io/rxmicro/rxmicro-logger/0.11/rxmicro-logger-0.11.jar:$M2_REPO/io/rxmicro/rxmicro-common/0.11/rxmicro-common-0.11.jar:$M2_REPO/io/rxmicro/rxmicro-config/0.11/rxmicro-config-0.11.jar:$M2_REPO/io/rxmicro/rxmicro-runtime/0.11/rxmicro-runtime-0.11.jar:$M2_REPO/io/rxmicro/rxmicro-files/0.11/rxmicro-files-0.11.jar:$M2_REPO/io/netty/netty-codec-http/4.1.85.Final/netty-codec-http-4.1.85.Final.jar:$M2_REPO/io/netty/netty-common/4.1.85.Final/netty-common-4.1.85.Final.jar:$M2_REPO/io/netty/netty-buffer/4.1.85.Final/netty-buffer-4.1.85.Final.jar:$M2_REPO/io/netty/netty-codec/4.1.85.Final/netty-codec-4.1.85.Final.jar:$M2_REPO/io/netty/netty-handler/4.1.85.Final/netty-handler-4.1.85.Final.jar:$M2_REPO/io/netty/netty-transport/4.1.85.Final/netty-transport-4.1.85.Final.jar:$M2_REPO/io/netty/netty-resolver/4.1.85.Final/netty-resolver-4.1.85.Final.jar:$M2_REPO/io/rxmicro/rxmicro-rest-server-exchange-json/0.11/rxmicro-rest-server-exchange-json-0.11.jar:$M2_REPO/io/rxmicro/rxmicro-exchange-json/0.11/rxmicro-exchange-json-0.11.jar:$M2_REPO/io/rxmicro/rxmicro-json/0.11/rxmicro-json-0.11.jar -m examples.quick.start/io.rxmicro.examples.quick.start.HelloWorldMicroService|
It is assumed that the By default, the local repository is located in the
|
|
The above example of launching a microservice project using a terminal won’t work on Inoperability is caused by the use of different special symbols on Unix (Linux and MacOS) and Windows platforms:
Therefore, in order to launch a microservice project on the |
After starting, the console will display the following information:
java -p ./classes: \
        $M2_REPO/io/rxmicro/rxmicro-rest-server-netty/0.11/rxmicro-rest-server-netty-0.11.jar: \
        $M2_REPO/io/rxmicro/rxmicro-rest-server/0.11/rxmicro-rest-server-0.11.jar: \
        $M2_REPO/io/rxmicro/rxmicro-rest/0.11/rxmicro-rest-0.11.jar: \
        $M2_REPO/io/rxmicro/rxmicro-model/0.11/rxmicro-model-0.11.jar: \
        $M2_REPO/io/rxmicro/rxmicro-http/0.11/rxmicro-http-0.11.jar: \
        $M2_REPO/io/rxmicro/rxmicro-logger/0.11/rxmicro-logger-0.11.jar: \
        $M2_REPO/io/rxmicro/rxmicro-common/0.11/rxmicro-common-0.11.jar: \
        $M2_REPO/io/rxmicro/rxmicro-config/0.11/rxmicro-config-0.11.jar: \
        $M2_REPO/io/rxmicro/rxmicro-runtime/0.11/rxmicro-runtime-0.11.jar: \
        $M2_REPO/io/rxmicro/rxmicro-files/0.11/rxmicro-files-0.11.jar: \
        $M2_REPO/io/rxmicro/rxmicro-rest-server-exchange-json/0.11/rxmicro-rest-server-exchange-json-0.11.jar: \
        $M2_REPO/io/rxmicro/rxmicro-exchange-json/0.11/rxmicro-exchange-json-0.11.jar: \
        $M2_REPO/io/rxmicro/rxmicro-json/0.11/rxmicro-json-0.11.jar: \
        $M2_REPO/io/netty/netty-codec-http/4.1.85.Final/netty-codec-http-4.1.85.Final.jar: \
        $M2_REPO/io/netty/netty-common/4.1.85.Final/netty-common-4.1.85.Final.jar: \
        $M2_REPO/io/netty/netty-buffer/4.1.85.Final/netty-buffer-4.1.85.Final.jar: \
        $M2_REPO/io/netty/netty-codec/4.1.85.Final/netty-codec-4.1.85.Final.jar: \
        $M2_REPO/io/netty/netty-handler/4.1.85.Final/netty-handler-4.1.85.Final.jar: \
        $M2_REPO/io/netty/netty-transport/4.1.85.Final/netty-transport-4.1.85.Final.jar: \
        $M2_REPO/io/netty/netty-resolver/4.1.85.Final/netty-resolver-4.1.85.Final.jar \
    -m examples.quick.start/io.rxmicro.examples.quick.start.HelloWorldMicroService

2020-02-02 20:14:11.707 [INFO] io.rxmicro.rest.server.netty.internal.component.NettyServer :
Server started at 0.0.0.0:8080 using NETTY transport in 500 millis (1)| 1 | The Server started in … millis message means that the RxMicro HTTP server has been successfully started. |
When starting the microservice via the terminal, it’s quite inconvenient to list all dependencies and their versions.
To solve this problem, You can use the maven-dependency-plugin, which can copy all project dependencies.
To activate the maven-dependency-plugin, You must add it to pom.xml:
<plugin>
    <artifactId>maven-dependency-plugin</artifactId>
    <version>${maven-dependency-plugin.version}</version>(1)
    <executions>
        <execution>
            <id>copy-dependencies</id>
            <phase>package</phase>(2)
            <goals>
                <goal>copy-dependencies</goal>
            </goals>
            <configuration>
                <outputDirectory>${project.build.directory}/lib</outputDirectory>(3)
                <includeScope>compile</includeScope>(4)
            </configuration>
        </execution>
    </executions>
</plugin>| 1 | The latest stable version of the maven-dependency-plugin. |
| 2 | The plugin is invoked during the package phase. |
| 3 | Target folder all dependencies should be copied to. (In the example above, this is the target/lib folder.) |
| 4 | This setting specifies what scope of dependencies should be copied. (This option allows excluding libraries required for testing or libraries, those already present on the client’s computer.) |
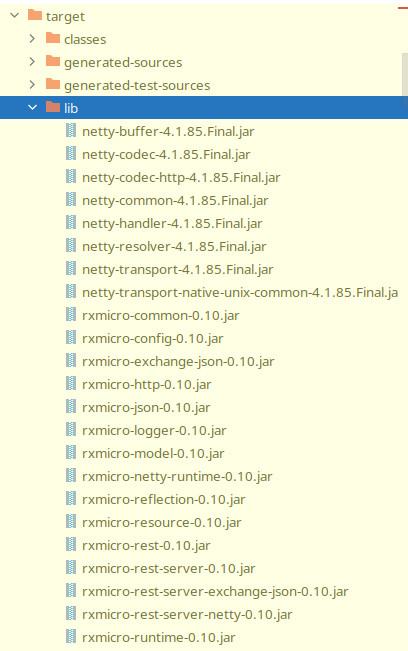
After adding the plugin, You need to execute the command:
mvn clean packageAs a result of running the command, the maven-dependency-plugin will copy all the dependencies to the target/lib folder:
Now You can simplify the start command
(Instead of listing all the libraries, specify the lib folder):
java -p ./classes:lib -m examples.quick.start/io.rxmicro.examples.quick.start.HelloWorldMicroService|
The above example of launching a microservice project using a terminal won’t work on Inoperability is caused by the use of different special symbols on Unix (Linux and MacOS) and Windows platforms:
Therefore, in order to launch a microservice project on the |
6. Verifying the Microservice
To receive the "Hello World!" message from the created REST-based microservice, execute GET request to localhost:8080 endpoint:
:$ curl -v localhost:8080

* Rebuilt URL to: localhost:8080/
*   Trying 127.0.0.1...
* TCP_NODELAY set
* Connected to localhost (127.0.0.1) port 8080 (#0)

> GET / HTTP/1.1 (1)
> Host: localhost:8080
> User-Agent: curl/7.58.0
> Accept: /
>

< HTTP/1.1 200 OK (2)
< Server: RxMicro-NettyServer/0.11
< Date: Thu, 2 Jan 2020 11:48:13 GMT
< Content-Type: application/json
< Content-Length: 25
< Request-Id: 62jJeu8x1310662
<
* Connection #0 to host localhost left intact
{"message":"Hello World!"} (3)| 1 | curl sends a GET request. |
| 2 | HTTP server successfully returns a response. |
| 3 | The HTTP body contains a JSON response with the "Hello World!" message. |
Therefore, the created REST-based microservice works correctly!
|
You can also use Your favorite browser instead of |
7. Automated Test
The RxMicro framework provides modules for effective writing of any type of tests. Among all supported test types, a REST-based microservice test is required for the current project.
7.1. Configuring the Project
Before writing a REST-based microservice test, You need to configure pom.xml of Your project by performing the following steps:
-
Add the required dependencies to
pom.xml. -
Configure the
maven-compiler-plugin. -
Configure the
maven-surefire-plugin.
7.1.1. Adding the Required Dependencies
Before using RxMicro modules for testing, You need to add the following dependencies to the project:
<dependencies>
    <dependency>
        <groupId>io.rxmicro</groupId>
        <artifactId>rxmicro-test-junit</artifactId> (1)
        <version>${rxmicro.version}</version>
        <scope>test</scope>
    </dependency>
    <dependency>
        <groupId>io.rxmicro</groupId>
        <artifactId>rxmicro-rest-client-exchange-json</artifactId> (2)
        <version>${rxmicro.version}</version>
        <scope>test</scope>
    </dependency>
</dependencies>| 1 | Unit testing library based on the JUnit 5 framework |
| 2 | Library for Java model conversion to JSON format and vice versa on the HTTP client side; |
The REST-based microservice testing process consists in launching the REST-based microservice and sending a request to the microservice via HTTP client.
(Therefore, in maven dependencies it’s necessary to add the library supporting the JSON
format on the HTTP client side (rxmicro-rest-client-exchange-json)).
After receiving a response from the microservice, the response is compared to the expected one.
7.1.2. Configuring the maven-compiler-plugin
Since the RxMicro framework uses the Java annotation processors, You need to configure maven-compiler-plugin:
<plugin>
    <artifactId>maven-compiler-plugin</artifactId>
    <version>${maven-compiler-plugin.version}</version>
    <configuration>
        <release>11</release>
        <annotationProcessorPaths>
            <annotationProcessorPath>
                <groupId>io.rxmicro</groupId>
                <artifactId>rxmicro-annotation-processor</artifactId>
                <version>${rxmicro.version}</version>
            </annotationProcessorPath>
        </annotationProcessorPaths>
    </configuration>
    <executions>
        <execution>
            <id>source-compile</id>
            <goals>
                <goal>compile</goal>
            </goals>
            <configuration>
                <annotationProcessors>
                    <annotationProcessor>
            io.rxmicro.annotation.processor.RxMicroAnnotationProcessor
                    </annotationProcessor>
                </annotationProcessors>
                <generatedSourcesDirectory>
                    ${project.build.directory}/generated-sources/
                </generatedSourcesDirectory>
            </configuration>
        </execution>
        <execution>
            <id>test-compile</id> (1)
            <goals>
                <goal>testCompile</goal>
            </goals>
            <configuration>
                <annotationProcessors>
                    <annotationProcessor>
            io.rxmicro.annotation.processor.RxMicroTestsAnnotationProcessor (2)
                    </annotationProcessor>
                </annotationProcessors>
                <generatedTestSourcesDirectory>
                    ${project.build.directory}/generated-test-sources/ (3)
                </generatedTestSourcesDirectory>
            </configuration>
        </execution>
    </executions>
</plugin>| 1 | The tests require a separate configuration, so a new execution must be added. |
| 2 | The annotation processor class that handles test configuration. |
| 3 | Location of Java-generated classes by the test annotation processor. |
|
To learn more about how the |
7.1.3. Configuring the maven-surefire-plugin
For a successful tests launch while building a project with maven it is necessary to update maven-surefire-plugin:
<plugin>
    <artifactId>maven-surefire-plugin</artifactId>
    <version>${maven-surefire-plugin.version}</version> (1)
    <configuration>
        <properties>
            <!-- https://junit.org/junit5/docs/5.5.1/api/org/junit/jupiter/api/Timeout.html -->
            <configurationParameters>
                junit.jupiter.execution.timeout.default = 60                (2)
                junit.jupiter.execution.timeout.mode = disabled_on_debug    (3)
                junit.jupiter.execution.parallel.enabled = false            (4)
            </configurationParameters>
        </properties>
    </configuration>
</plugin>| 1 | Last stable version of maven-surefire-plugin.(The plugin version must be 2.22.1 or higher, otherwise maven will ignore the tests!.) |
| 2 | In case of an error in the code which uses reactive programming, an infinite function execution may occur. In order to detect such cases, it is necessary to set a global timeout for all methods in the tests. (By default, timeout is set in seconds. More detailed information on timeouts configuration is available in official JUnit5 documentation.) |
| 3 | While debugging, timeouts can be turned off. |
| 4 | This property is useful for the tests debugging from IDE or maven.(By setting this property the speed of test performance will decrease, so use this property for debugging only!) |
7.2. Creating a Test Class
REST-based microservice test is a one class containing one test method:
package io.rxmicro.examples.quick.start;

import io.rxmicro.test.BlockingHttpClient;
import io.rxmicro.test.ClientHttpResponse;
import io.rxmicro.test.junit.RxMicroRestBasedMicroServiceTest;
import org.junit.jupiter.api.Test;

import static io.rxmicro.test.json.JsonFactory.jsonObject;
import static org.junit.jupiter.api.Assertions.assertEquals;

@RxMicroRestBasedMicroServiceTest(HelloWorldMicroService.class) (1)
final class HelloWorldMicroServiceTest {

    private BlockingHttpClient blockingHttpClient; (2)

    @Test
    void Should_return_Hello_World_message() {
        final ClientHttpResponse response = blockingHttpClient.get("/"); (3)
        assertEquals(
                jsonObject("message", "Hello World!"), (4)
                response.getBody()
        );
        assertEquals(200, response.getStatusCode()); (5)
    }
}| 1 | The RxMicro Test Annotation indicating which microservice should be run for testing. |
| 2 | The BlockingHttpClient is a basic HTTP client interface designed for use in tests.
This interface allows executing blocking requests to the microservice via the HTTP protocol.
This field is initialized automatically when running the test with reflection.
Upon initialization it refers to the test HTTP server that was automatically started for the test. |
| 3 | Blocking request to the microservice. |
| 4 | Comparing the contents of an HTTP body with an expected value. |
| 5 | Comparing the HTTP status code with an expected value. |
|
For low-level and effective work with JSON format, the RxMicro framework provides a separate To get a common idea of the capabilities of this module, which are required when writing tests, go to the following section: core.html. |
In microservice tests it is recommended to compare the HTTP request body before comparing the HTTP status, when the microservice constantly returns a text error message! (This will make it easier to understand the error in case it occurred during the testing.)
If the microservice returns ONLY the status when an error occurs, the HTTP body comparison should be skipped!
|
For further information on how to test REST-based microservices, go to the following section: testing.html. |
7.3. Starting the Test Class
To start the tests, You need to run the command:
mvn clean testAfter starting, the console will display the following information:
...
[INFO] ------------------------------------------------------------------------
[INFO]  RX-MICRO ANNOTATIONS PROCESSING (1)
[INFO] ------------------------------------------------------------------------
[INFO]
[INFO] Current environment context is:
  RxMicro version: 0.11
  Current module:
    examples.quick.start
  Available RxMicro modules:
    ...
  Include packages: <none>
  Exclude packages: <none>
[INFO] Found the following REST controllers:
  io.rxmicro.examples.quick.start.HelloWorldMicroService:
    'GET /' -> sayHelloWorld();
[INFO] Generating java classes...
[INFO] All java classes generated successful in 0.030 seconds. (2)
[INFO] ------------------------------------------------------------------------
[INFO] Annotations processing completed successful.
[INFO] ------------------------------------------------------------------------
...
[INFO] ------------------------------------------------------------------------
[INFO]  RX-MICRO TEST ANNOTATIONS PROCESSING (3)
[INFO] ------------------------------------------------------------------------
[INFO]
[INFO] Current environment context is:
  RxMicro version: 0.11
  Current module:
    examples.quick.start
  Available RxMicro modules:
    ...
  Include packages: <none>
  Exclude packages: <none>
[INFO] Generating java classes...
[INFO] Test fixer class generated successfully: rxmicro.$$RestBasedMicroServiceTestFixer (4)
[INFO] All java classes generated successful in 0.009 seconds. (4)
[INFO] ------------------------------------------------------------------------
[INFO] Annotations processing completed successful.
[INFO] ------------------------------------------------------------------------
...
[INFO] -------------------------------------------------------
[INFO]  T E S T S
[INFO] -------------------------------------------------------
...
[INFO] Fix the environment for REST based microservice test(s)... (5)
[INFO] opens examples.quick.start/rxmicro to ALL-UNNAMED (5)
[INFO] opens examples.quick.start/io.rxmicro.examples.quick.start to ALL-UNNAMED (5)
[INFO] opens examples.quick.start/rxmicro to rxmicro.reflection (5)
[INFO] opens examples.quick.start/io.rxmicro.examples.quick.start to rxmicro.reflection (5)
[INFO] opens rxmicro.rest.server.netty/io.rxmicro.rest.server.netty.local to ALL-UNNAMED (5)
[INFO] opens rxmicro.runtime/io.rxmicro.runtime.local to ALL-UNNAMED (5)
[INFO] opens rxmicro.runtime/io.rxmicro.runtime.local.error to ALL-UNNAMED (5)
[INFO] opens rxmicro.runtime/io.rxmicro.runtime.local.provider to ALL-UNNAMED (5)
[INFO] opens rxmicro.config/io.rxmicro.config.local to ALL-UNNAMED (5)
[INFO] opens rxmicro.rest.server/io.rxmicro.rest.server.local.model to ALL-UNNAMED (5)
[INFO] opens rxmicro.rest.server/io.rxmicro.rest.server.local.component to ALL-UNNAMED (5)
[INFO] opens rxmicro.common/io.rxmicro.common.local to ALL-UNNAMED (5)
[INFO] opens rxmicro.http/io.rxmicro.http.local to ALL-UNNAMED (5)
[INFO] Running io.rxmicro.examples.quick.start.HelloWorldMicroServiceTest (6)
[INFO] ...NettyServer: Server started at 0.0.0.0:38751 using NETTY transport. (7)
[INFO] ...Router: Mapped "GET '/'  onto ...HelloWorldMicroService.sayHelloWorld()
[INFO] ...Router: Mapped "GET '/bad-request'  onto ...BadHttpRequestRestController.handle(...)
[INFO] ...HelloWorldMicroServiceTest: JdkHttpClient released (8)
[INFO] ...NettyServer: Retrieved shutdown request ...
[INFO] ...NettyServer: Server stopped (9)
[INFO]
[INFO] Results:
[INFO]
[INFO] Tests run: 1, Failures: 0, Errors: 0, Skipped: 0 (10)
[INFO]
[INFO] ------------------------------------------------------------------------
[INFO] BUILD SUCCESS
[INFO] ------------------------------------------------------------------------| 1 | Starting of the RxMicro Annotation Processor. |
| 2 | RxMicro Annotation Processor has successfully completed its work. |
| 3 | Starting of the RxMicro Tests Annotation Processor. |
| 4 | RxMicro Tests Annotation Processor has successfully completed its work. |
| 5 | For the test configuration, missing exports were automatically added using the capabilities of the java.lang.Module class. |
| 6 | REST-based microservice test starting. |
| 7 | HTTP server has started automatically on random free port. |
| 8 | The resources of the BlockingHttpClient component have been released. |
| 9 | HTTP server has stopped successfully. |
|
For further information on how the |
8. The Project at the Github
The REST-based HelloWorldMicroService microservice project is available at the following link:
|
The DON’T FORGET to remove the link to the parent project: and add the |